Home
Introduction
This document provides a technical reference to be used during the implementation of a new system.
It is assumed at this point that the customer has read and is familiar with the Customer Implementation Project Guide.
The document serves as a guide both the OrderFlow Implementation Engineer as well, as well as a reference point for the customer IT contact.
It is designed to be used in conjuction with the customer's Implementation Notes wiki page, which is a working document with a structure that directly mirrors the structure of this document.
Initial Setup
Customer Redmine Project Setup
A new customer project needs to be created in Redmine.
See the Add new project to Redmine wiki page for more details on how to do this.
Customer RemoteMan Setup
A new RemoteMan entry needs to be created for the customer.
Vanilla Environment Setup
One of the first actions in a new implementation is the setup of a new server environment.
This involves the following actions:
- server setup
- OrderFlow vanilla instance installation
- server hardening
The exact steps involved will depend on whether the environment is customer or OrderFlow hosted.
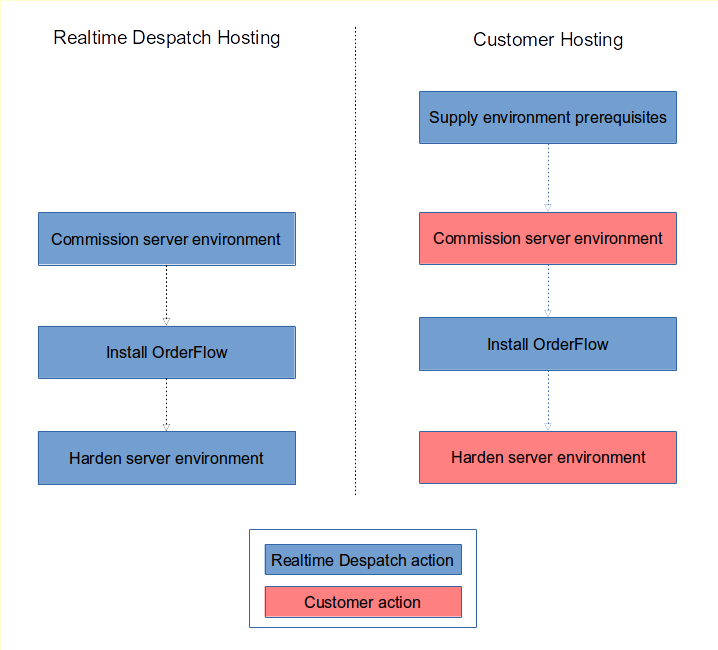
For customer hosting, we will need to communicate requirements to the customer or their hosting provider, and to install OrderFlow. However, the server environment setup and hardening will be the customer's responsibility.
Suggested Tickets
| Applicability | Description |
|---|---|
| Customer-hosted environments | Ticket to interact with customer to request hosting prerequisites and preferences |
| Always | Commission vanilla OrderFlow instance |
| Hosted-environments | Harden OrderFlow Environment. This is not necessary at the very outset but needs to be done before the system gets used in anger |
Note
Don't forget to ensure that the customer machine, instance and login details are present in RemoteMan, and that the sshplus file is updated appropriately.
Creation of Bespoke Module
A bespoke module for the customer should be created.
Useful for despatch note creation, and bespoke features that are subsequently added.
This is a developer task, and is covered in the Create a new OrderFlow module wiki page.
Module Setup
Prerequisites
A high level understanding of requirements and what feature sets will be used. This includes a knowledge of the couriers as well as the third party integrations that need to be supported. For customer-hosted environments, commercial agreement may be required for the installation of certain modules.
As soon a high level understanding of the feature set to be used is known, you're in a position to set up the OrderFlow module configuration.
More details on module setup and usage can be found in the Advanced Concepts Guide.
See also the following HowTos:
Note
Don't forget to enable all of the required modules on the customer's RemoteMan page before attempting to set up modules.
Primary User Setup
The purpose is to set up user accounts for the main people with whom you will be interacting during the testing phase.
These users are normally:
- warehouse managers responsible for decisions on warehouse layout, process and workforce utilisation
- IT managers and technical staff with responsibility for system functions
The action here is to set up new user accounts for the primary users, and to hand these over to the users concerned.
See the Add new user to Redmine wiki page for more details on how to do this.
First Channel, Site and Organisation
You should rename the channel and organisation to one that corresponds with the new customer environment.
Note that in the commissioning data set, the organisation and channel will initially be named 'changethis', so this step will be necessary. Note that it is possible to rename the organisation and channel later if necessary.
In a single site environment, there is no immediate need to rename the site. However, if multi-site functionality is enabled, its a good idea to name the site to correspond with the first site targeted for the deployment.
For more information see the HowTo.
Address fields, site address, returns address, etc. need to be configured.
Model Warehouse Setup
Using the model warehouse setup lets you get to the point where you can do end to end processing of test orders.
The objective of this part of the implementation is to have a fully populated hypothetical warehouse. Having an environment set up in this way is particularly useful for Process Requirements Gathering.
You won't at this point be using real warehouse areas and locations; this relies on handover of warehouse location setup.
| Name | Description |
|---|---|
| Add areas via spreadsheet | Describes how to upload and verify the OrderFlow area import spreadsheet |
| Add locations via spreadsheet | Describes how to upload and verify the OrderFlow location import spreadsheet |
Process Requirements Gathering
The purpose of this part of the implementation is to get a shared understanding of the requirements for the key warehouse processes that will need to be set up as part of a typical new customer implementation.
Prerequisites
A working system using a model warehouse is useful as a starting point, as it data that can be used to demo and test some of the processes under consideration.
General Notes
In each area of the system where requirements need to understood and agreed, the objectives follow a similar pattern:
- the OrderFlow Implementation Engineer should gain the best possible understanding of the customers business objectives and constraints
- the customer should gain a sufficient understanding of the options available, in particular what can be supported via configuration, and what can be supported only via further development
- the OrderFlow Implementation Engineer should understand what the customer's preferred options are
- if necessary, any further scoping work for change requests should be initiated as part of this exercise
- determine whether any missing features are considered essential for launch or can be delayed until after launch
Implementation Notes
In all cases, the process is very collaborative as it requires a lot of two way communication in trying to match what is needed with what is available. For this reason, it is normally recommended to cover these areas as part of a site visit to the customer during an early stage of the project.
Goods In and Putaway
Good-in and putaway are the main ways in which stock will need to come into the system.
Objectives
The aim of this part of the process is to ensure that:
- the customer understands the options that are available.
- come to an agreement on the approach to be used.
- understand whether there are any requirements that are not supported out of the box, and whether any of these are blockers for launch.
- document the choices in the customer implementation summary document.
Actions
The OrderFlow Implementation Engineer should demonstrate the options for receiving goods in. That demonstration should cover:
-
the basic approach used for deliveries received using the Desktop GUI.
-
options for setting up goods in versus explicitly chosen locations.
- describe the use of licence plates when creating deliveries to be checked in using handhelds.
-
describe the main options for handheld delivery check-in:
- directly to stock locations
- via incoming location for putaway to stock
- via incoming location for Just-in-Time (JIT) processing
- via incoming for direct move to bulk pallet locations
The Implementation Engineer will be familiar with the process flow in each of these cases.
Further requirements that should validated, if desktop processing is to be used:
If any requirements are present which are not supported, then customer ticket should be raised for further requirements gathering.
Picking
The task here is to go through the different options for picking. In most environments, the default picking mechanism will be batch picking.
At this point you should be aware of whether handheld or report based picking is used. If customer has invested in HHTs, this is the preferred option.
Objectives:
to ensure that the customer understands the different options. to select the mechanism that will be used for picking at launch. If different approaches are to be used depending on circumstances, then the task here is to determine which is the primary picking mechanism to be used.
At this point we are not concerned about the detail of how shipments are assigned to batches. That is covered in section X.
Actions (HHTs)
Demo to explain the options for handheld batch processing: * pick to single mobile location * pick to subdivided cart with user selected locations * pick to subdivided cart with system selected locations (one per shipment)
The should determine what the desired short pick strategy is.
Actions Reports (HHT)
Here the customer needs to validate the paperwork that will be used.
Packing
Objectives
The key objectives in this area are to
- ensure customer understands different options in terms of:
- initiating a packing operation
- auto printing
- recording packaging usage
- to document the customer choices
Note
Some of the packing options will be determined by choices for picking. For example, when using HHTs, the operator can initiate a pack by scanning the trolley containing the items picked. For report-based picking, the pack will normally be initiated by scanning the batch ID on the printed picking list.
Additionally, some of the packing options will be determined by the printing mechanism used. For example, it will not be possible to 'autoprint' both a despatch note and a label unless the print server is used.
Replenishment
This option only applies if the customer is planning to use bulk storage locations. This is typically a requirement for
- for large warehouses
- warehouses which use difficult to reach overhead locations
- warehouses for which picking locations are at a real premium
The OrderFlow Implementation Consultant should explain how replenishment is configured, and initiate the setup of replenishment.
Returns
This functionality should be verified and set up if returns need to be supported into the warehouse.
If the customer has specific workflow in mind that they want to use to support returns, then this is an opportunity to discover what this is. You should be able to determine whether some kind of prior returns authorisation process is required, or whether it is acceptable to have unplanned returns.
You should also consider whether any external system or email notifications will be required if returns are received.
If either of these is the case, then it would be appropriate at this point to raise a ticket for scoping of these requirements and implementation of a solution. If not, then the task is really about explaining the built-in functionality, and the options around these.
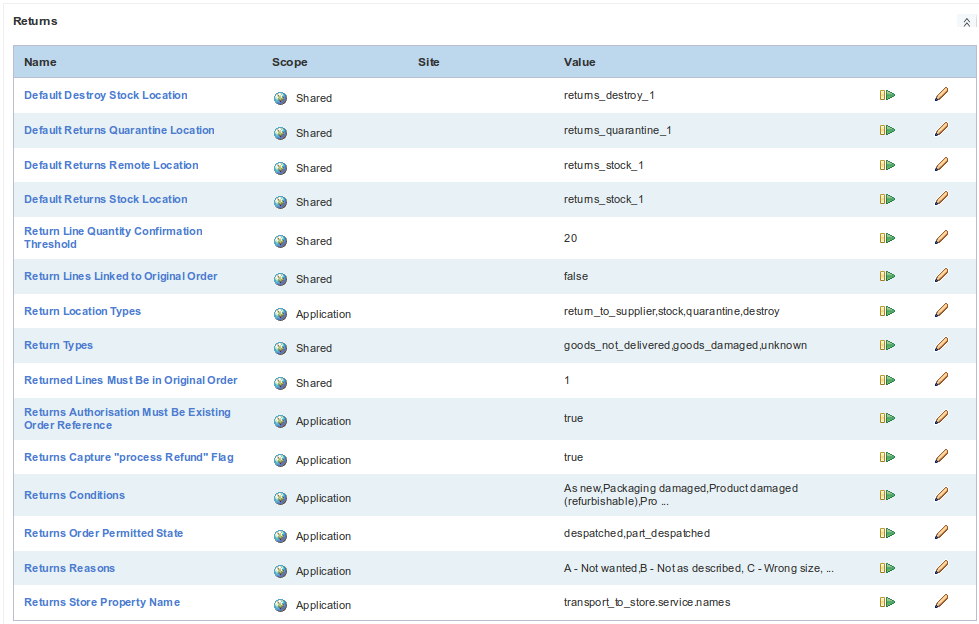
Here, the key things to point out are the options around the returns process. Many of these options are encapsulated in the returns properties whose values need to be verified as part of the system implementation, and cover choices such as the returns conditions, default returns locations, etc.
Warehouse Setup
Verify Printer Configuration
The purpose of this exercise is to verify and record the setup for printers used for printing of labels.
Applies especially to thermal printers, but may also to apply to desktop printers.
Printer verification involves ensure that OrderFlow is able to print labels with scannable barcodes using the label stock that needs to be used.
For stock that needs to be used, you will need to print and scan out sample labels to verify that the printer setting are correct.
See in particular the Label Sizing and Printing section in the OrderFlow Report Writers' Guide.
Ideally, you should also capture notes on the specific thermal printer(s) used (both make and model), and add details on the configuration to a wiki page.
You should also note the contact details for the person or organisation responsible for supporting the printers.
Verify Handheld Scanners
The purpose of this exercise is to:
- to verify that the handheld scanners work as expected
- to record details on how the scanner is configured
Also, with some scanners it might be necessary to make style adjustments to improve the usability of the handheld screens. So an additional objective is to identify whether this is the case, and to action these improvements, either directly or by raising a ticket for subsequent work.
Details of the handheld scanner, and notes on its configuration, should be captured on the Wiki page accomanying this document, or on separate Wiki page in the same project.
In addition, the details of any support contact should be captured.
Area and Location Import Handover
This part of the implementation involves the setup of locations and areas on the system to match the physical setup of locations on in the warehouse:
Key objectives are:
- Help customer how to populate warehouse areas and locations to match the actual physical setup of the warehouse
- Ensure customer understands how to maintain these import files for future updates
- Assist and train customer with the mechanics of the OrderFlow setup import
- Validate the location spreadsheet output to ensure that it is set up as required
Note that the 'physical.location.types' and 'warehouse.product.physical.storage.types' properties will need to be set to match the physical types that are actually being used in the warehouse.
Note that the operational choices made will affect location selection. For example:
- are you using consolidation processes? If so, then you will require consolidation locations.
- are you happy to use the same locations for picking and other warehouse processes? Ideally, this should be avoided, as some of the dashboards are more effective when this restriction is imposed.
- are you using handheld picking with or without subdivided carts? This will clearly affect the way that picking trolley locations are created and labelled.
Supporting Documents
Relevant supporting documentation for this part of the setup include:
| Document | Link | Description |
|---|---|---|
| Advanced Concepts Guide | Areas and Locations | Describes how areas and locations are used in OrderFlow |
| Customer Implementation Requirements Guide | Warehouse Design | Customer requirement considerations for area and location setup |
Actions
The OrderFlow Implementation Engineer will need hand over this in two parts.
- Populate spreadsheet: describe to the customer how to combine their understanding of the actual physical location setup into a populated spreadsheet.
- Upload spreadsheet: the first few times you do this, recommended first for the customer to do it with only a few locations at a time, and also with OrderFlow Implementation Engineer close at hand to assist.
HowTos
Notable HowTos in this area are:
| Name | Description |
|---|---|
| Area upload link name | Describes how to upload and verify the OrderFlow area import spreadsheet |
| Location upload link name | Describes how to upload and verify the OrderFlow location import spreadsheet |
Category and Product Import Handover
In most real live systems the import of products is not done directly by warehouse staff or administrators. However, it is essential during the testing phase of the implementation, before any integrations with third party systems have been set up and completed.
Key objectives are:
- Help customer how to populate categories, products, warehouse products, barcodes and product data sheet spreadsheets
- Assist and train customer with the mechanics of the OrderFlow Setup Import
Actions
The OrderFlow Implementation Engineer will to assist in.
- Populate spreadsheet: help customer to understand the structure of the spreadsheet imports for the category, product, warehouse product and data sheet entities (as required).
HowTos
See the Set up and perform spreadsheet based product import Wiki page.
Supplier Import Handover
Suppliers will need to be entered onto the system to purchase orders, advanced shipping notes and deliveries to be received. Suppliers can be added manually or via a spreadsheet import.
Objectives here are:
- Help customer to populate supplier spreadsheet and/or record supplier entries via GUI
- Understand how to import suppliers using the OrderFlow Setup Import
Warehouse Location Labelling
Once the real locations have been added to the system. Note that it is important to double check to ensure that the locations on the system do indeed match the physical setup. If not, then labels may be printed unnecessarily.
Objectives here are:
- Identify or setup the label report that meets the customers requirments for location labels
- Hand over to customer so that they can generrate new labels when necessary
Actions
- Agree with customer on format of labels to be used. This will translate into a choice of a particular label report.
- If changes are required to an existing label report, make the changes, or raise a ticket to for new changes.
HowTos
See the Print Location Labels Wiki page.
Product Labelling
OrderFlow can be used to generate product labels, normally as part of a goods in process. If this is required, then the correct product labelling report needs to be set up.
The mechanics for setting up product labels are very similar to those for location labels. Initially, the objective will be to set up a product label report which outputs a barcode for a specific product identified by ID or external reference.
Inbound Channel Integration
This involves ensuring, at a minimum, that products and sales orders are received as expected. Other entities, such as purchase orders and returns are sent as expected.
Determine Import Mechanism
The task here is to determine what mechanism is to be used for imports of products and orders.
The options are:
- manual posting of products and orders.
- imports using a file fetch-based mechanism, which relies on an FTP server setup.
- import via API integration.
There are detailed HowTos on the various options on the Integration HowTo wiki page.
The objective at this point is to communicate to the customer what the options are, and to determine which should be used for the first integration(s).
FTP Server Configuration
This applies only for 3PLs that need to host a FTP server and receive order and product files via FTP, as well as to publish end of day reports.
The idea is there to be a well defined scheme and process for supporting SFTP (FTP over SSH), which will involve the following:
- a instance specific root folder (e.g. /var/rtd/customer/live)
- the 'input.file.base.directory' property set to point to the directory set above
- individual customer-specific accounts, which can be allocated by the customer (e.g. acme),constrained to the subdirectory below the root directory, and restricted to IP address
- input file definitions set up to use customer-specific root directory
See the Setup OpenSSH and user for SFTP access HowTo page for more details.
Set Up Import Mechanism
This step involves the technical task of setting up and handing over the import mechanism.
It will involve the following, for each type of data imported (orders, products, etc.)
- ensure that there is an appropriate Import Handler for the format of source data.
- ensure that there is an appropriate Import File definition to describe the location from which import files are fetched. This will correspond to the location in the FTP directory into which specific files are placed.
- (optional) ensure that any additional business rules are applied using the Import Mapping

All of the above are technical tasks that would normally be accomplished offsite, based on requirements supplied by customer.
Set Up API Connectivity
This option applies when a file-based import mechanism is to be used.
Here, the basic connectivity needs to be set up. This should include:
- the necessary module being installed and present in the customer environment.
- the channel pointing to the API integration.
- the organisation set to point to a primary channel, if necessary.
- credentials including URL, user name, passwords, and any other credential information being set.
Note that the application properties above should be set at the channel level, and not at the shared level, especially in 3PL environments which are multi-channel by definition.
Verify Product Import
Verify that products can be successfully imported.
The verification should ensure that all of the required field values are populated as expected.
If the product is expected to be activated, which is normally the case, the verification should ensure that:
- the fields required for product activation is set correctly.
- the activated flag for the product is set correctly for imported products.
For more details on how to control product activation, see the Configure product activation rules HowTo.
Verify Order Import
Verify that orders can be successfully imported.
The verification should ensure that:
- all of the required field values for the orders are populated. This should include:
- delivery address information.
- delivery contact information.
- pricing information, both at the order level as well as the order line level.
- that the site for the order is set.
- that the order, shipment and order lines should end up in the correct state.
Note that it is particular important to ensure that the address and contact information is populated correctly using the correct fields. Courier integration verification should include an end to end test that verifies that the all of the order address and contact information is passed through to the courier expected. This in particular should verify the correct behaviour:
- with or without a company name.
- with or without relevant delivery address fields.
Address Field Mapping
Need to verify that the address field mapping is correct.
By default, the following applies:
line5is used for the city or town value.line6is used for the region value.otherfields can be used flexibility.
This is reflected in both the default 'Address City Field' and 'Address Region Field' as well as the 'Address Line 5 Label' and 'Address Line 6 Label' fields, as shown below.
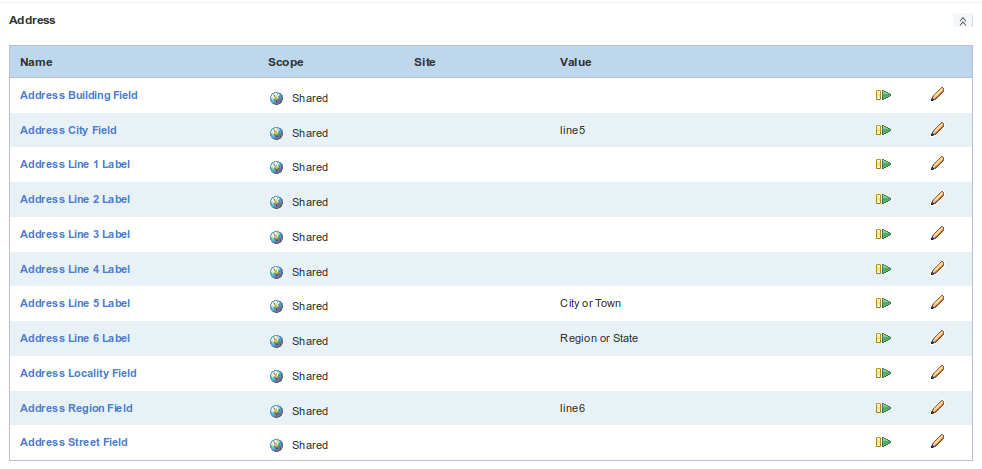
Note
It is particularly important that the address fields are used consistently throughout the system, particularly when interacting with couriers that rely on the receipt of information such as contact names, regions, etc. Here end to end testing with close inspection to ensure that address and other information is being carried across is important.
It is worth point this out to the customer clearly, so that they can also pay particular attention to these considerations when doing their own testing.
Courier Integration
OrderFlow Courier Setup
The modules for the integrations that need to be active at launch need to be present on the system.
This requires:
- the necessary modules need to be enabled for the customer in RemoteMan.
- the modules need to be installed in OrderFlow (and declare on their module profile list).
- the associated Courier entries need to be be visible.
See the Deploy new module in customer environment HowTo for details on this.
Once this is all in place, the setup for each courier should be applied, as per the instructions defined for that courier. Initially, the setup will use just test credentials.
Set Property Granularity
With any courier integration, a number of properties may need to be set to be site or organisation scoped.
For example, if different account numbers with different credentials are used for different channels or organisations, the scoping of the relevant application properties will need to be modified to reflect this.
End to End Testing on Test Account
Using orders for a test organisation and channel, the next step is to verify the courier integration process end to end.
This will involve:
- importing a set of test orders onto the system.
- pushing these orders through the courier validation process.
- 'picking' the orders, then printing the labels at the packing desk.
- verifying that the labels scan without difficulty.
- sending the physical labels for verification with the courier.
- performing any end of day notification or manifest submission.
At this point you will be connecting using the courier integration test credentials and URL.
Verification should involve end to end testing which should ensure that:
- the interaction with the external courier system works as expected.
- the label prints as expected.
- the printed label can be easily scanned.
- that all of the address and contact information is present on the label.
This verification should be applied for an appropriate mix of orders:
- orders with different combinations of address:
- company name present and absent.
- long addresses with all relevant fields present.
- short addresses with allowable fields not present.
- addresses to different destination categories (e.g. domestic vs international orders).
- all relevant services.
In particular, it should be verified that relevant address and contact information received from the source system is passed to the courier, and is present in the courier label. The API messages and the labels should be inspected to verify this.
The labels as well as information supplied to the courier should be checked for:
- all main address fields present as expected, including town and region, and no missing address lines
- contact information present as expected
- business name present as expected
- weights, dimension, prices and any other required information present as expected
- if appropriate, product details such as pricing and customs information present as expected
The testing should be carried out by the OrderFlow Implementation Engineer, as well as the customer.
Note that testing should be conducted from orders received from the third party system, in order to ensure that no information is 'lost' along the way.
A Note on Courier Testing
Attention to detail is very important in this stage in the process, as failure to spot missing information can result in parcels returning undelivered, which will be expensive and bad for customer service.
Courier Selection
The rules for performing courier selection need to be defined and implemented.
This requires:
- communication from the customer of the rules that need to be applied. This may be in the form of a spreadsheet.
- a unit tested courier selection script that covers the test scenarios identified.
- verification using a handful of orders that the rules are being applied correctly.
Note that unit testing is beneficial in reducing the requirement to end to end test exhaustively through all scenarios, which is much less efficient.
For more details on courier selection, see the Courier Selection chapter in the OrderFlow Scripting Guide.
Live Setup and Verification
This involves the setup of live credentials for the courier integration service.
Once this is done, the courier protocol should be followed in terms of testing and verifying labels.
This typically will involve the following, but details may vary:
- importing a set of test orders with characteristics that represent the mix of orders likely to be received from real customers. This should include a mix by destination, business vs personal addresses, etc.
- pushing these orders through the courier validation process.
- 'picking' the orders, then printing the labels at the packing desk.
- verifying that the labels scan without difficulty.
- sending the physical labels for verification with the courier.
- performing and verifying any end of day notification or manifest submission.
Note that the same tests Verification steps that are applied for the test account should be repeated with the live account setup.
Introducing New Accounts
Only really applies for 3PL. May need to use separate account when introducing new clients, from billing point of view.
Need to verify whether this is the case, and hand over mechanism for doing this.
Workstation Printing
Prerequisites
Windows Workstation PC with required printers setup.
Current version of Java Runtime Environment. See Printing and Workstation Setup Guide
Note that initial testing can be done using the default despatch note.
Printing Requirements Gathering
This is where we determine things such as:
- whether print server or applet based printing is used. Beware of the warnings around print servers.
- autoprinting requirements.
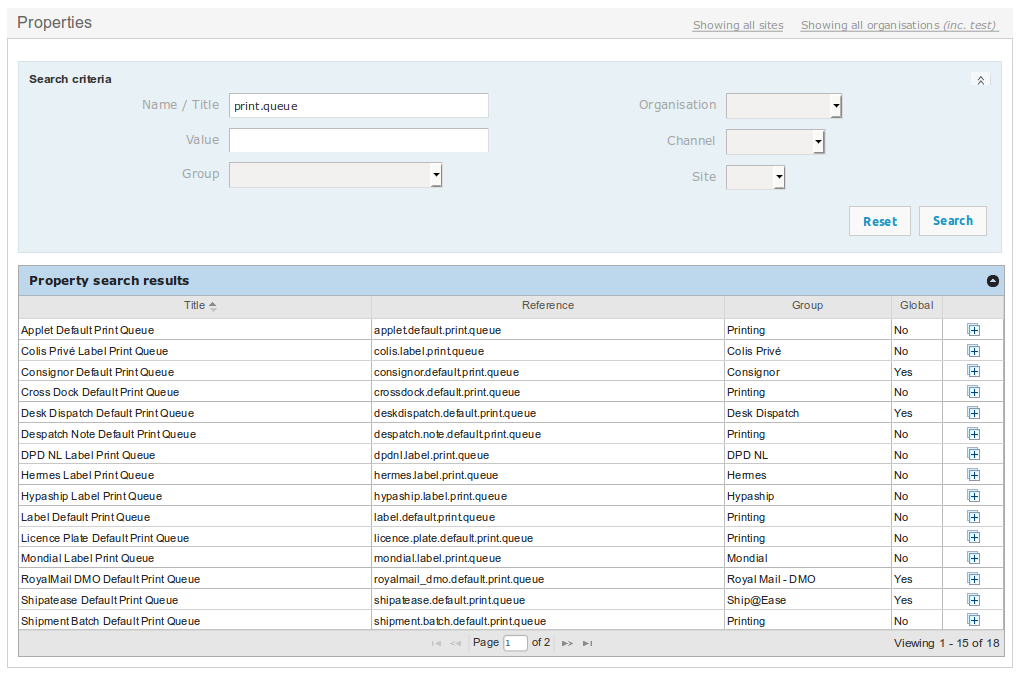
Set Default Print Queues
Set the default print queues, that is the print queues that will apply if no workstation properties are set.
You can find the default print queues most easily by doing a property search with the 'print.queues' text, as shown below.
Verify Printing Approach
Run through the basic approach for setting up printing.
By default, printing will be done using a Print Server per workstation. While applet print is possible, it has limitations, can result in support overhead:
- a Print Server per workstation
- a workstation-specific label and despatch note print queue on OrderFlow, set up using the workstation naming conventions.
- a workstation entry on Orderflow, which has the 'label.print.queue' and 'despatch.note.print.queue' workstation properties, set accordingly
- the correct settings in 'fetch.properties' and 'print.properties'.
See the Printing and Workstation Setup Guide for more detail.
Setup of First Workstation
The OrderFlow Implementation Engineer will need to set up the first workstation. Ideally, the first workstation should be set up with a member of the customer IT team watching.
See the Set up Print Server based printing of despatch notes.
For more detailed background information, see also the Print Server chapter in the Printing and Workstation Setup Guides.
Hand Over New Workstation Creation
Any further handover of the mechanism for creating a new workstation from scratch should follow. The customer IT team member should then perform the second workstation setup from first principles, with the OrderFlow Implementation Engineer on support.
Document New Workstation Creation
The exact steps involved in setting up a new workstation should be documented.
The easiest way is to zip a copy of than existing Print Server installation, and unzip this into C:\RealtimeDespatch on the target machine.
Key bits to focus on are:
- specific naming conventions for workstation and queues.
- specific properties that will need to be modified.
See the Replicate despatch note printing on new workstation HowTo for more information on this specific task.
Optimise Printer Workstations
The main thing here is to set the polling frequency so that it is fast enough to remove unnecessary waits at the packing station, but not flood the server unnecessarily. A polling frequency of every few seconds is suitable.
See the Set the Print Server polling frequency HowTo for more information on how to do this.
Picking Setup
Enable Handheld Picking
Handheld picking is not enabled by default as it requires additional modules and access to handheld terminals. Where these are available, handheld picking is recommended.
For details on how to set up handheld picking, see the Set up handheld batch picking HowTo.
Create and Batch Test Orders
Note that by default batch picking is turned on through use of the application property 'shipment.default.picking.mode' which has a value of 'batch'. This means that shipments will by default go through batch processing.
If this needs to vary, then an import mapping script can set an alternative picking mode for shipments based on specified criteria.
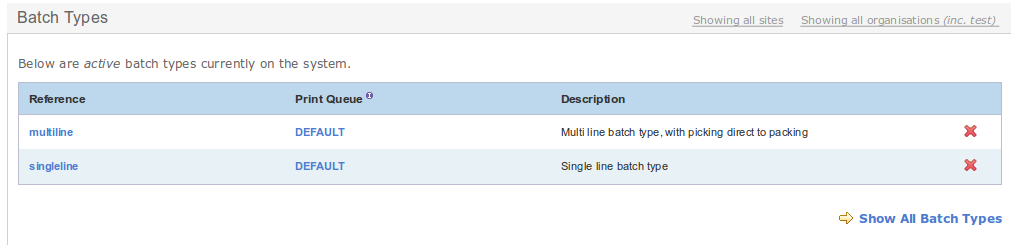
Initially, the built in batch types for single line and multi-line orders are fine for testing. The default built-in batch selection script will associated shipments to batch types according to whether they are single or multi-line.
Verify Pick End to End
This is where you verify that the pick process. Note that location choices will already have been made, so this is really an end to end walkthrough to verify, and ensure that settings have been applied correctly.
See the Do end-to-end walk through of batch pick HowTo for more details.
Cover Batch Ejection
It is important to cover batch ejection and make sure that it forms part of the customer's SOP.
The customer needs to understand:
- what is batch ejection, and why does it happen.
- what happens to a shipment when it is ejected from a batch.
- how customer administrator users and check on the status and activity of an ejected shipment and it's associated batch.
- what user intervention may be required to deal with batch ejection.
Short Pick and Empty Cart Operations
A case that the customer needs to be able to manage is when a pick and pack is complete, but there are still items remaining in the trolley.
The most likely cause for this is if a short pick has occurred (where one or more items requried for a shipment is identified as not usable or not present).
The OrderFlow Implementation Engineer will need to make sure customer knows how to handle empty cart operation, and use dashboard to see short picked shipments.
It is worth pointing out to the customer that alternative scenarios for dealing with short picks can be catered for, should this be considered necessary or desirable. However, this should be normally as second phase effort.
Refine Batch Types and Selection
The object at this point is to identify and implement the changes required to optimise batching.
This involves the creation of new batch types, as well as the selection of batch selection rules. Note that different picking strategies and sizes may be applied per batch type. Different types of batch types may be applied per channel, organisation and sites.
For more details on the kinds of batching strategies that can be used, see Batching Strategies in the Advanced Concepts Guide.
Unless requirements are simple and can be actioned easily, it is best to raise a ticket to capture the requirement and carry out implementation.
For more information on the batch selection script, see the Batch Selection chapter in the OrderFlow Scripting Guide.
Packing Setup
Once courier integration, courier selection and picking have been taken care, of the next stage in the implementation is to address Packing.
To a large extent the decisions on picking and packing influence each other, and hence need to be made together.
Set Up Packing-related Configuration
There is some basic packing-related configuration that needs to be applied.
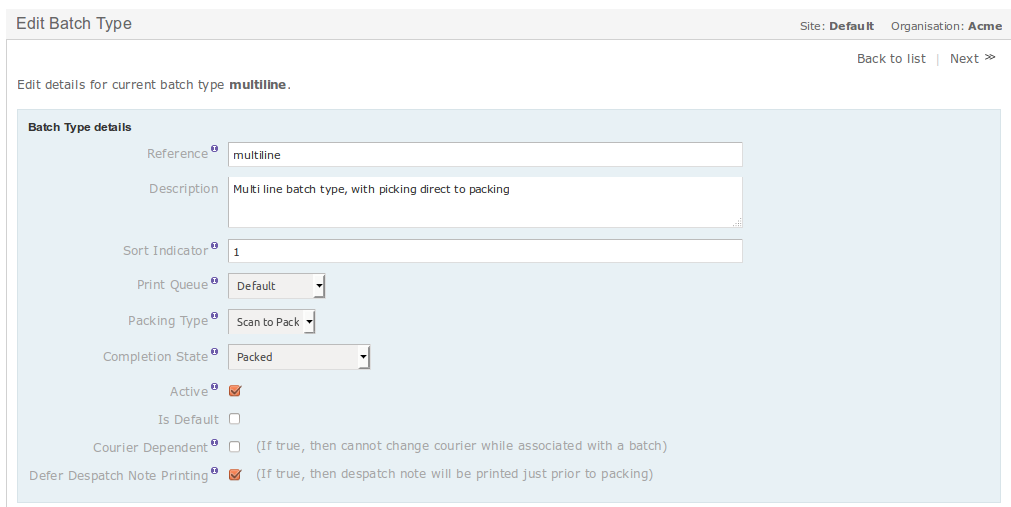
Typically, for each batch type, the 'Defer Despatch Note Printing' option will need to be set. This indicates that printing of despatch notes will take place at the packing desk. Also, it is more common to the 'Courier Dependent' option unticked; this option will only apply when it is important that only shipments with a particular courier appear as part of a batch.
Scan to pack is enabled by default. This requires the user to scan each product at the packing desk before allowing it to be packed. This behaviour can be modified by setting the 'bypass.product.scan' property to true.
The packing screen for shipments can be accessed via a number of routes. The appropriate starting point for initiating a packing operation will be determined by the nature of the picking mechanism used.

When handheld picking is used, the most common starting point is the Despatch -> Pack -> From Location. Once this has been decided, it is best to hide the menu options that will not be used.
Details on how to hide unwanted menus can be found in the How to hide menus HowTo Wiki page.
Verify Scan to Pack of Picked Shipments
This follows end to end test of picking. The aim here is to ensure that the full packing workflow can be completed:
From the Pack menu it should be possible to ensure that:
- the identification of the batch or shipment being packed takes place
- individual items can be scanned if necessary prior to reaching the packing screen
- any necessary paperwork printing operations are completed
- the shipment can be marked as packed using the 'Pack' button
The customer should also understand when a shipment is locked for packing, and how to unlock the shipment.
The customer should also be comfortable with the mechanism for selecting a different courier or service at the packing screen, if this is to be supported.
Verify Despatch Note Printing
The aim of this part of the implementation is to ensure that despatch note printing is occurring correctly.
This of course relies on the packing workstation being set up correctly (see the Workstation Printing chapter) and the correct workstation being selected.
You should at this point cover the options for auto-printing, and turn these on and verify if appropriate.
Relevant Application Properties
| Name | Description |
|---|---|
| despatchnote.autoprint.enabled | Whether automatic printing of despatch notes or labels is supported. |
| despatch.autoprint.operations | An optionally scriptable property which determines which packing desk operations are automatically run at packing desk without user intervention. |
Verify Label Printing
The next step in the integration is to ensure that the label printing is occurring as expected.
Once again, we want to make sure that the courier label is printed as expected.
Note that the courier integration testing should already have verified the label generation mechanism for a relevant combination of shipments, so that this point we are really just sanity checking the end to end workflow.
Multiple Courier Implementations
As printing mechanisms tend to vary by courier integration, this step needs to be repeated for each courier integration.
Again, the auto-printing discussion from the previous section applies. Note that it may not be applicable to auto-print labels for all carriers in all situations, so the choice here should be verified.
Verify Package Division
The customer needs to understand how to perform package division at the packing desk.
This will normally be necessary if more than one package (also called parcel or piece) is required to despatch the shipment. (In some cases, OrderFlow can be set up to divide shipments into packages automatically based on a maximum weight threshold).
Verify for each courier that can be package split, and that you are able to print the relevant multi-package labels. If necessary also reprint despatch notes.
The customer should also understand the difference between shipment splitting (which results in separate shipments or consignments) and package division (where multiple parcels are sent out as part of the same shipment).
Multiple Courier Implementations
The supported mechanism for division of shipments into packages varies by courier integration. For this reason, it is necessary to verify package division separately for each courier integration used in the implementation.
Returns Setup
Configure Returns
This involves setting up the returns parameters and config, based on the requirements capture from the Process Requirements Gathering chapter.
Some of the returns-related application properties are shown below.
The following properties relate to the nature, condition and routing of the returns and their associated items:
Return Properties - Nature and Routing
| Name | Description |
|---|---|
| return.types | "Types for the return as a whole." |
| return.location.types | "Location types for items to be returned." |
| returns.reasons | "Possible reasons for the returning a particular line." |
| returns.conditions | "Possible conditions for a returned item." |
| default.return.[locationtype].location | "For each location type defined using the property above, a default location should be specified." |
The following properties concern the relationship between returned items and the orders against which the return is to have occurred.
Return Properties - Order Relationship
| Name | Description |
|---|---|
| returns.authorisation.must.be.existing.order.reference | "Authorisation value in returns must refer to an existing order item external reference." |
| return.lines.linked.to.original.order | "Mandates whether return should be linked to a existing order." |
| returned.lines.in.original.order | "When creating a return lines whether order line must be in original order and have equal quantity or less." |
| returns.order.permitted.states | "The states in which orders are permitted to be in order to be associated with a return." |
The main job in setting up returns is, in consultation with the customer, to set appropriate values for the above sets of properties.
Once this is done, then returns processing can be handed over.
Verify Returns Processing
The OrderFlow implementation Engineer should go through returns process end to end with the customer, and validate the processing steps involved.
Returns Notifications
It is possible for a notification to be triggered on receipt of returns. This can either be a notification to a third party eCommerce system, or an email to a preconfigured list or recipients. Setup for this functionality is normally done through a post-launch task. However, if this functionality is required for launch, the OrderFlow Implementation Engineer should raise a ticket to initiate the work required.
Stock Management Setup
Replenishment
This only applies if customer is using bulk picking locations.
If so, explain to customer pros and cons of using priority vs background replenishment.
Explain pros and cons of primary vs multi-location picking.
For background replenishment, will need further info: reorder trigger level and picking quantity max.
Reordering
Explain how OrderFlow can be used to feed into purchasing process through reordering reports.
Solicit detail on how customer would like to use these, and hand over.
Validate Allocation and Assignment Priority
Defaults should be okay, but just need to verify this.
Hand Over Inventory Admin
Customer should know how inventory calculations are triggered, what they are used for, and should be able to do a manual refresh if necessary.
Validate Inventory Schedules
Go through schedules with customer. Determine whether to do full inventory refresh and full stock push, possibly on weekly basis.
Enable Advanced Stock Checking
Whether this should be activated or not.
Validate Advanced Stock Checking Metrics
Once advanced stock check is setting, need to make sure the metrics used are correct and fit for purpose.
Paperwork
Despatch Note Requirements Gathering
Despatch notes are included within the package sent to the customer. Normally the customer will provide the requirements and often an example of an existing one.
For retailers, this will reflect the information they want to show to their customers.
For 3PLs, this should ideally be a generic but generally useful despatch note that could be tweaked on a per customer basis (different logo), and may even include some of the 3PL's own branding.
Implementation of Despatch Note
Raise a ticket for this.
Despatch Note Selection
Implement despatch note selection script. Either do this directly, or raise ticket for the implementation.
Determine also whether despatch note needs to be reprinted if courier selection changes, and ensure this is applied.
Despatch Note Print Verification
Hand over the verification of the despatch note. This should be done through end to end testing based on orders with representative data.
Customer should ensure that the despatch note details are displaying correctly.
Is all pricing information present? Has returns information been properly represented? Is the customer name, business name, and address information properly present.
Note that if the despatch note is used as tax invoice, the invoice address may need to be present on the despatch note.
Other Paperwork
Find out from customer, or figure out, whether any further changes are required to any other existing paperwork. May include:
- licence plate labels
- task printouts
- manifest paperwork
- picking notes or picking lists
Outbound Channel Integration
This involves the export of information to third party systems. The most commonly applied include inventory levels and shipment despatch notifications, so should be considered the minimum to be considered.
Inventory Notifications
Can be done either via end of day report or via API inventory notification. Here we address the latter.
Ensure that inventory update is working.
Configure both OF and third party system.
Do single stock push and verify message is received.
Check inventory update recorded in third party system.
For Magento, follow instructions as per doc.
Check that any mechanism to help avoid oversells is applied.
Set schedule, then do stock change and verify that inventory is updated, and stock notification goes through as expected.
Shipment Despatch Notifications
Can be done either via end of day report or via API inventory notification. Here we address the latter.
Ensure that the shipment despatch event is turned on and is synchronous.
Mark single shipment as despatched and verify that remote message is created.
Send remote message and verify that this is received.
Verify that this is processed as expected on third party system.
End of Day Reports
Applies in particular where inventory and shipment despatch API notifications are not used.
EOD periodic reports already present on the system. Need to verify whether they are fit for purpose, whether they can be received.
Turn on periodic reports, and ensure that export has been set up for them. For email periodic reports, will need email to be set up and working. Configure periodic report recipients.
Email Setup
Need SMTP server for outbound emails.
We don't use RTD's email server for this purpose. Should come from customer's email server (even if hosting).
Customer needs to provide details that we can use.
Task then to test out and verify. Link to email SETUP.
Other Notifications
These may include:
- individual stock changes
- receipt of deliveries
- receipt of returns
- order or shipment cancellation
- changes to product definitions
- notifications on other changes made to shipments (in addition to despatch notifications)
Further Setup
Application Properties
Set up of common organisation and site scoped properties:
https://support.orderflow-wms.co.uk/projects/support-function/wiki/Bulk_clone_organisation_properties
HOWTO on verifying application properties ...
The idea is that all properties should be verified prior to system go live.
Best done with customer on site during implementation.
Scheduling Configuration
The default configuration enables schedule handlers for all of the key processes.
Worth going through with customer all of the remaining schedules and handlers, and seeing which need to be turned on.
Validate the frequency of the schedules with customer.
Best done with customer on site during implementation.
Menu Refinement
Need to go through and remove redundant menus for functionality that is not required.
Reporting and Dashboards
Additional Reports Check
Check with customer whether there are any reports that are required.
Validate Dashboards
Check existing dashboards and verify which could be turned off. Validate with customer any requirements for additional dashboards. If there are any, raise ticket for adding these.
User and Role Setup
Hand Over User Spreadsheet Upload
Show customer how to bulk add users using spreadsheet upload.
Preferable however, to create by cloning template user.
Hand Over New User Setup
Show customer how to create new user, either from scratch or by cloning an existing user.
Hand Over User Role Setup
Show customer how to modify existing user roles. Point out that changes are generally best to validate with RTD first in this area, but may be possible to do simple changes themselves.
Housekeeping
Purging
Ensure that purging is enabled, and that scheduling is turned on.
Check the date thresholds and run by customer.
Explain how these are to be used.
Archiving
Start process of getting customer buy in for archiving off (optional) and deleting business data.
This requires business decisions to be made.
Come up with specific proposal on what should be done as starting point, and run this by customer.
Value Add Features
Task here is to explain what is available here, and to determine whether any of these features may be required at launch.
If so, then should progress within implementation either directly or by raising tickets.
Productivity Tracking
Activity Recording
Billing
User Training and Testing
Document User Processes
List the processes that are to be used. Should ideally link to the process documentation, for each defined process, with exceptions.
Creation of Test Plan
Based on user process doc.
Hand Over Creation of Standard Operating Procedures
Hand over details on responsibility of creation of SOP, which incorporates physical as well as system elements.
Preparing for Launch
Does not apply for soft launches, where there is no substantial existing operation to migrate.
A specifically created launch migration plan is required over the period during the transition to live that covers the following areas.
Plan for Transfer of Stock Position
Plan for a mechanism to export the current stock position from the existing system, and to import this into OrderFlow.
Plan to Ensure No Order Duplicates
Identify a mechanism to ensure that no orders are processed twice.
One way to do this is to create an export of the most recently processed orders on the existing system, and import these into OrderFlow as completed orders. If the same orders get mistakenly imported into OrderFlow, these will be rejected as duplicate.
Line up Required Third Party Support
If third party systems are involved, such as eCommerce and ERP systems, for which integration is being applied, then the support contacts for these systems should be lined up to ensure that they are available when they are needed.
Dry Run
A dry run of the migration steps should be applied before to launch to verify that the migration steps will work reliably.
Develop Migration Timeline
The specific sequencing of the launch steps during the transition to live should be identified and recorded, so that it can be easily played back at the time.
Plan for Launch Support Presence
The timing of the OrderFlow Implementation Engineer's presence on site should be planned. Ideally, this should be just before the transition to live through to a day or so after. This will help to ensure that any issues that arise are identified and addressed promptly.
In addition, offsite support resource should be lined up, so that any offsite actions to support the launch can be accomplished promptly.
Launch
The actual launch should involve:
- executing the migration plan
- guiding users through the process
Needless to say, minor issues will be encountered. The on site support engineer will need to identify these and ensure that they are recorded and actioned as appropriate.
Post Launch
Validate Rules of Engagement
Once launch has been completed, further actions will no longer be part of the initial implementation, but will involve separately chargeable follow up work.
At this point it will be appropriate to validate the rules of engagement with respect to billing.
As pointed out in Customer Services and Support Guide.
Check if there are any variations from default.
Determine who will be responsible for approving any chargeable work.
Commission Test and Populate Test Environment
Create new test environment based on live config data.
Better to do this after launch as the configuration will mirror live, without having to keep two systems in sync manually during the pre-launch phase.
LINK to HOWTO on this.
Customer Summary Wiki Page
The customer summary wiki page should be updated to reflect the current state.
Not sure if this is required.
Problem Escalation Rules
Here we could do with a flow diagram which describes who should be contacted for different types of problems.
LINK to example diagram.
Post Launch Functional Follow Up
The system should be given an opportunity to bed in, with users getting used to the system, and dealing with corner cases which inevitably arise.
Within 2 to 4 weeks after launch, is appropriate to follow up with a functional review:
- what is working well
- what is not working so well
- any areas that are likely to require change/improvement
At this point, a program of further improvements can be initiated, if appropriate.