Home
Introduction
OrderFlow is a enterprise strength web-based order processing and warehouse management system. While OrderFlow can be hosted within the customer's warehouse environment, it is more typically hosted by a dedicated hosting provider, often in a cloud environment.
The warehouse environment needs to support printing. Items that need to be printed may include despatch notes, labels and picking reports.
A key feature of printing operations is that local network access is required. Software that connects to either a local or network printer needs to be running on the warehouse's local network.
In an OrderFlow environment, this function is performed through a dedicated application, know as the Print Server. The print server is a robust Java-based application designed to run on the warehouse local network specifically to handle printing tasks on behalf of OrderFlow.
The Print Server can be set up to perform workstation-based printing tasks for documents and labels, and is also able to integrate with a number of third party courier label printing systems. In addition, it can be used to handle bulk printing of paperwork for large shipment batches.
The purpose of this document is to describe the steps involved for setting up and maintaining a printing environment which uses the Print Server. The target audience for this document includes technical support teams working for customers of Realtime Despatch Software.
Note
Previous versions of this document also covered direct to browser printing using Java Applets and the Adobe PDF Reader software package.
As support for these technologies have been removed from modern browsers due to security concerns, they are no longer supported in OrderFlow.
Print Server
Introduction
The OrderFlow Print Server serves two purposes.
Its primary purpose is for document printing. The Print Server is optimised for printing of shipment batches, allowing large numbers of documents to be printed with little or no user intervention.
For document printing, a typical configuration will involve one instance of the Print Server for each site connecting to an OrderFlow system. However, it is possible to use multiple Print Server instances for this purpose, if volumes dictate.
The other main use for the Print Server is for integrating with third party courier label printing systems. Examples include:
- UPS Worldship
- DPD Ship@ease
- Yodel DeskDispatch
These systems are all desktop applications which run on Microsoft Windows. They interface directly with label printers on the warehouse floor. They are typically not internet enabled, but instead data is shared with these systems by writing files to and reading files from the local file system.
As the Print Server is also installed on the local network, it is able to communicate with these systems on OrderFlow's behalf, typically to trigger printing of shipment labels and to capture tracking references.
Concepts and Architecture
As mentioned earlier, OrderFlow does not print directly to printers on a local network. Instead, printing is either accomplished through the use of Print Servers.
A key concept that is used in OrderFlow printing is the print queue. When a printable document, or print item, is created on OrderFlow, it is published to a print queue. The document will be retrieved from the print queue by a Print Server, and then printed to a local printer.
Print queues are associated with printable items in a number of ways. See the Orderflow Configuration section for more details on how this is done.
Print Servers are well suited to high volume printing environments in that they support a flexible scheme for distributing high volume printing among multiple printers. The Print Server also supports offline download of print jobs, which themselves can be generated automatically via scheduled jobs.
The architecture for the Print Server is shown in the diagram below.
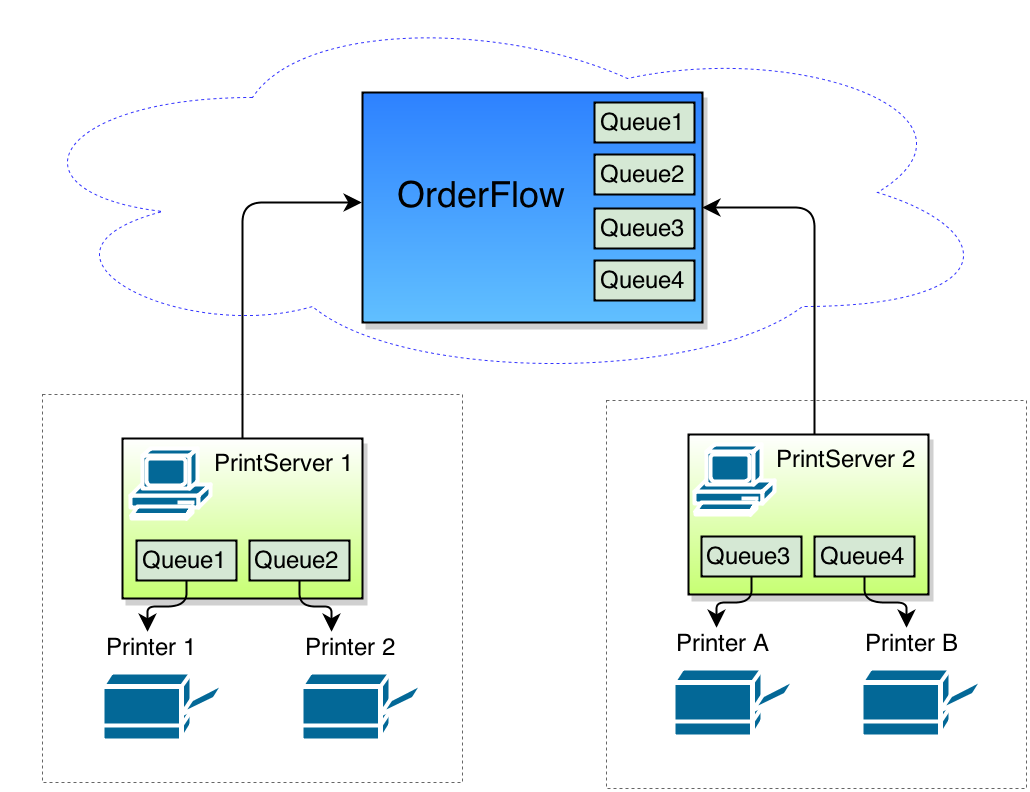
In the architecture diagram above, two Print Server instances, possibly on two local area networks, are connecting to a single OrderFlow instance.
- Print Server 1 connects to Printer 1 and Printer 2.
- Print Server 2 connects to Printer A and Printer B.
Print Queues
OrderFlow (typically) does not maintain a direct mapping to printers. Instead it publishes print jobs onto queues. Print Servers monitor these queues, and can map these queues to specific printers. In our example above, four print queues are used.
Note that every print item that OrderFlow generates is associated with a logical print queue. By convention documents sent to other queues are typically consumed by one Print Server instance.
The identification of a particular print queue can be done in a number of ways:
- for print jobs involving shipment batches printed on a centrally located printer in the warehouse, the shipment batch type will typically be associated with a print queue.
- for printing of shipment documents directly to workstations (e.g. packing desks), the print queue may be set up through an OrderFlow Workstation property.
Normally, in a single site environment, each OrderFlow print queue should only be monitored by a single Print Server instance. If multiple Print Servers are downloading jobs from the same queue, it can lead to some confusion, as the destination of individual print jobs is not easy to predict.
Installation
The Print Server is distributed as a self-contained Java application via a zip file.
A copy of the Print Server installation file can be obtain on request from Realtime Despatch technical support. For customers, it is also available from the Published Documents page on the support portal.
The installation steps involved as as follows.
- download and unzip the zip file
- copy the config directory
- test running the application
However, before beginning, it is worth installing (or verifying the installation of) the prerequisite software.
The Print Server recommends the following software to be installed on the host computer.
- Microsoft Windows
- Java
- Team Viewer
Microsoft Windows
Our typical customer uses a Windows workstation hosted in the warehouse environment as a Print Server host. While we will support or even encourage the use of Linux as a Print Server host operating system, this document only covers the setup of the Print Server on Windows.
We do not mandate a particular version of Windows, except to say that it needs to support the running of Java below.
Note that the workstation used must have network access to the OrderFlow server, potentially hosted offsite.
You will need to be able to run applications, as administrator in some environments, depending on local network security policies.
Java
The Print Server also runs on Java, although as a server, rather than simply as a browser-embedded plugin.
We recommend that the latest available version of Java be used at the time of setup. Our commitment is to ensure that the Print Server will always run on the latest available version of Java. However, the Java version on which the Print Server runs typically does not need to be upgraded after install, except when requested by OrderFlow technical support.
Java can be downloaded from the Java web site.
TeamViewer
TeamViewer software is used by Realtime Despatch for remote desktop access when supporting the Print Server. TeamViewer allows OrderFlow technical support staff to gain access to the Print Server environment to check configurations, diagnose issues and perform other support tasks when required.
Text Editor
As configuration of the Print Server involves modifying text files, we recommend that you install a text editor that works nicely with the Print Server configuration files.
An example is NotePad++.
Download and Setup
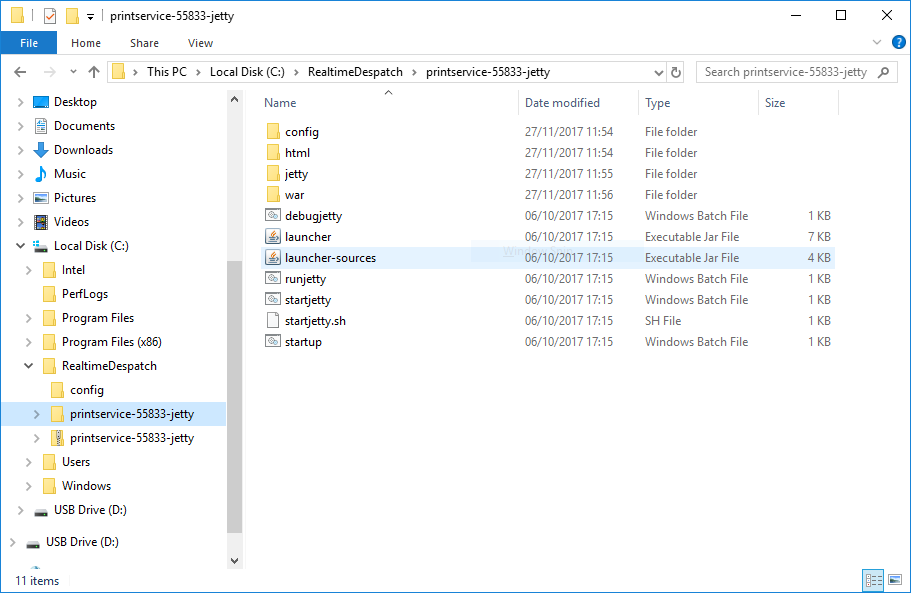
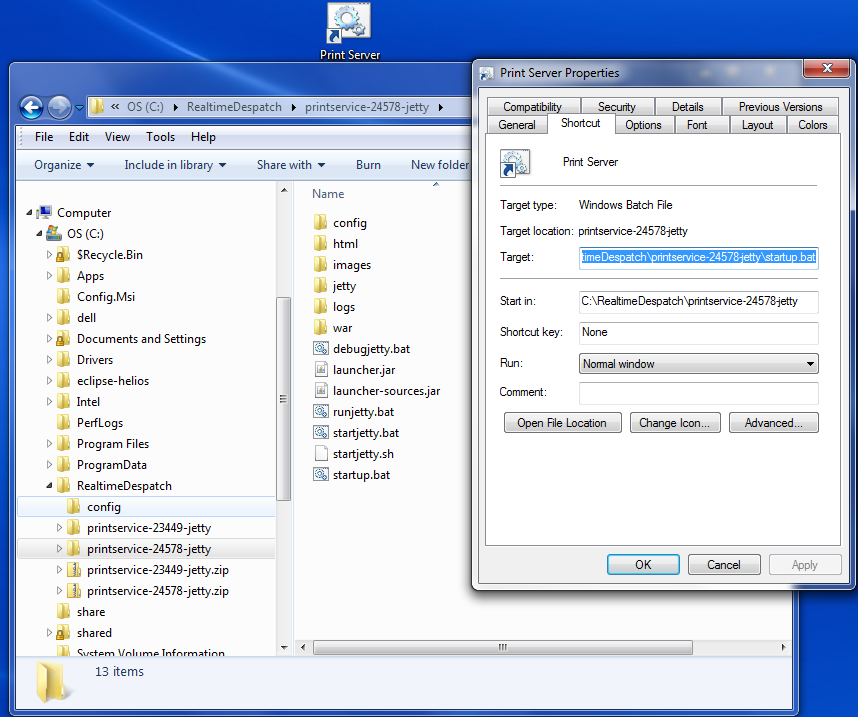
Download print service, and unzip it into C:/RealtimeDespatch, as shown below. The use of the C:/RealtimeDespatch folder for hosting the Print Server is not required, but is recommended as a convention which makes it slightly easier for us to support your Print Server environment.
Once you've unzipped the zip file into C:/RealtimeDespatch, copy the config directory contained within the printservice-xxxxx-jetty, and paste it into C:/RealtimeDespatch, as shown in the diagram below.
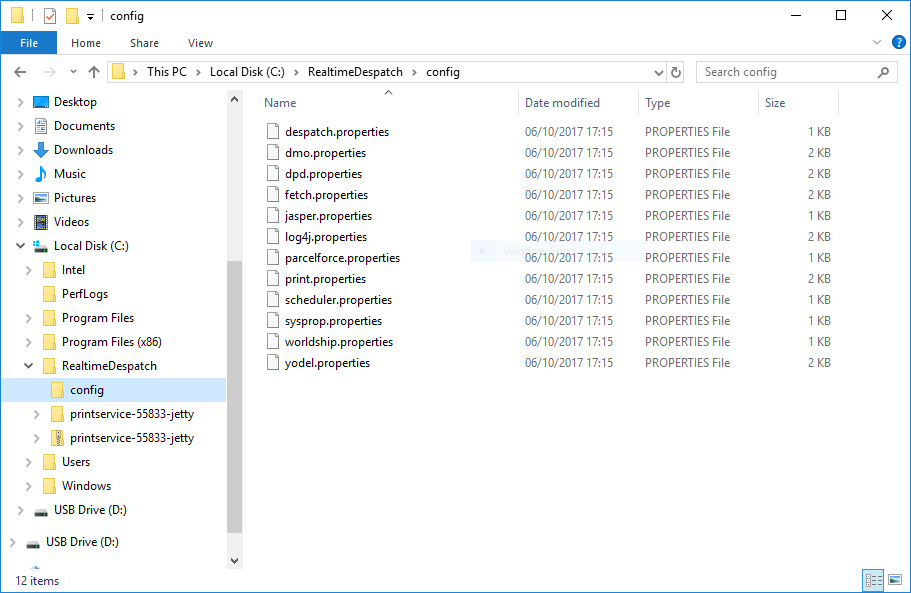
The reason for the above step, which only applies for the initial install, is so that subsequent upgrades of the Print Server can reuse the previously set values in the config directory. The config directory contains the main configuration files used to customise the Print Server. Basic instructions on configuration changes suggested for these files follow in the next section.
Once the directory structure has been set up, it is a good idea to set up a shortcut.
Simply right click on the file startup.bat, and click 'Create shortcut'. Copy the shortcut to the desktop, to make it easier to launch the application, as shown below.
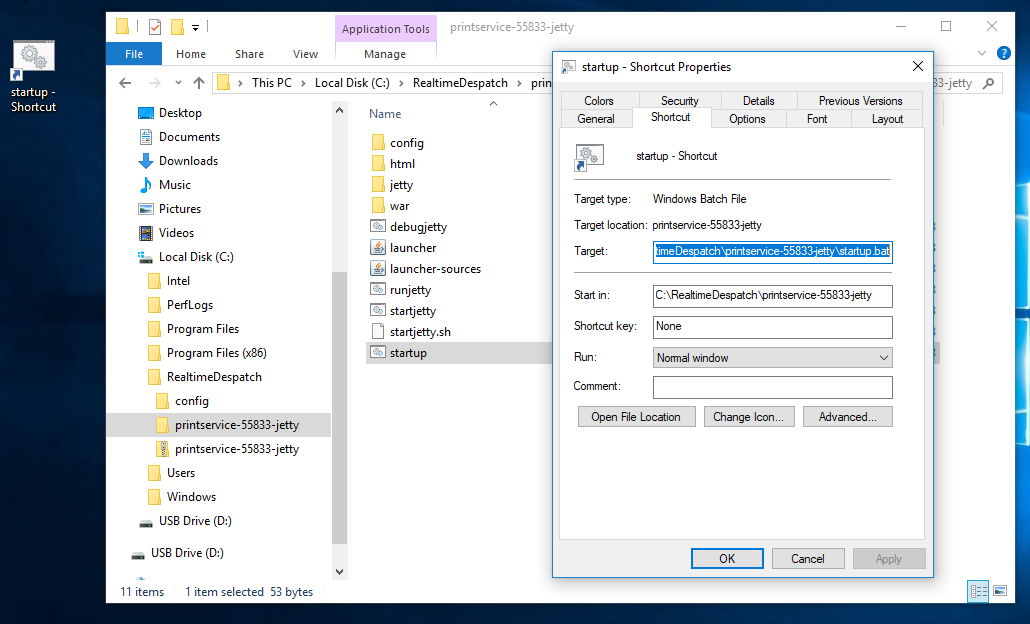
Optional steps once the shortcut has been created are to rename the shortcut, or to modify the shortcut icon. Once the shortcut has been placed on the desktop, the application can be launched by double clicking on the shortcut icon.
Post-installation Configuration
Before starting up the Print Server, you will need to set the value for the configuration parameters, in order to connect successfully for OrderFlow, to monitor the correct print queues, and to set the necessary print queue to printer mappings.
Note also you will need to restart the Print Server
Note that configuration parameters that are commented-out (i.e. those that have a '#' at the beginning of the line) will take the default value built into the Print Server application.
fetch.properties
#The site identifier for the site/warehouse in which this print service is based.
#Corresponds with the appropriate site identifier on orderflow
fetch.site=DEFAULT

#The friendly name for the Print Server, used to help identify the source of jobs
fetch.friendly.name=PRINT1

#The base URL, user and password of the OrderFlow instance
fetch.base.url=http://localhost:8081/web/remoteprint/
fetch.user=print
fetch.password=print
The property fetch.site is the OrderFlow site. If connecting from more than one site to a single OrderFlow instance, different
Print Servers will have different values for fetch.site.
The property fetch.friendly.name helps to identify the print server in a user-friendly way.
The properties fetch.base.url, fetch.user and fetch.password are fairly self-explanatory. They need to be
set correctly in order to connect successfully to OrderFlow.
print.properties
This configuration file is used to set the print queues to monitor on OrderFlow, and the mapping from logical print queue to printer.
#The comma separated list of queues which this Print Server is interested in for direct printing or downloading
print.queues=LABEL11,DOC11

#The mapping from queue name to printer name. The right hand side of the first equals sign
#contains a comma separated set of pairs of queues to printers
print.queue.printers=LABEL11=ZDesigner GK420d,DOC11=A4 Laser
Note that the in the example above, the Print Server has been set up to poll the OrderFlow print queues LABEL11 and DOC11. The documents published onto LABEL11 are then routed to the printer ZDesigner GK420d, and those published onto DOC11 are routed onto A4 Laser.
Note that you can also use the special value DEFAULT as a printer name, which will route documents to the default printer on that workstation as per the Windows setup.
print.queue.printers=LABEL11=DEFAULT,DOC11=A4 Laser
The above example would also work if the ZDesigner GK420d printer is also the default Windows printer.
scheduler.properties
Print Server monitors print queues in the background.
scheduler.poll.interval=5
scheduler.poll.delay=10
The scheduler.poll.interval property is used to control the polling interval.
The property scheduler.poll.delay is used to control the delay after startup.
sysprop.properties
This file contains Java system properties that may need to be loaded at startup. The main entry of interest here is the line below:
bootstrapModulesResource=moduledefinitions.xml
The above line contains a reference to the module definitions file which controls which Print Server module are loaded at startup.
If a non-standard module configuration needs to be applied, this will normally be done with additional instructions provided by a member of the Realtime Despatch support team.
Running the Application
Application Startup
As described earlier, the Print Server can be started simply by double clicking on the shortcut icon.
On startup, the Print Server will:
- connect to the configured OrderFlow instance, and register itself with OrderFlow
- download resources, especially label icons and logo images, for use locally in print jobs
- initiate a schedule to poll for print jobs
A terminal window will be visible if once the application is running.
Once started, the Print Server will be ready to download and print jobs to local printers, and to perform other integration tasks on the local network.
Typically, the Print Server is started on port 8181, so you can navigate to the Print Server by pointing your browser to the following address: http://localhost:8181/web/. (To change the port on which the Print Server runs, edit the startup.bat file referenced by the shortcut.
The next couple of sections describe how to verify the Print Server installation, using features available both on the Print Server and OrderFlow.
Verifying on the Print Server
As well as supporting printing operations, the Print Server user interface includes a number of support screens which can be used to verify the configuration and setup.
- the fonts installed on the Print Server
- the image resources downloaded from OrderFlow
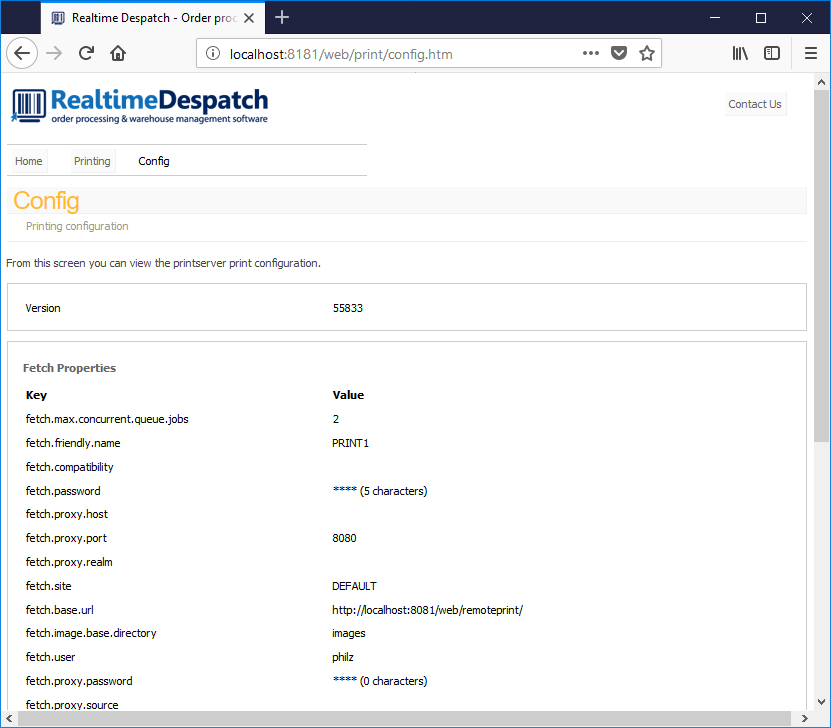
The screen below shows the Print Server configuration, which is essentially a visual representation of the configuration values loaded from the config directory.
Verifying on OrderFlow
We can also verify on OrderFlow that a Print Server instance has successfully connected, from the Reports -> Print Items - Print Servers menu.
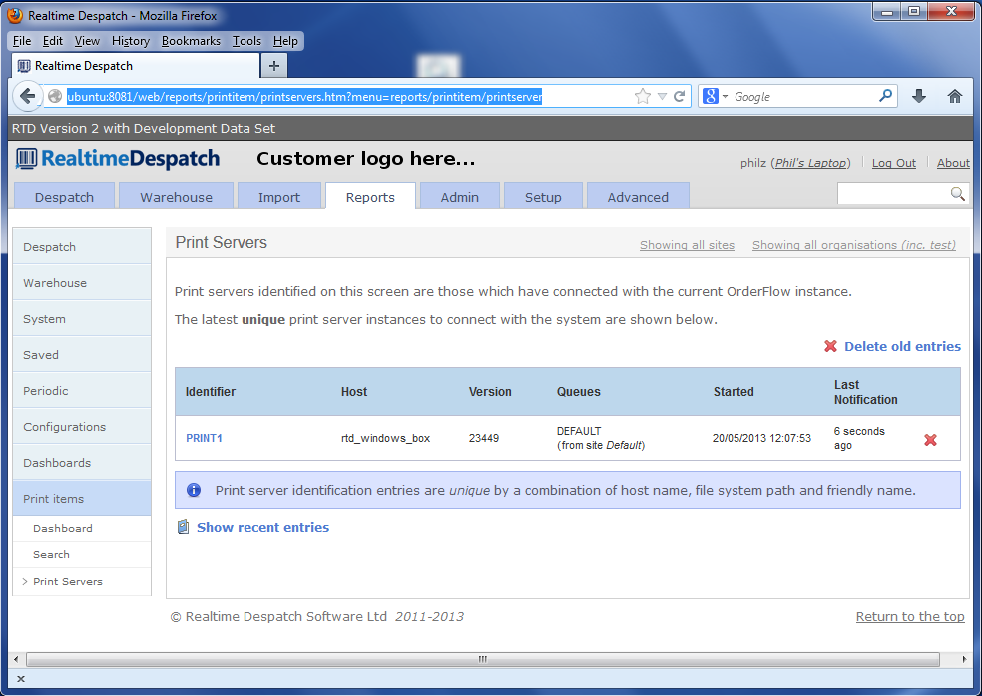
Note that each Print Server which connects to OrderFlow periodically sends a heartbeat message. The page above shows the Print Server instances connecting to the current server, the print queues being monitored, and when the last heartbeat message was received.
In the example above, the print queue DEFAULT is being polled by the Print Server with the 'friendly' name PRINT1, with the last heartbeat message received six seconds ago.
Testing the Print Queue
Once the above test has been successfully performed, you can test printing to the print queue from the Setup -> Print Queues menu.
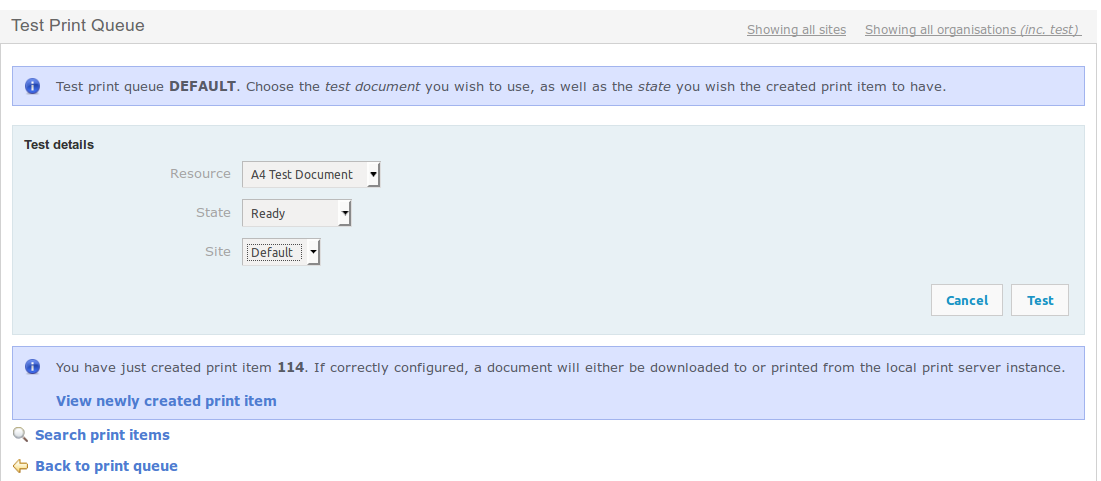
First, navigate to the print queue you wish to test. The select a resource, and site. Note that the site needs to be the site to which the Print Server is connecting. In a multi site environment, you will need to make the correct choice there.
After clicking on the 'Test' button, you will see output as shown above.
On the Print Server workstation, you should see your document print if the configuration is correct there too. You should also be able to inspect the console output shown on the print server, and see output such as the following.
2016-06-23 14:34:41,684 INFO [MultiStatusBatchFetchingPrintManager] Received 1 jobs from reader
2016-06-23 14:34:41,684 INFO [MultiStatusBatchFetchingPrintManager] Printing job 114-test_a4.xml
2016-06-23 14:34:41,684 INFO [BaseBatchFetchingPrintfileWriter] Printing job 114-test_a4.xml using printer: DEFAULT
2016-06-23 14:34:41,709 INFO [DownloadingPrintDetailSource] Time taken to download print item '114': 23 milliseconds
2016-06-23 14:34:43,510 INFO [BaseBatchFetchingPrintfileWriter] Update print status to 'sent' for 114 via resource updatePrintStatus.xml
Upgrading the Print Server
Occasionally an upgrade to the Print Server will be required, to take advantage of new features and bug fixes.
The steps involved for performing an upgrade are as follows.
- Stop the existing Print Server by closing the terminal window in which it is running.
- Download the more recent release of the Print Server, and unzip it into C:/RealtimeDespatch as for the initial install.
- Delete the existing shortcut icon from the desktop, and replace it with a new shortcut icon which points to the startup.bat file in the newly unzipped printservice-XXXXX-jetty directory.
- Double click on the new shortcut icon to restart the application.
The screenshot below shows an example how the directory structure will appear after the upgrade.
Note that there is no need to copy the config directory after the upgrade. The application will continue to use the config settings in the directory under C:/RealtimeDespatch. In other words, existing settings will be preserved.
Orderflow Configuration
Introduction
This document is primarily about Print Servers, and not OrderFlow configuration. However, a little understanding on how print queues are set up will be helpful in gaining a better overall picture of how the pieces fit together.
As described in the Print Server section, print queues are used by OrderFlow to identify target destinations for printed output. Each print queue used in the application needs to be set up as an entry visible on the OrderFlow GUI, shown below.
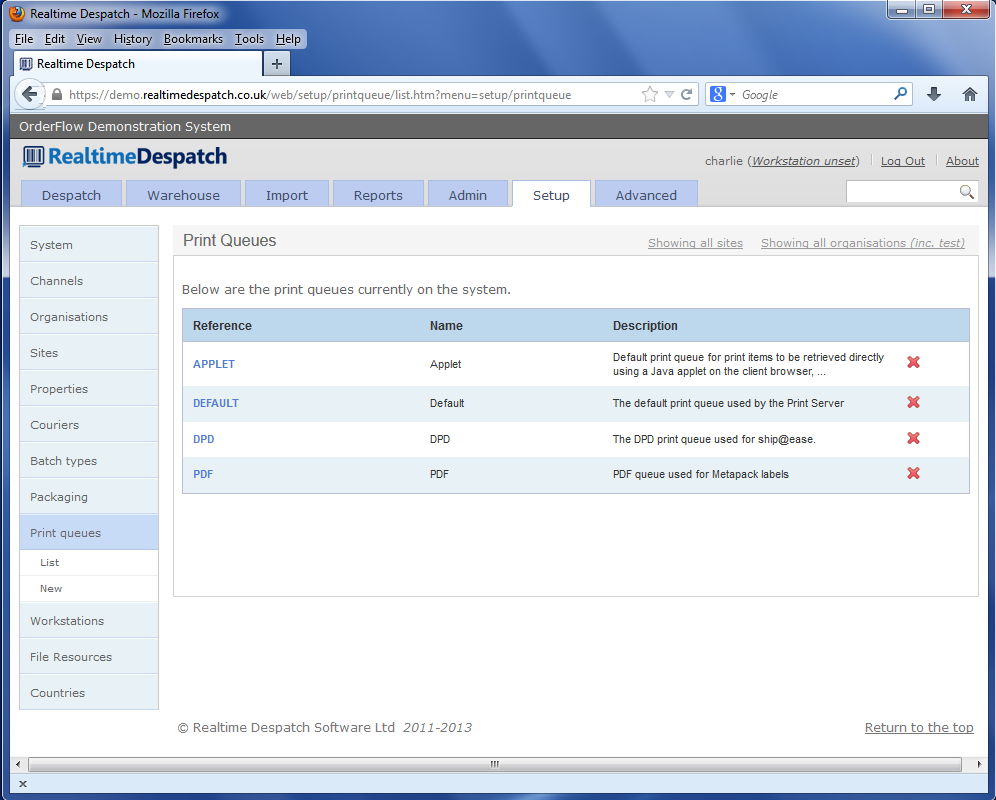
A number of different mechanisms are used within the application to determine the print queue for a printable document, or print item.
For shipment batches, each shipment batch type is typically associated with a print queue. However it is also possible for the queue to be used for a batch print job to depend directly on the workstation from which the batch printing is initiated.
For other types of documents, the print queue typically depends on a workstation-specific property value. The name of the property will itself be context dependent, changing according to the type of document being generated.
Shipment Batches
Every shipment batch is associated with a print queue through the shipment's batch type, as shown below.
However, it is also possible to associate a shipment batch with a workstation-specific print queue. This is only possible for shipment batches which are printed manually. Shipment batches printed automatically using a scheduled job can only be associated with the print queue associated with their parent batch types.
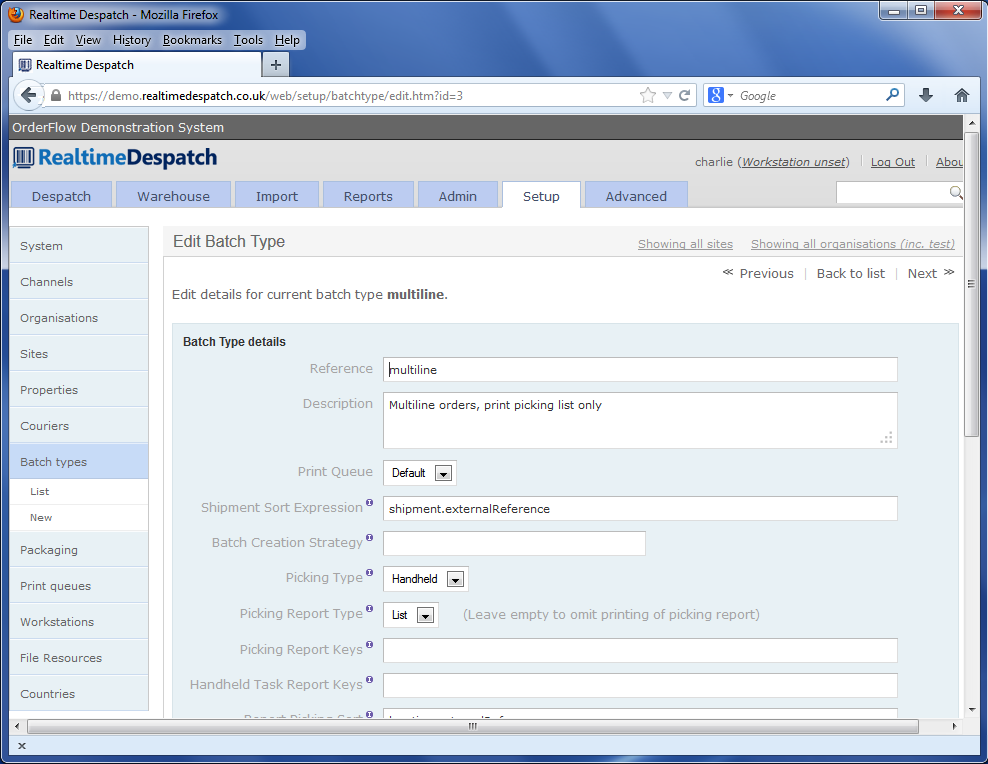
In the screenshot above, the multiline batch type has been associated with the DEFAULT print queue.
During their lifecycle, Print Items on OrderFlow can be in the ready state or the downloadable state. Those in the
ready state get printed out automatically by the Print Server. Those in the downloadable state have to be dragged to
a printer on the "Printing Control" page of the Print Server web interface. Shipment batches can be configured to default their
Print Items to either state, using the batch.download.before.printing application property (on OrderFlow).
Workstation-specific Print Queue Naming
The following section describes some best practices that can be applied when using the Print Server for printing documents on the packing desk. This can apply both for despatch notes and labels.
In this scenario, you will need the Print Server to be installed not just on a single workstation, but on each of the packing desks.
Establishing and applying sensible naming convention for workstations, Print Servers and print queues is important in making this arrangement easy to set up, replicate or extend with further packing desks.
For the configuration just described, you will need:
- an instance of the Print Server to be installed set up on each packing desk.
- a Workstation instance on OrderFlow for each packing desk.
- for each document type that is to be printed using the Print Server, a Print Queue queue for each workstation and documentation type combination.
The naming of the Print Server itself can be set up using the fetch.friendly.name property in the fetch.properties configuration file.
For example, if you are using the Print Server to print A4 despatch notes to a laser printer, and 6x4 labels to a thermal printer, then you a suitable naming convention might be.
- a numbered workstation for each packing desk, for example, WORKSTATION_01, WORKSTATION_02 etc.
- corresponding named print queues for A4 document printing: DOCUMENT_01, DOCUMENT_02 etc.
- corresponding named print queues for label printing: LABEL_01, LABEL_02 etc.
These values will be reflected in the Print Server's print.properties file configuration. The will also be reflected in the Workstation Property values, described in the next section.
Workstation-specific Documents
For many of the printing operations, the user is expected to be associated with a workstation. Different workstation properties are used to identify the workstation-specific target for different types of printed documents.
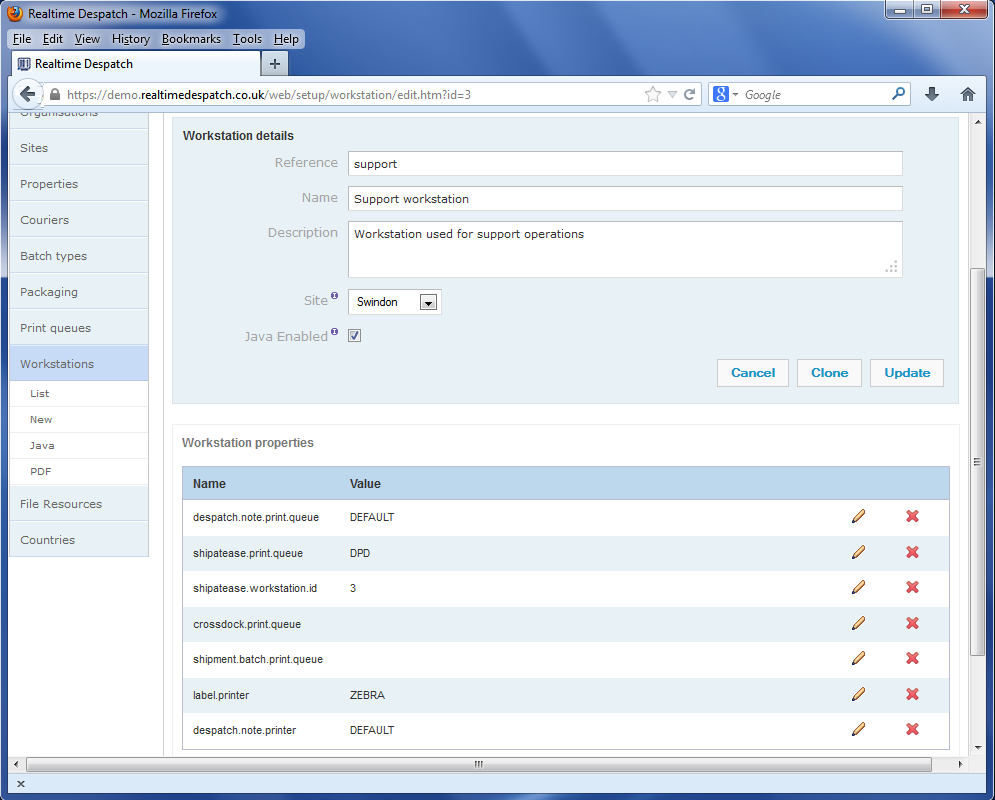
Note the workstation properties which end print.queue.
| Property | Purpose | Possible values |
|---|---|---|
| despatch.note.print.queue | Despatch notes printed from packing screen | DOCUMENT_01: routes to Print Server |
| label.print.queue | Courier labels from packing screen | LABEL_01: routes to Print Server |
| shipment.batch.print.queue | Despatch notes printed via batch printing | DOCUMENT_01: routes to workstation specific queue; No value: uses shipment batch default (see below) |
Note also that similar values can be set for crossdock.print.queue (where a workstation is being used for cross docking
shipments from incoming deliveries), and for shipatease.print.queue (where a print queue is being used to support
integration with DPD shipatease).
In screenshot above, the properties label.printer and despatch.note.printer are being used to
explicitly set the printer to be used for applet printing for labels and despatch notes respectively, from
a particular workstation. This is to accommodate the situation where both labels and despatch notes are
printed from the packing screen, but to different printers (typically, despatch notes would be routed to
a A4 laser printer, while labels will be outputted to a smaller thermal printer).