Home
Introduction
Background
OrderFlow is a Warehouse Management and Order Processing System that specialises in eCommerce fulfilment.
OrderFlow helps retailers and fulfilment specialist performs key 'back office' functions, from managing their warehouses, to handling picking and packing processes,
In order to fulfil these roles OrderFlow needs to integrate with eCommerce systems. Magento is the world's leading Open Source Enterprise eCommerce Platform. This document covers OrderFlow's integration with Magento.
Integration Operations
There are four main operations that are covered in the integration between OrderFlow and Magento.
- export of products from Magento to OrderFlow. Magento has a rich product model which makes it ideally suited to managing a retailer's product catalog. The product export operation allows products defined in Magento to be exported to OrderFlow.
- export of orders from Magento to OrderFlow. Magento is a public facing application, the 'shopping cart' software that members of the public use to find and purchase products online. Orders received in this way need to be passed through to OrderFlow for fulfilment.
- notification of inventory changes from OrderFlow to Magento. As the system responsible for stock management and fulfilment, OrderFlow needs to keep Magento up to date with changees to product inventory levels, to ensure that products are neither oversold nor undersold.
- notification of shipments despatched from OrderFlow to Magento. When shipments have been despatched, OrderFlow needs to inform Magento to ensure that the appropriate orders are marked as complete, and to assist the retailer's customer services in keeping customers up to date with the delivery of their orders.
These operations are all covered in detail in this document.
OrderFlow Magento Extension
OrderFlow is a web based warehouse management and order processing environment specifically designed to support high volume B2C pack and despatch operations.
Our integration with Magento is a very important part of our strategy to provide the best fulfilment environment for merchants using this eCommerce platform. On the OrderFlow side, we make use of the Magento web services, On the Magento side, RealtimeDespatch provide a free and open source extension which can be installed in the Magento environment.
The OrderFlow Magento extension aims to provide a robust integration between OrderFlow and Magento that addresses known issues with an OrderFlow/Magento integration that relies solely on natively available Magento Web Services.
The extension has been developed by the Magento agency SixBySix, based in Glasgow, and wholly funded by OrderFlow. It is hosted on the GitHub realtimedespatch/orderflow-magento-module>` open source project repository.
The extension includes the following features:
- Event based despatch of configured data from Magento to the OrderFlow API (including products, quantities, prices, shipping values, order id, discount codes etc).
- Partial stock pushes from OrderFlow to Magento API.
- Scheduled and on-demand pushes of product definitions from Magento to OrderFlow.
- Requeue and retry of failed updates, with error notifications visible in the Magento administration console.
- Context sensitive links in Magento Admin that allow users with the necessary rights to navigate directly to the OrderFlow environment to view the details of shipment or products within the warehouse environment.
- Configurable schedules for product exports and order export retries in addition to general configuration settings.
- Extensible, open codebase to allow further customisation for merchant specific requirements.
This document aims to cover everything that merchants and their agencies need to know about installing, using, configuring and receiving support for the OrderFlow Magento extension, both from the OrderFlow and the Magento administrator's perspective.
Licensing and Compatibility
The OrderFlow Magento extension is released under the Open Software Licence v3.0. The Licensor is OrderFlow Limited.
The module is compatible with the following Magento versions:
- Magento CE 1.6, 1.6.1, 1.6.2, 1.7, 1.8, 1.8.1, 1.9, 1.9.1
- Magento EE 1.11, 1.12, 1.13, 1.14
Support Arrangements
The OrderFlow Magento extension is designed to be easy to install and configure.
However, Magento is a complex environment, and each installation typically includes a number of other third party modules that need to work alongside the OrderFlow extension and may interact with it. Merchants manage their Magento installations either through the use of an in house support and development team, or by contracting a Magento Agency.
In these kinds of environments, additional support effort is often required to install and configure the module to work successfully.
This chapter explains the support arrangements available for the OrderFlow Magento module.
Key Parties
For the avoidance of confusion, it is worth pointing out who may be involved, and what their responsibilities are likely to be in the process of installing, configuring and supporting the OrderFlow extension.
The Merchant
The Merchant is the 'owner' of the overall process. Typically, the Merchant is also a OrderFlow customer, or a client of a 3PL that is an OrderFlow customer.
Extension Developer
The Extension Developer is SixBySix , also a Magento Developer. They do not have any direct responsiblity for administering the Merchant's environment.
Their efforts may be required to support specific issues relating to the functioning of the module, to develop additional module features, etc.
Any chargeable work incurred by the Extension Developer is covered by OrderFlow. In some cases, depending on the issue concerned, the costs incurred are passed on to the OrderFlow customer (normally, the Merchant).
If any conflict occurs between the OrderFlow extension and any other third party extension, the Extension Developer may be brought in on a chargeable basis to address this.
Note that if the Extension Developer is required to provide rapid response support for the module to coincide with a new launch, then advance notice will need to be given for this in order to ensure their availability.
The Extension Developer should typically not have direct access to the live Magento server. They will however require direct access to the test Magento server (including SSH access) to perform support tasks.
Primary Magento Agency
The Primary Magento Agency is responsible maintaining the Merchant's Magento environment, administering their live and test servers, etc, and for developing custom Magento features for the Merchant.
The Primary Magento Agency will be responsible for all deployments, including those to both test and live environments.
The Primary Magento Agency will be responsible for maintaining a test environment that closely represents the features present in the live environment. If necessary, the Primary Magento Agency may be asked to replicate the aspects of the live environment in test, in order to reproduce live issues and to allow the Extension Developer to access to a technical environment in which these issues can be debugged.
Support Process
All support for the module is coordinated through the OrderFlow ticketing system. For each OrderFlow customer, a Magento module-specific project will be set up, to which each of the above-named parties will have access.
OrderFlow plays a coordination role in this process, providing the following services:
- leading the initial induction process to ensure that the module is installed correctly
- ensuring that the relevant parties have access to the shared Merchant-specific project on the OrderFlow support ticketing system
- ensuring that the necessary system access is available to the relevant parties
- if an issue has been raised, doing the the initial triage to verify that the issue is valid, and to identify a possible cause
- if additional chargeable work is likely to be incurred, or if further investigation is required by the Extension Developer, to arrange for this to happen
OrderFlow will charge for support work undertaken on the same basis as support work for OrderFlow itself. Typically, this means that work is chargeable unless it is the result of a bug which has not been introduced by a specific change made to the Magento environment by the Merchant or the Primary Magento Agency.
Note that neither OrderFlow nor the Extension Developer (SixBySix) will take any responsibility for configuring or maintaining any Magento environment, or for deploying changes to this environment, apart from configuration changes made through the Magento Administration Console.
Required Access
The table below indicates the level of access that will be required to support the Magento module.
| Access Required | Primary Agency | OrderFlow | Extension Developer |
|---|---|---|---|
| Test Admin Panel | Yes | Yes | Yes |
| Test SSH | Yes | Yes | Yes |
| Test Database | Yes | Yes | Yes |
| Live Admin Panel | Yes | No | No |
| Live SSH | Yes | No | No |
| Live Database | Yes | No | No |
Note that where access to the live system is required for either OrderFlow or the Extension Developer, this will need to take place via a TeamViewer session with the help of the Primary Agency, arranged between the parties concerned.
Induction Process
Merchants using the OrderFlow Magento extension will be required to go through an induction process.
The purpose of an induction process is to ensure that problems that might arise with the extension can be dealt with in a cost effective and timely manner.
Having an induction process helps to ensure that the Merchant's and Primary Magento Agency's first experience of using the module is a positive one.
The induction process will involve the following:
- clarification on who the main parties are as described in the previous section.
- ensuring that system access as described above is already available.
- clarification the support process, and ensure that all parties are aware of their responsibilities.
- help in verifying the installation of the module in the test environment, with the assistance of this documents.
- any further training in the use of the Magento extension.
A recommended first step for any Magento agency that is new to the module is to install the module on a clean Magento environment before attempting to install the module in the customer's test environment.
An example of how this can be done is covered in the Clean Magento Install section.
Customisation
The Primary Magento Agency should be able to take care of any additional advanced configuration that is required to customise data mappings for products and orders exported from Magento to OrderFlow. Additional support of this effort can be provided, if required, by the Extension Developer.
Installation
This section documents the install process. As described in the Support Arrangements chapter, the process of installing the OrderFlow Magento extension needs to be undertaken by the Primary Support Agency, supported by OrderFlow and, where necessary, the Extension Developer.
The installation is performed as a file-based install via a supplied compressed archive in the tar.gz format.
An install based on the Composer PHP dependency manager is also possible for Magento integrators who are already familiar with and would like to continue using this tool. However, this option is not covered in this document.
Prerequisites
For the Magento extension to run, developer symlinks need to be enabled.
From System -> Configuration -> Developer -> Template Settings, select 'Yes' to the Allow Symlinks option.
Obtaining the Files
During the Induction Process, the Primary Magento Agency will be directed to the relevant release.
The latest built release is available via the following URL:
https://www.sixbysix.co.uk/orderflow/releases/.
In most cases, you will need to download the most recently available file from the list.
The selected file can be downloaded and placed in the Magento root directory using the command:
sudo -u www-data wget https://www.sixbysix.co.uk/orderflow/releases/orderflow[version].tar.gz -O orderflow.tar.gz
Example output is shown below:
sudo -u www-data wget https://www.sixbysix.co.uk/orderflow/orderflow.tar.gz -O orderflow.tar.gz
--2015-09-10 14:57:51--  https://www.sixbysix.co.uk/orderflow/orderflow.tar.gz
Resolving www.sixbysix.co.uk (www.sixbysix.co.uk)... 178.79.180.182
Connecting to www.sixbysix.co.uk (www.sixbysix.co.uk)|178.79.180.182|:443... connected.
HTTP request sent, awaiting response... 301 Moved Permanently
Location: https://www.sixbysix.co.uk/orderflow/orderflow.tar.gz/ [following]
--2015-09-10 14:57:51--  https://www.sixbysix.co.uk/orderflow/orderflow.tar.gz/
Reusing existing connection to www.sixbysix.co.uk:443.
HTTP request sent, awaiting response... 301 Moved Permanently
Location: https://www.sixbysix.co.uk/orderflow/releases/orderflow-1.0.0.30-master.tar.gz [following]
--2015-09-10 14:57:51--  https://www.sixbysix.co.uk/orderflow/releases/orderflow-1.0.0.30-master.tar.gz
Reusing existing connection to www.sixbysix.co.uk:443.
HTTP request sent, awaiting response... 200 OK
Length: 418600 (409K) [application/octet-stream]
Saving to: ‘orderflow.tar.gz’

100%[================================== .... =====>] 418,600     1.94MB/s   in 0.2s

2015-09-10 14:57:51 (1.94 MB/s) - ‘orderflow.tar.gz’ saved [418600/418600]
Note that through the -u www-data the file is being downloaded with the www-data user permissions.
Deploy the Files
Warning
We'd strongly recommend taking a backup of the Magento web root directory before performing this operation, in case any mistakes are made and need to be reversed.
Once the files have been extracted they can be installed in the Magento web root directory.
The file can be extracted into the Magento web root directory using the following command:
sudo -u www-data tar -xvf orderflow.tar.gz
Note that this command does not extract the module files directly into the application subdirectories. Instead, it extracts the files into a subdirectory which corresponds with the version of the file that has been downloaded. After the extraction, a versioned file will be present in the Magento web root directory:
/var/www/magento$ ls -l orderflow-1.0.0.30-master/
total 12
drwxr-xr-x  5 www-data www-data 4096 Sep 10 13:42 app
drwxr-xr-x  3 www-data www-data 4096 Sep 10 13:42 skin
drwxr-xr-x 11 www-data www-data 4096 Sep 10 15:38 vendor
The files in these subdirectories can then be copied into the root subdirectory in the following way:
cd orderflow-1.0.0.30-master
sudo -u www-data cp -R * ../
Updating the Extension
Warning
We'd strongly recommend taking a backup of the Magento web root directory before performing this operation, in case any mistakes are made and need to be reversed.
Performing the module update can be done in exactly the same way as performing a module install. Simply follow the steps in the previous section, overwriting the existing module files as necessary.
In case the state of any existing install is uncertain, it is best to clean down the environment to uninstall the existing extension ready for a new installation. To uninstall the module navigate to the magento root directory, and run the following command:
$ sudo rm -rf app/code/community/SixBySix \
vendor/sixbysix
app/design/adminhtml/default/default/layout/realtimedespatch.xml \
app/design/adminhtml/default/default/template/realtimedespatch \
app/etc/modules/SixBySix_RealTimeDespatch.xml
Cron Setup
The OrderFlow Magento extension relies on the use of the Magento scheduling functionality to run background jobs. The Magento cron functionality will need to be enabled.
A commonly used extension for managing scheduling in Magento is AOE Scheduler. If scheduling has been set up using this extension, then no further setup will be necessary.
If not, the the Magento cron functionality will need to be turned on. To do this, run the following command:
sudo crontab -u www-data -e
Using one of the editors, add the following line to the crontab file, and save.
*/1 * * * * /bin/bash /var/www/magento/cron.sh
The above result in the Magento scheduling functionality being invoked every minute.
Final Steps
A couple of further actions will need to be performed before the module extension install or update properly takes effect.
First, clear the Magento cache. This can be done from the Admin Panel, by navigating to System -> Cache Management and clicking 'Flush Magento Cache' and 'Flush Cache Storage'.
It may also be necessary to clear the Zend framework cache, which can be done on the command line via
sudo rm -rf /tmp/zend_cache---*
Second, log out and log in again.
Verification
After the install has been completed, a few basic verification steps can be conducted to ensure that the module has been installed properly.
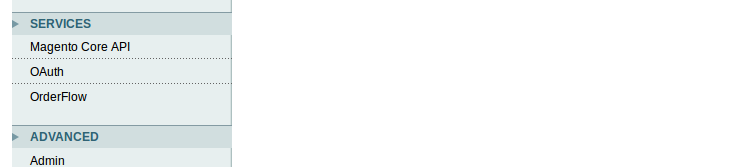
- The OrderFlow menu item should appear at the top level menu on the Magento Admin Panel.
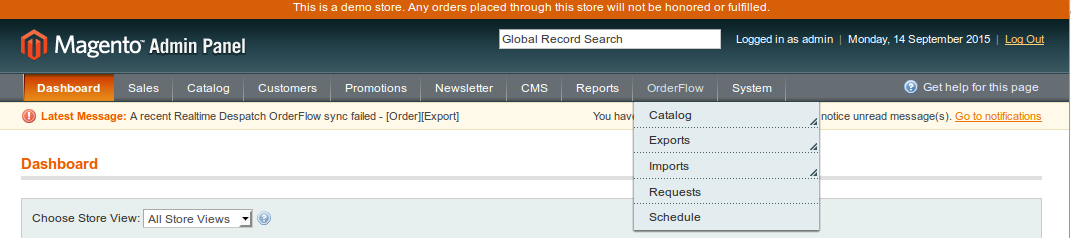
- An OrderFlow menu should also appear under System -> Configuration in the SERVICES section.
At this point you can verify that navigating to these menus shows module-specific screens, without any errors being reported.
System -> Configuration -> Services -> OrderFlow should display the module version number and text similar to the following:
OrderFlow v1.0.0.30
  A module provided for OrderFlow by the Magento agency SixBySix
(Note the version number for support and/or future upgrades.)
If some or all of these elements are missing then the installation has failed. At this point, view the Troubleshooting section below, or attempt to reinstall the module. If necessary, raise a support request with the OrderFlow support team for further assistance.
The following chapters will cover further verification of the functionality of the extension.
Troubleshooting
Below are the suggested remedial actions following problems encountered during previous installation on certain environments.
Permissions Not Correct
In a typical Debian or Ubuntu distribution of Linux, the Magento application is served from an Apache Virtual Host mapped from a subdirectory of /var/www, for example, /var/www/magento but the document root directory from which Magento is served will be dependent on your server environment.
The Magento application needs to read, write and execute access to this folder via the Apache user, normally www-data in a Debian or Ubuntu distribution.
If correcting permissions is necessary, you can use the following command from the Magento root directory:
sudo chown www-data:www-data -R ./
OrderFlow menu is not visible
If following installation the OrderFlow menu is not visible on the Magento Admin Panel, the files may not have installed correctly. From the Magento root directory, run the following commands:
ls -l app/code/community/SixBySix
ls -l vendor/sixbysix
ls -l app/design/adminhtml/default/default/layout/realtimedespatch.xml
ls -l app/design/adminhtml/default/default/template/realtimedespatch
ls -l app/etc/modules/SixBySix_RealTimeDespatch.xml
None of the file commands above should return an empty listing. If so, then repeat the steps described in the Deploy the Files section.
404 on Configuration Screen
If you see the '404 Not Found' when navigating to System -> Configuration -> OrderFlow, you will need to log out of the Magento Admin Panel, and log in again.
Blank Screen When Exporting Product to OrderFlow
Magento error messages are hidden by default, so the you will need to enable display of errors. In Magento 1.9.1.1 this can be done by adding the following lines to the index.php file in the Magento root directory:
Mage::setIsDeveloperMode(true);
ini_set(‘display_errors’, 1);
The lines will need to be added before the Magento is framework is invoked, that is prior to the line:
Mage::run($mageRunCode, $mageRunType);
Subsequent attempts to perform the same operation will then show a stack trace. If a stack trace similar to the following is shown:
Fatal error: Class 'SixBySix\RealtimeDespatch\Api\Credentials' not found
then a cacheing issue has occurred. In this case, clear the Magento and Zend framework caches. If this does not resolve the issue, then PHP Opcacheing may be enabled, in which case a restart of Apache will be necessary to fix the problem.
Magento Configuration
Assuming that the OrderFlow Magento extension has been installed successfully, we now need to configure it to work with OrderFlow.
Note that there is also some configuration required on the OrderFlow side, which we cover in the Orderflow Configuration chapter.
Navigate to System -> Configuration on the Magento Admin Panel.
You should also be able to see OrderFlow in the SERVICES section, as shown in the screenshot below.
Click on OrderFlow and the module configuration page will appear.
General Module Settings
To begin with, let's consider the general settings on the extension's configuration screen, shown below:
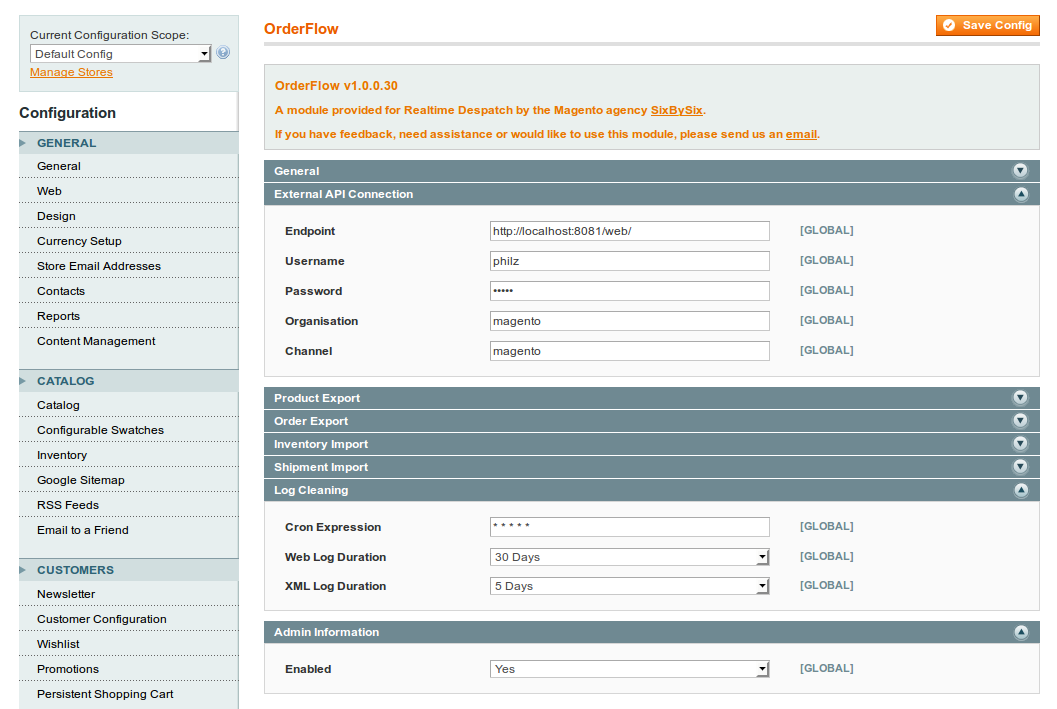
General Settings
Enabled: This needs to be set to Yes in order to turn on module functionality. Admin Name: The name of the administrator responsible for the installation.
Email Address The address for email alerts.
External API Connection
These are the main settings for connecting to the OrderFlow instance. The correct values for these will be depend on the configuration of the target OrderFlow environment, and will be set with the help of OrderFlow support.
Endpoint: This is the base OrderFlow API URL to which the extension will send messages.
Username: The OrderFlow user configured to receive API requests from the Magento extension.
Password: The password for the above user.
Organisation: The configured OrderFlow organisation to which API requests relate. Must correspond with the identifier for an organisation within OrderFlow to which the above named user has access.
Channel: The configured OrderFlow sales channel to which API requests relate. Note that in OrderFlow, channels belong to organisations, so this channel needs to be one which belongs to the organisation named above. Again, the value supplied must correspond with the identifier for a channel within OrderFlow to which the above named user has access.
The channel may already be set up in OrderFlow, otherwise it can be entered here and subsequently created in OrderFlow. By convention this channel is usually named magento.
Log Cleaning
The extension produces a significant amount of log and management data that is used both for the functioning of the module as well as being helpful for verification. The log cleaning options ensure that the volume log data that the extension generates is kept manageable, and does not grow indefinitely.
Cron Expression: The cron expression that controls the frequency of log cleaning operations. Daily running of the log cleaning operations is sufficient.
Web Log Duration: The period for which records generated by the extension will be retained in the Magento var/log directory.
XML Log Duration: The length of time for which request and response XML will be stored.
Admin Information
This option should be left enabled.
Import and Export Settings
The import and export settings control the functional elements of the extension. Specifically,
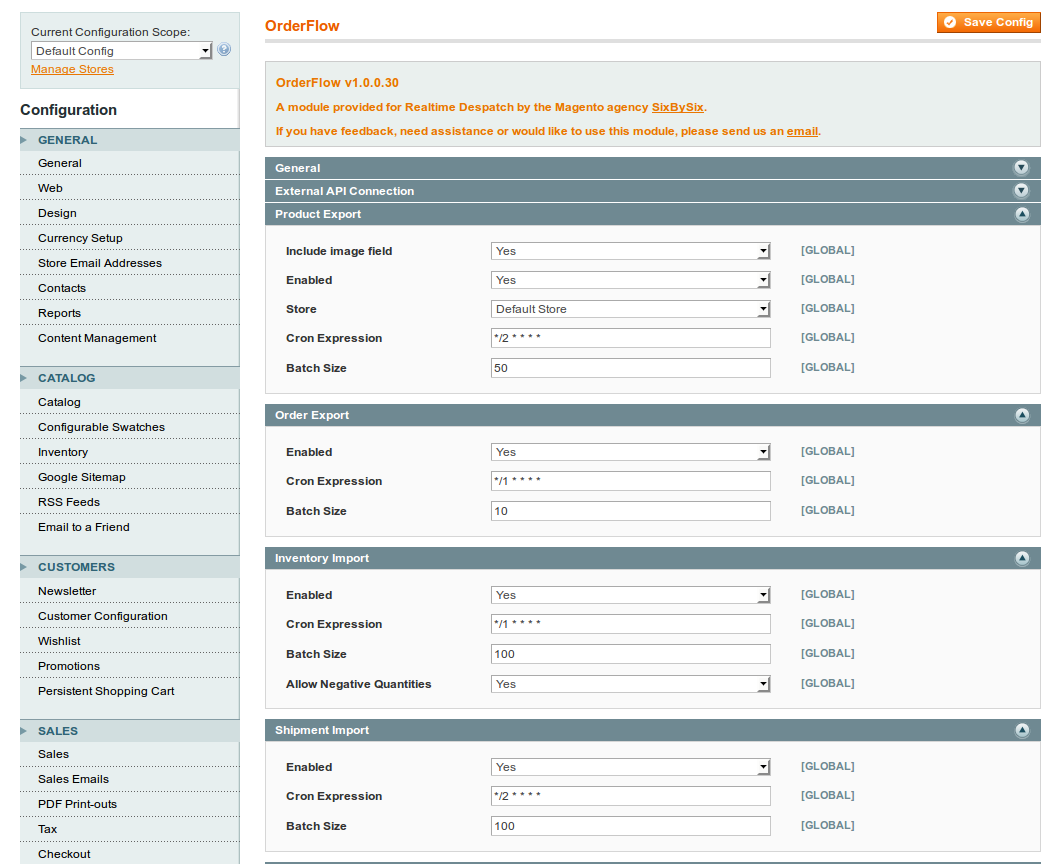
Product Export
This controls behaviour of the export of product definitions from Magento to OrderFlow.
Enabled: Needs to be set for export of product definitions to take place. If enabled, then any change to a product definition will result in an update being sent to OrderFlow. Additionally, if enabled, an option will be present on the Catalog -> Manage Products grid to manually export to OrderFlow the definitions for selected products.
Include Image Field: Magento can include a product image (or a default image) when exporting a product or products to OrderFlow. This field either enables or disables including an image. Note that if this option is set, then if there is no product image AND no default Magento image specified, the export will fail. If the value is set to Yes, then confirm there is a default Magento image available in System > Configuration > Catalog > Product Image Placeholders, where you can upload a default image.
Cron Expression: controls the frequency of checks for updated products. Each time the cron expression is run, then up to a configured maximum number of new or updated product definitions are sent to OrderFlow. The configured maximum is controlled by the Batch Size.
Order Export
The settings for the export of orders from Magento to OrderFlow are supplied here. Once orders have been invoiced in Magento, they are eligible for export to OrderFlow. Orders can be exported manually, but more typically orders will be exported automatically based on the schedule configuration in this section.
Enabled: Needs to be set for export of orders to take place.
Cron Expression: Controls the frequency of the automatic order export. An order will be exported if it is eligible for exporting, and has not already been exported. It is not necessary to set this too frequently - once every few minutes should be more than adequate.
Batch Size: Determines the maximum number of orders that will be exported each time the schedule runs.
Inventory Import
The inventory import is initiated by OrderFlow to send product inventory quantities to Magento.
For performance reasons, stock updates are not applied immediately. Instead, the requests are queued by the Magento extension, and applied via a Magento cron job.
The settings on this screen control the timing of these schedules, as well as the number of stock updates applied per schedule execution.
Enabled: Needs to be set to allow the import of inventory updates to take place.
Cron Expression: Determines the run frequency of the job to apply stock updates following requests received from OrderFlow.
Batch Size: Determines the maximum number of stock update requests that can be processed each time the inventory import job runs.
Allow Negative Quantities: Determines whether negative inventory quantities can be applied. An inventory level will be negative on OrderFlow for example when orders have been received for a product but there is no stock present for that product. Magento won't allow negative numbers to be applied, so if set to true, the extension will simply convert negative values received from OrderFlow to zero. The value for this field should be set to 'Yes'.
Shipment Import
The shipment import is initiated by OrderFlow when an order is despatched or part despatched, resulting in the creation of a shipment against the order in Magento.
As with the inventory imports, the shipment creation does not take place immediately; the request for shipment creation are queued, and applied when the shipment import schedule job executes.
The settings on this screen controls the execution of this scheduled job.
Enabled: Needs to be 'Yes' for the shipment import to take place.
Cron Expression: Determines the run frequency of the job to create shipments in Magento following the despatch of shipments in OrderFlow.
Batch Size: Determines the maximum number of shipments created in Magento each time the scheduled job runs.
Web Services Configuration
OrderFlow uses the SOAP web services to communicate with the Magento extension. Configuration is required on the Magento side to enable the relevant web services.
A valid enabled Web Services User associated with an applicable Role must be in place for the extension to work. To create a Web Services User, first create an applicable role via System > Web Services > SOAP/XML-RPC - Roles.
By convention, we typically use the name orderflow for the OrderFlow Magento extension Role created in this way.
From the Role Resources submenu, the minimal custom resource access required is for the 'OrderFlow Import' resource, as shown below:

You can then create a User via System > Web Services > SOAP/XML-RPC.
Enter a value for the required fields, and ensure that the account is active.
By convention, we typically use the name orderflow for the OrderFlow Magento extension user created in this way.
Make a note of the API Key for the user, as this will be required when setting the relevant password when configuring OrderFlow.
You will then need to associate the user with the role created above in order to give the user access to the extension resource.
OrderFlow Configuration
There instructions are primarily targeted at the OrderFlow administrator responsible for carrying out the OrderFlow side of the setup for the OrderFlow and Magento integration. For these steps you will need admin privileges on the target OrderFlow instance.
Module Configuration
As OrderFlow is a modular system, you will first need to ensure that the necessary modules are present:
Navigate to the Advanced -> System -> Loaded Modules, and confirm that the following modules are loaded.
rtd2-process
rtd2-integration
rtd2-integration-magento
rtd2-web-integration
If any of these modules are not present, then this will need to be rectified in order to complete the integration. The steps for doing this are outside of the scope of this document.
User Configuration
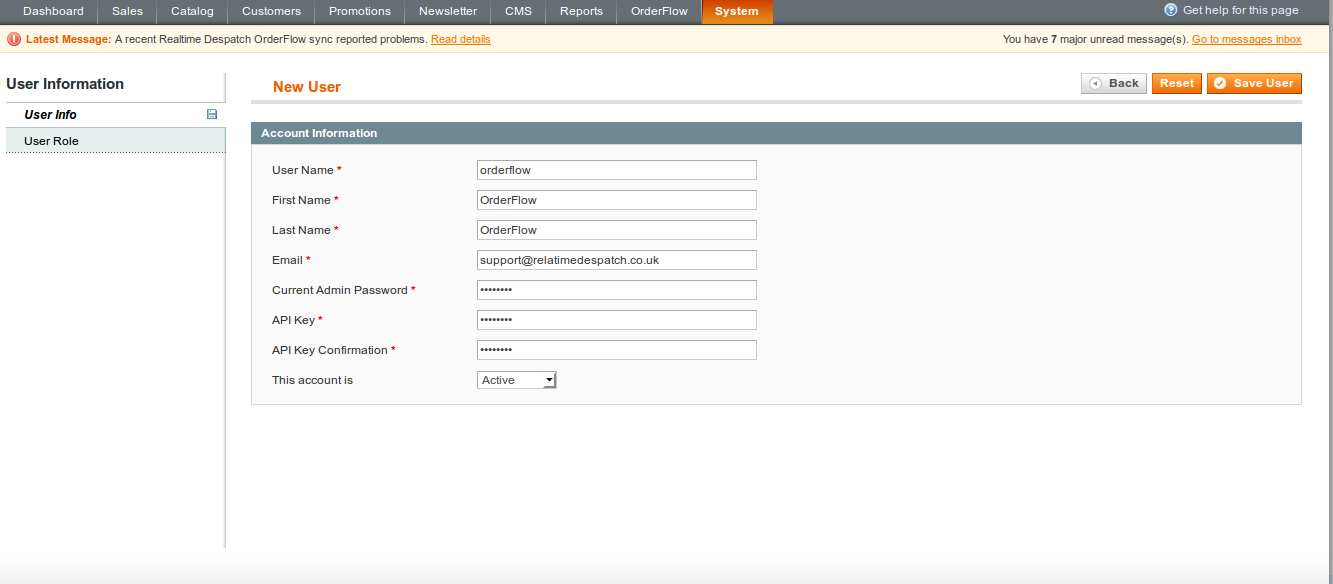
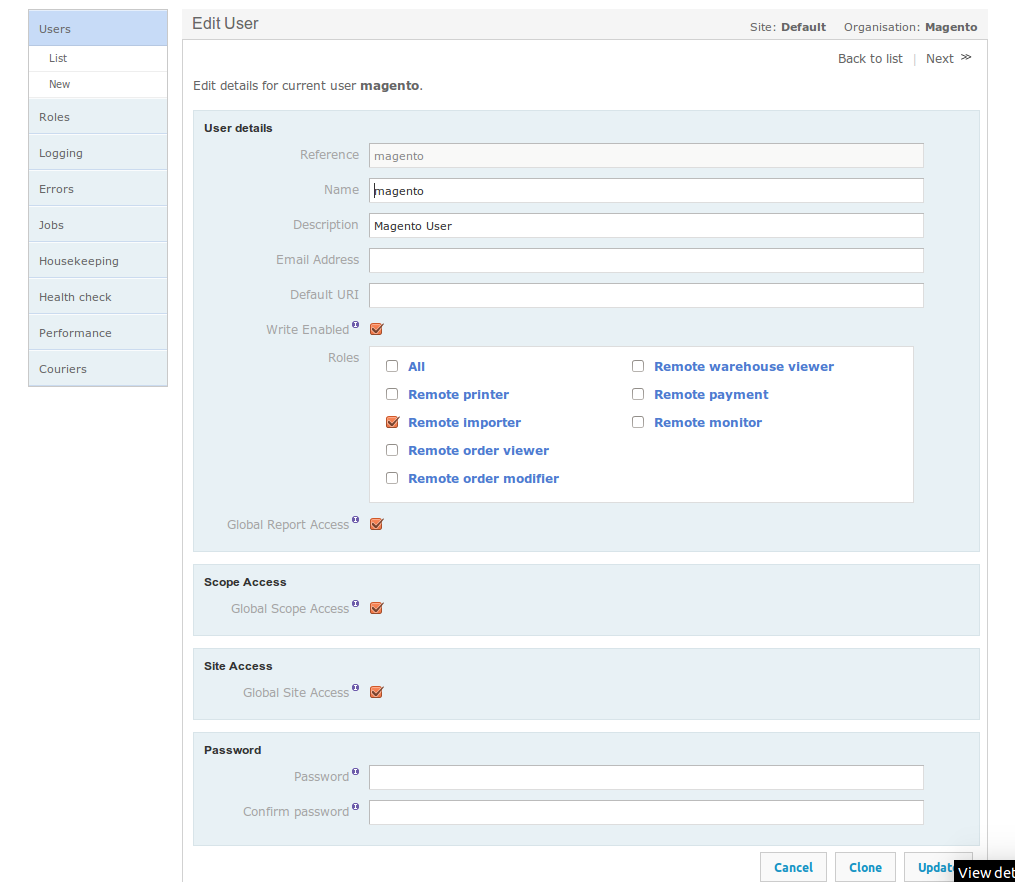
In order to allow Magento to connect with OrderFlow, make sure that there is a user present that corresponds with the user setup in Magento External API Connection configuration.
Note that the user will need:
- access to the /remoteorder/imports/importitems.xml and /remoteorder/imports/importitems.xml resources. This is typically achieved by associating the user with the Remote Importer role.
- access to the organisation and channel required on which the connection is to take place.
Application Properties
The next step in to set up the application properties to correspond with the settings of the Magento installation described in Magento Configuration These include values for the endpoint URL, API user and API Key as described in the Magento Web Services Configuration
General Properties
From Setup -> Properties -> Search in OrderFlow, you will need to check the value for the property inventory.process.based.notification is set to true.
(This property was added for backward compatibility purposes, but with the value set to false, inventory import using the extension will not be possible.)
Magento-specific Properties
From the same menu, do a search, but filter on the group 'Magento API'. This is where the Magento API properties are configured. We are only concerned with the following SOAP properties.
Magento API SOAP base URL: this is the base URL for the Magento API endpoint. In our example, the value used is http://orderflow.magento/. Navigating to this URL should take you to the public facing store (and not the Admin Panel).
Magento API SOAP User: this corresponds with the name of the user set up in the Magento Web Services Configuration.
Magento API SOAP base URL: this corresponds with the API Key for the user set up in the Magento Web Services Configuration.
Note that the properties used may need to be scoped by organisation or channel to align with the channel and organisation used with the specific Magento instance. For single channel or organisation OrderFlow environments, this will not be necessary.
Channel and Organisation Configuration
OrderFlow is a multi-channel and multi-organisation system that allows a single instance of OrderFlow to interface with multiple instances of Magento and other eCommerce platforms.
For a particular integration, the OrderFlow Channel and Organisation through which the specific Magento instance will communicate to OrderFlow will need to be correctly configured.
Give the channel the same name as entered in the Magento configuration e.g. magento. Set the organisation that will own the channel, choose Magento for the Integration API. The Scheduled Handlers Activated and Periodic Reports Activated options should be enabled.
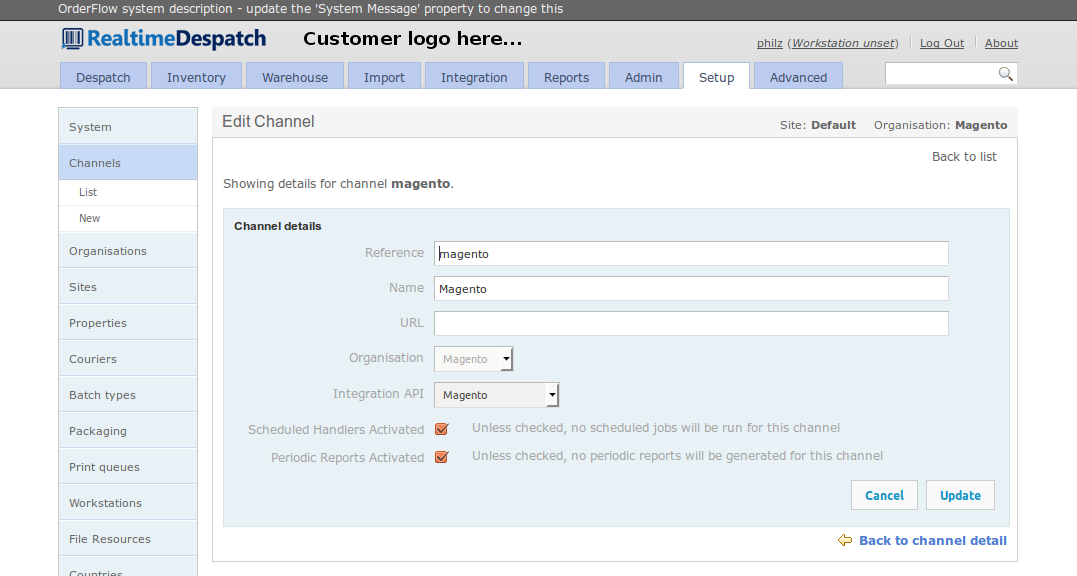
For inventory updates to be posted back via using the Magento channel, the organisation’s Primary Channel should point to the Magento channel.
Event Configuration
To enable shipment despatch notifications from OrderFlow to Magento, use the Advanced > Event menu to navigate to the event definitions screen.
Then select the shipment_despatch event. From there, enable the shipment_despatch_process_listener if it is not already enabled, and disable the shipment_despatch_listener if it is enabled, as shown in the screenshot below.
(The latter event is present for backward compatibility purposes only, and is now deprecated.)
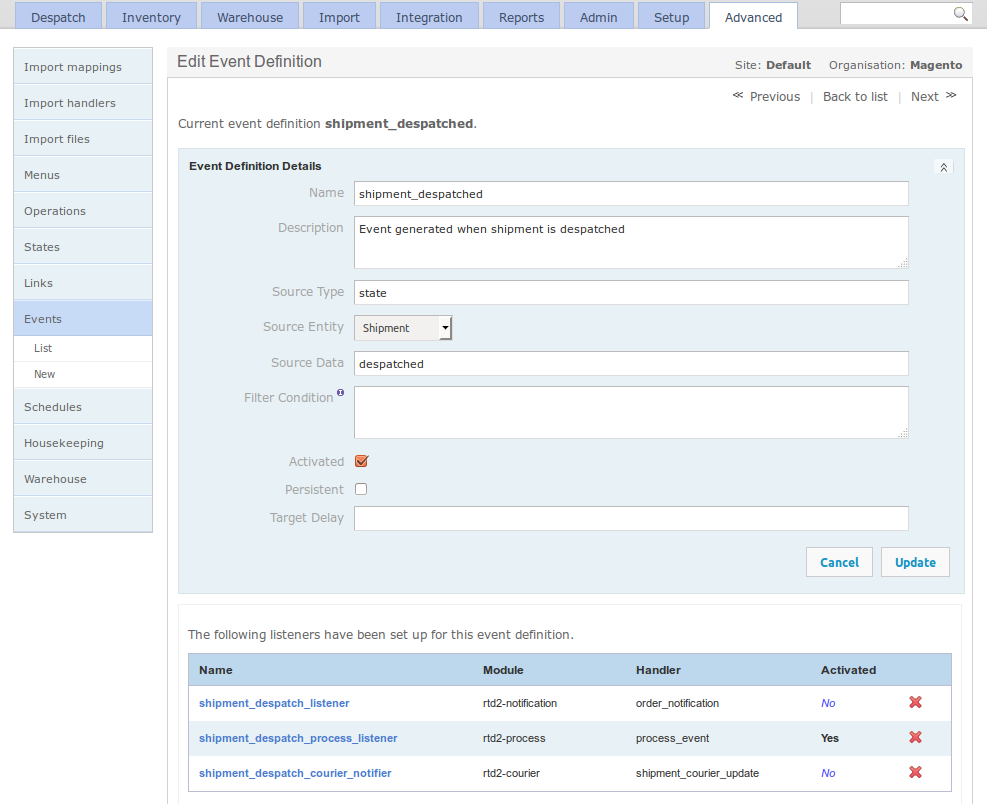
Note: that you might want to turn off any event listener that uses the rtd2-notification module with the order_notification handler, as these will generate errors in the logs.
Remember to refresh the event definitions using the Refresh button at the on the event definitions screen.
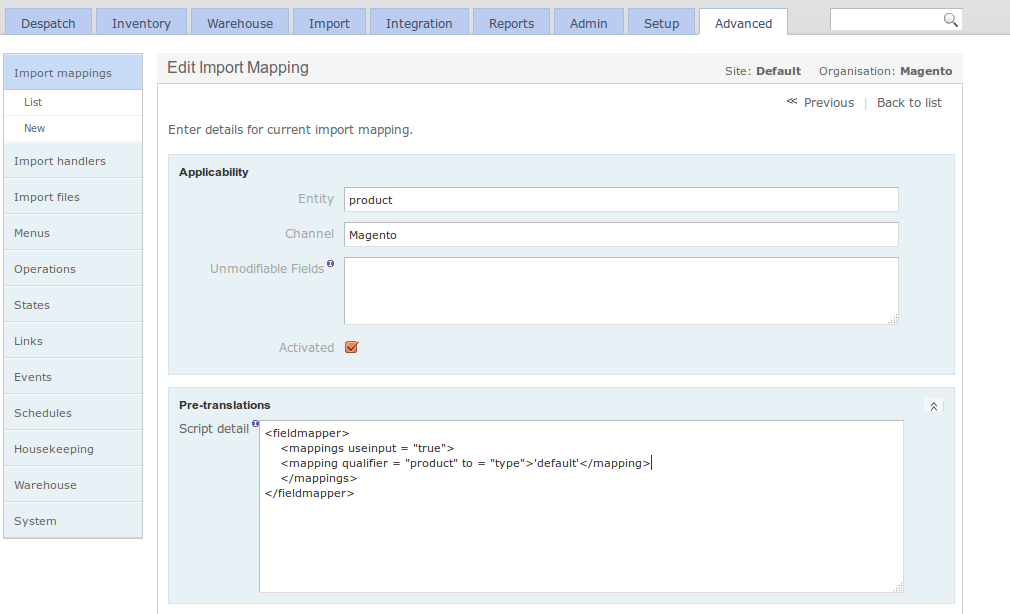
Import Mapping
As Magento does not send a product type when exporting product definitions, you will need to configure the import mapping to handle this. Navigate to Advanced > Import Mappings > List and select the product entry that is associated with the Magento channel. Add the following to the Pre-translations script field, then use the 'Update' button to apply this configuration:
<mapping qualifier = "product" to = "type">'default'</mapping>
If there is no import mapping for the Magento-enabled channel, then you will need to add one. Click on the New new button, set Type to 'Product', set the Organisation or Channel, and enable the Activated field. Then add the following text into Pre-translations, and update the form:
<fieldmapper>
   <mappings useinput = "true">
   <mapping qualifier = "product" to = "type">'default'</mapping>
   </mappings>
</fieldmapper>
An example of this in action is shown below.
Product Export
With the module successfully installed, this section describes how to use the OrderFlow Magento extension.
It describes how the extension functionality can be applied, both manually and automatically. It also describes how the automatic options can be monitored.
The explanations below assume that the module has been enabled, that job scheduling functionality described in Magento Configuration has been turned on.
Product Embellishments
The OrderFlow Magento extension provides an additional section to the product detail area in which OrderFlow-specific information can be added.
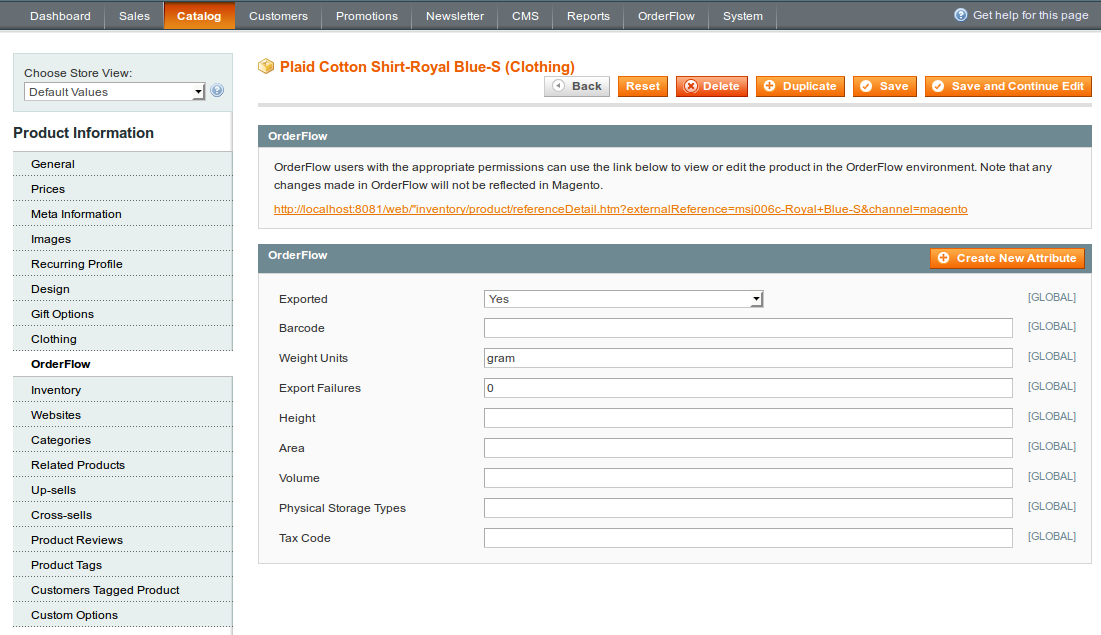
All of these additional attributes for which values have been specified will be included as part of the product export to OrderFlow.
Note also that it is possible to link directly to the OrderFlow product screen once the product has been exported.
Export Types
The module supports three flavours of product export.
implicit: each time a product is updated, an export of the product to OrderFlow is triggered.
manual: the product export can be triggered manually from the catalog product grid.
bulk: a job to trigger the export of the entire product catalog can be triggered through a single action.
We'll go through each of these actions in turn.
With the implicit product export, each time a product is updated, the last update time of the product is modified. This information is used to trigger an update to OrderFlow.
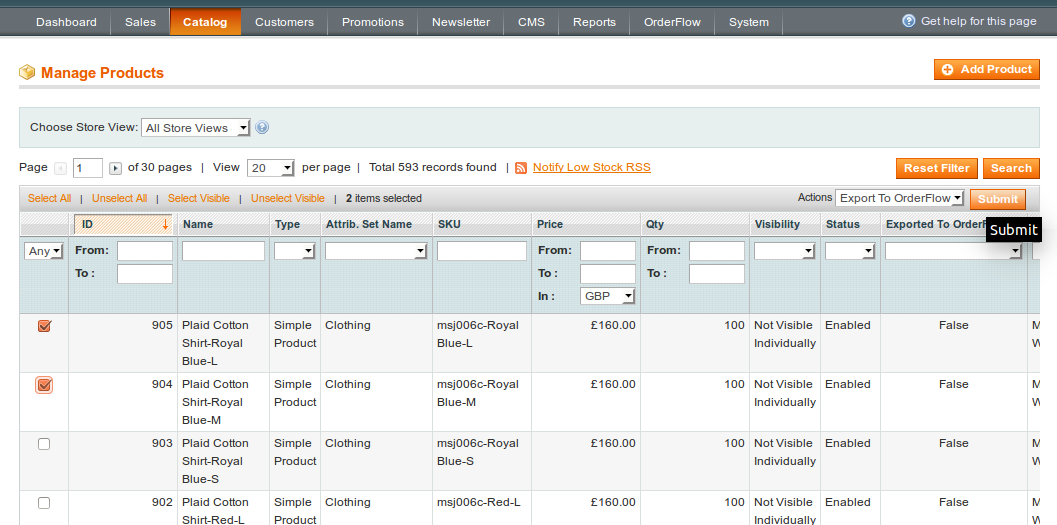
Manual product export can be triggered from the Magento Admin Panel Catalog -> Manage Products grid, using the 'Export to OrderFlow' action, as shown below:
Finally, it is also possible to trigger bulk export of the entire Magento product catalog. Note that this operation may take a long time to complete for large catalogs. However, it is particularly useful operation when loading the product catalog into OrderFlow for the first time.
To perform a full catalog export, use the OrderFlow -> Catalog -> Bulk Export menu.
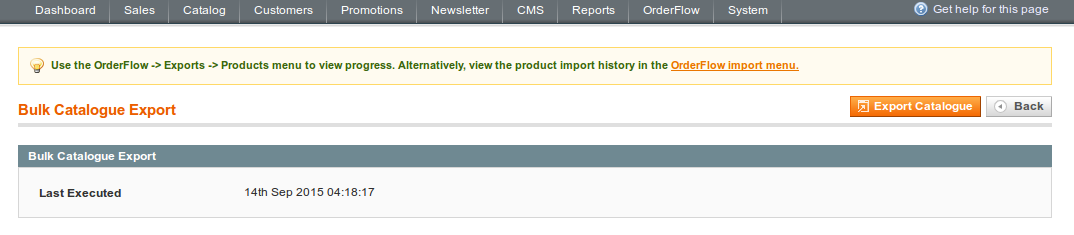
Note that the last catalog export time is shown. Once a catalog export is invoked, jobs will be queued to process the requests according to the OrderFlow Product Export configuration. Viewing the history of the operations that result is described in the section below.
Product Export History - Magento
The history of product exports is available from the OrderFlow -> Exports -> Product menu.
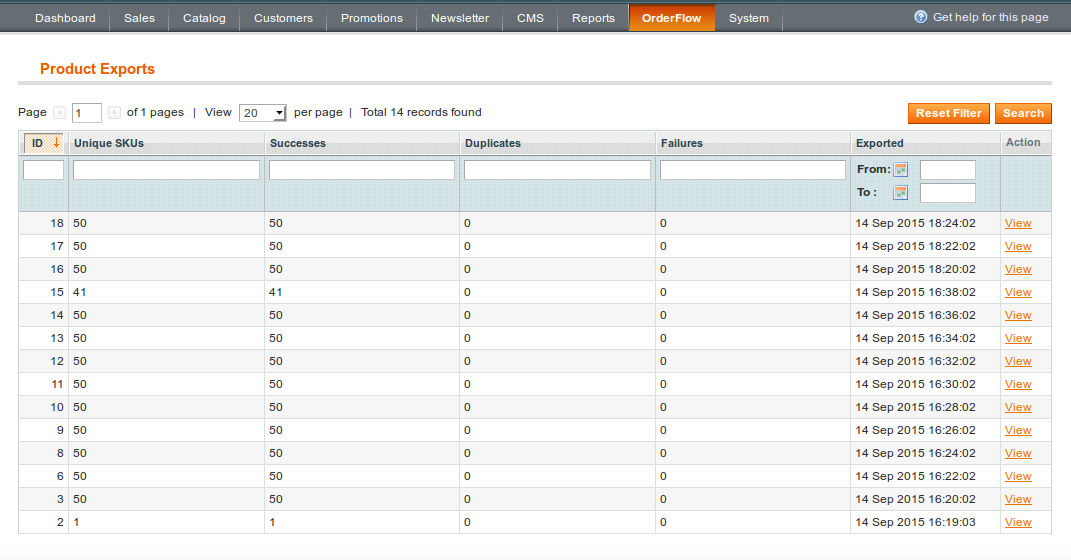
The summary product export admin grid includes a timestamp, the number of unique SKU’s within the batch, the returned responses (Successes, Duplicates, Failures) and the ability to view transactions in detail.
The detail product export form repeats the summary information, lists the exported SKU’s along with response, any message and a timestamp. Depending on log cleaning settings within the configuration the raw requests and response XML is detailed.
Product Import History - OrderFlow
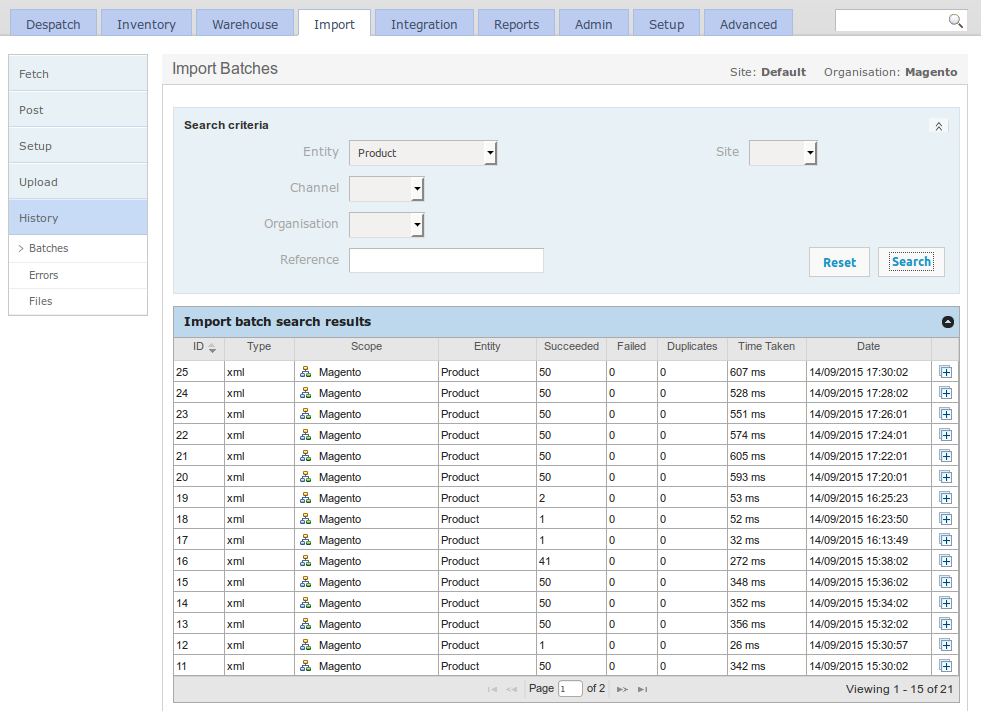
The history of product imports can also be seen in OrderFlow in the Import -> History -> Batches menu, filtered by the Entity 'Product', as shown below:
Testing the Product Export
This section describes a simple end to end step for verifying the connectivity of the module as well as the product export process. It assumes that there are simple product definitions present in the Magento catalog.
From the Magento Admin Panel Catalog > Manage Products menu, select a simple product by clicking on the check box to the left. Select 'Export to OrderFlow' at the top right and click on 'Submit' button. Confirm your choice when presented with a dialogue.
If successful, you will see this message:
Exported 1 product(s) to OrderFlow with 0 failures.
Next, navigate within OrderFlow to the Import > History > Batches menu. The first entry in the list will be the most recent import. Click on it and you should see the Import batch details and below, the message received from Magento. An example message text receipt may look as follows.
<?xml version="1.0" encoding="UTF-8"?>
<imports>
    <import type="product" operation="merge" externalReference="wbk002c-Black-S"
        <![CDATA[externalReference=wbk002c-Black-S
        description=Black Nolita Cami-Black-S
        weight=10
        priceNet=25.89
        sellable=1
        priceGross=25.89
        magentoType=simple]]>
    </import>
</imports>
The OrderFlow Magento extension sends the message in the native OrderFlow API format (as described in https://www.orderflow-wms.co.uk/resources/documentation).
If the product existed in OrderFlow before the message arrived, the product information will have been merged into the existing record. If it did not exist, the new product definition will have been created.
The next step is to find the product in using the OrderFlow product search.
Take a note of the product externalReference, then go to Inventory > Products > Search, and enter the externalReference in the Product Code field. Set the Active dropdown to blank and click on the 'Search' button. You should see the product that has just been imported in the search results list. Click on it to see more information. Selecting the magnifier next to Created will take you to the import record last used to update the import definition.
Note: a product imported into OrderFlow will not necessarily be set to activated by default, it will be inactive until all the conditions defined using the system property product.activation.required.fields are met.
Order Export
The OrderFlow Magento extension supports the export of orders, allowing them to be packed and despatched in the OrderFlow environment.
As with product export, orders are typically configured to be exported to OrderFlow automatically once they become eligible for export. However, orders can also be exported manually, which is particularly useful while still testing the integration.
An example of this in operation is shown below.
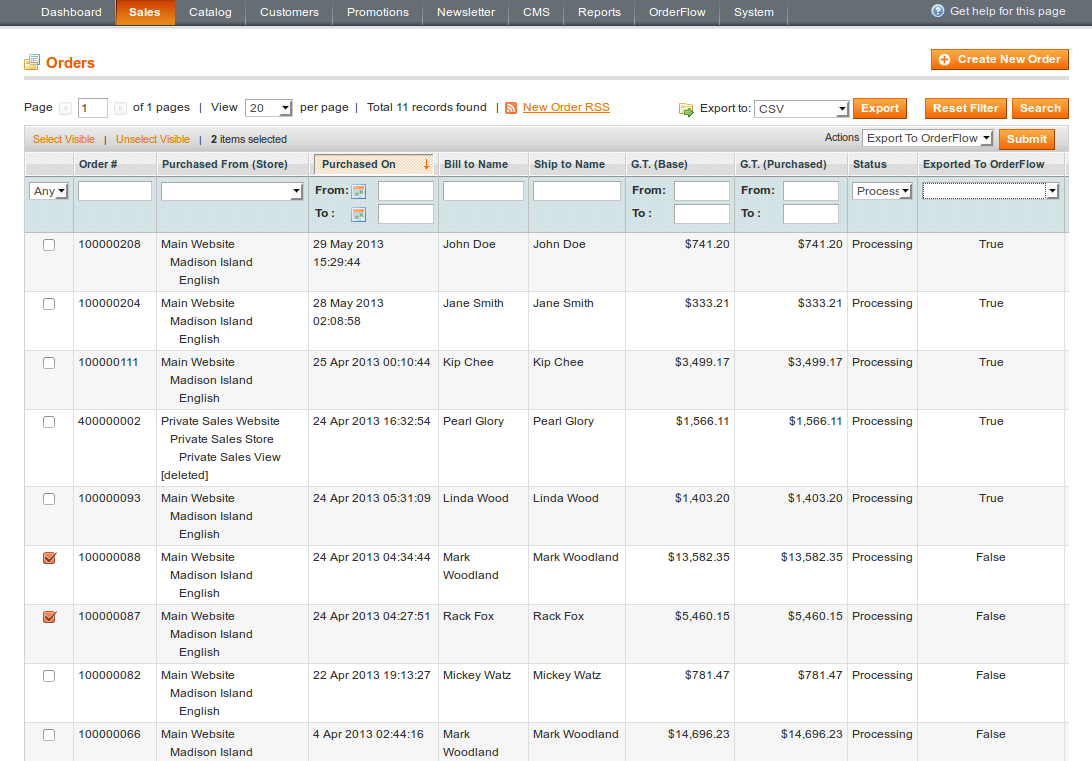
To manually export orders, select orders which are in the state 'Processing'.
Select the 'Export to OrderFlow' Action, then 'Submit'. You should see a message such as the following:
Exported 2 orders(s) to OrderFlow with 0 failures.
Note that only open invoiced orders can be exported in this way.
Orders which are 'Pending' or 'Cancelled' will not be eligible for export, so attempting to export these will return a message such as:
No exportable (invoiced) orders selected.
Order Embellishments
The OrderFlow Magento extension includes an additional section in the order summary, as shown below
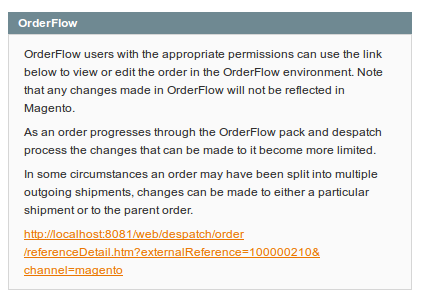
The section includes information on how OrderFlow may be used, and provides a link to the current order in OrderFlow (assuming the order has been exported).
Order Export History - Magento
The history of order exports, including those exported manually and automatically is available from the OrderFlow -> Exports -> Order menu.
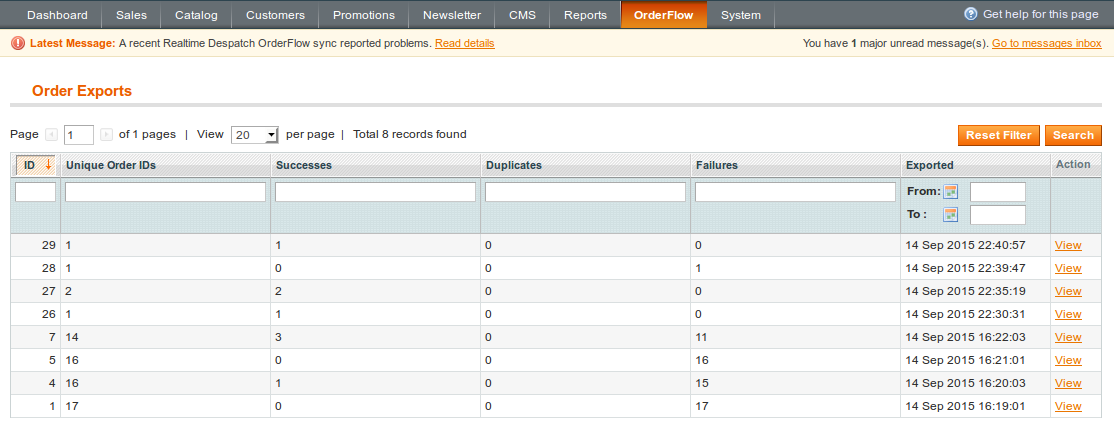
As with the product export screen, the summary order export admin grid includes a timestamp, the returned responses (Successes, Duplicates, Failures) and the ability to view transactions in detail.
The detail order export form repeats the summary information, lists the exported order ID’s along with response, any message and a timestamp. Depending on log cleaning settings within the configuration the raw requests and response XML may be detailed.
Order Import History - OrderFlow
The equivalent history of order imports into OrderFlow can also be seen in OrderFlow in the Import -> History -> Batches menu, filtered by the Entity 'Order', as shown below:
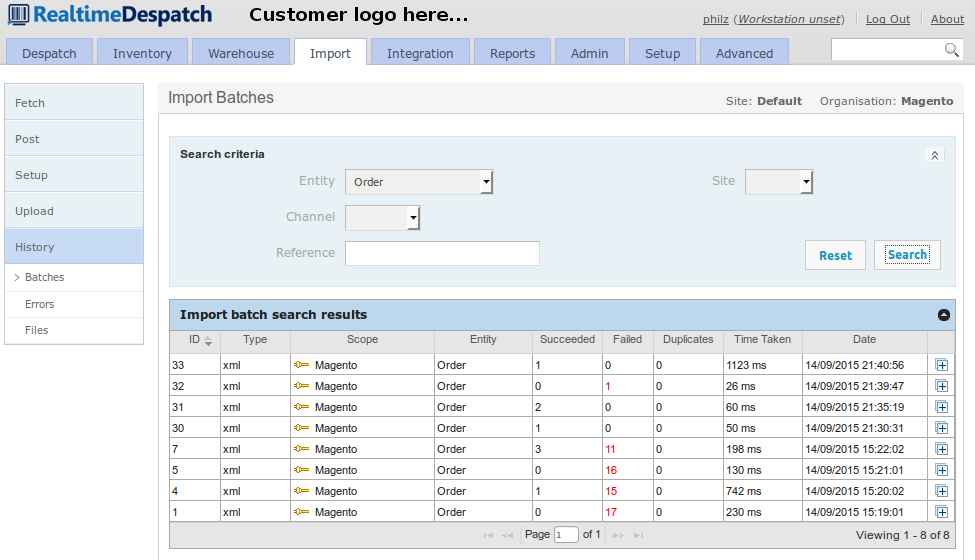
The most recently imported order will also normally appear as the first item in the Order search, reached from the Despatch -> Orders -> Search menu.
Inventory Import
The inventory import operation is a very important part of the OrderFlow Magento integration, particularly as the imported stock quantity is generally used to determine whether or not the product concerned appears as 'in stock' and therefore sellable to the public.
In the current version (1.9.1.1) of Magento, the built-in SOAP web service stock update is limited by the fact that only a single product stock figure can be updated via a single web service call. This limits the ability of OrderFlow to do efficient bulk stock updates, or indeed, to reset the stock levels across the full product catalog where this is necessary.
The inventory import uses a queueing architecture through which many (any number from one to several hundred, for example) product stock levels may be sent from OrderFlow to Magento via a single message. This message is queued for processing.
The interface is robust in allowing for these messages to be delivered out of sequence, while still being able to determine whether a particular update is the most recent available, or whether it should be discarded as a stale update.
As mentioned earlier in this document, the stock updates are initiated by OrderFlow.
The product inventory quantity is calculated as the following:
- the total stock across all locations
- less stock in non-usable locations (damaged, quarantined, etc.)
- less the stock quantity associated with open (unfulfilled) orders received by OrderFlow
Info
As of version 1.0.0.37 of the module, the product inventory calculation can be adjusted to also take into account unsent orders and active quotes on Magento.
Initiating Inventory Import
There are three ways that inventory import into Magento can be triggered. In each case, the action is initiated in OrderFlow.
Single product push: the stock level for an individual product can be 'pushed' or exported from OrderFlow to Magento. This option is not typically used in day to day operations, but is very useful in testing.
Full stock push: the stock levels for all products in OrderFlow can be pushed from OrderFlow to Magento. This option is typically used to reset all of the Magento stock levels, for example, after a stock take.
Incremental stock push: this mechanism involves a stock push for products whose stock level may have changed since the last export took place, so is very efficient in its use of system resources. In almost all environments this process will be automated.
Single Stock Push
The best way to understand how OrderFlow and the Magento extension work together to do stock updates is to work through a single stock push example.
Start by navigating to a test product, which we can do through the Inventory -> Inventory -> Search menu.
The following screenshot shows the listing for one of the out of stock products.
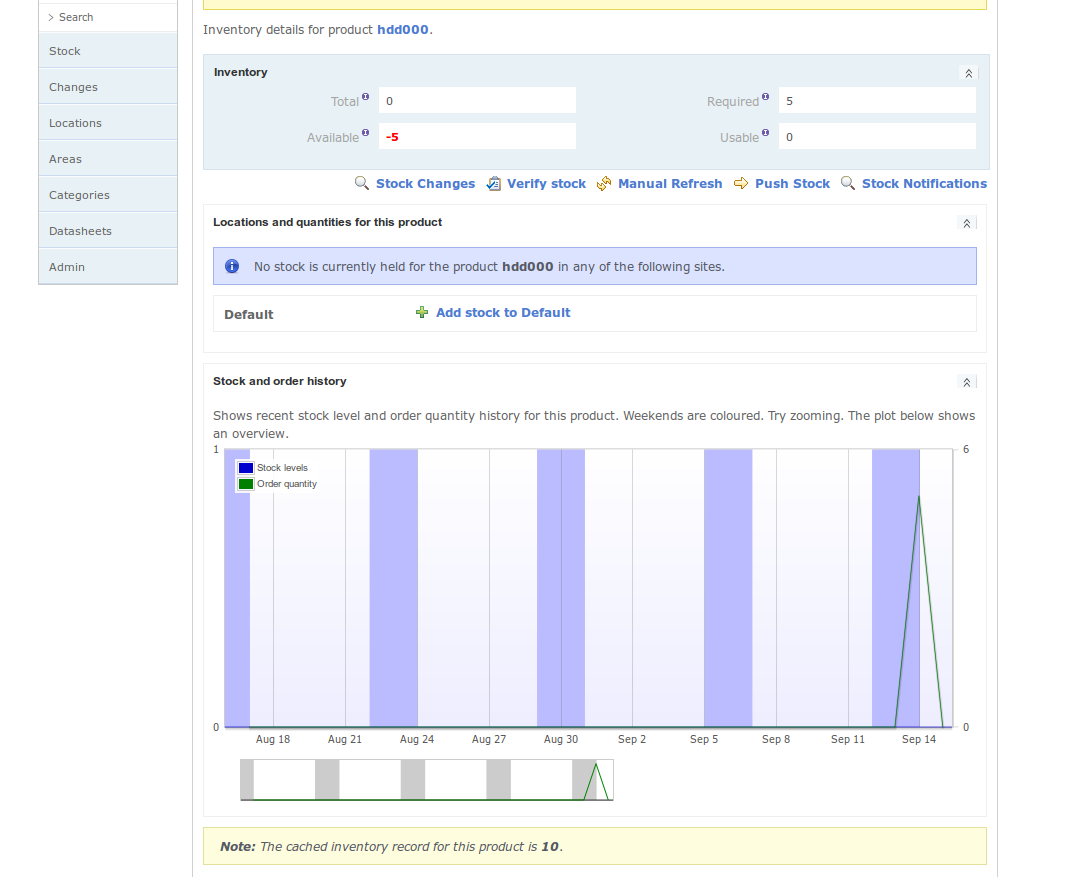
Note the cached inventory record for this product, which here shows as 10.
A single stock push can be invoked using the Push Stock link, followed by the Confirm button.
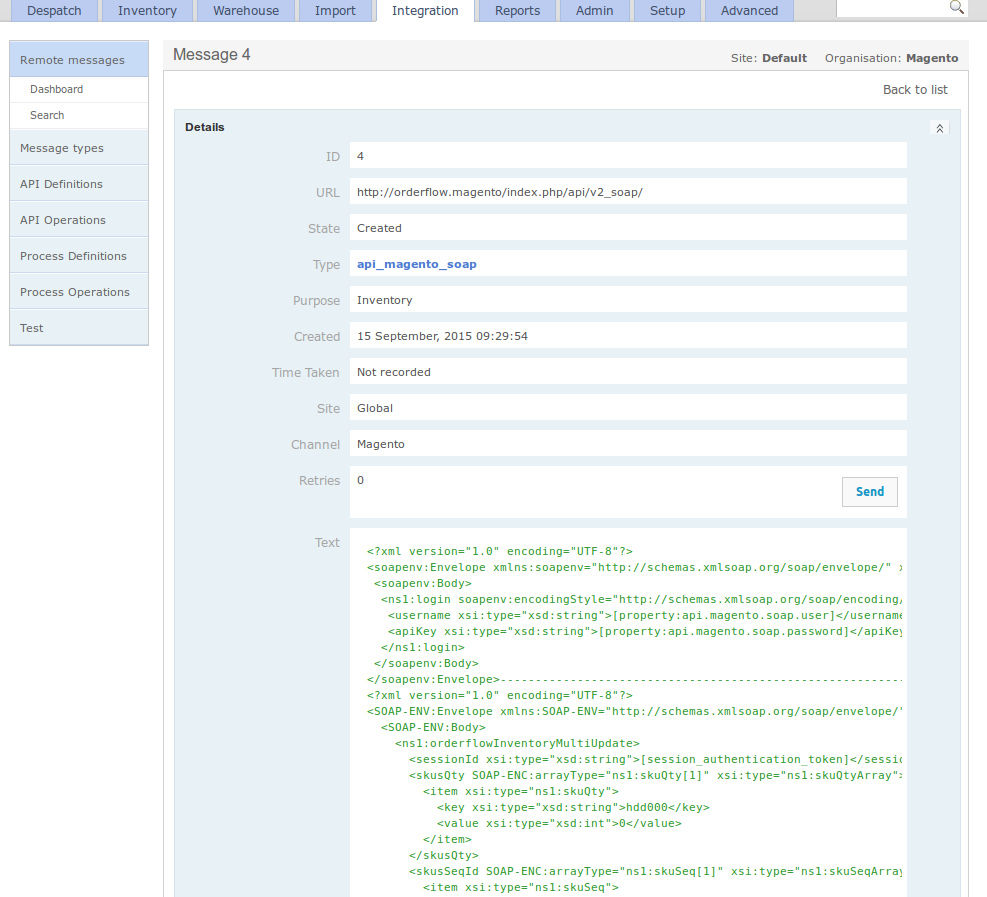
On the OrderFlow side, this operation results in an outgoing message being queued, which can be found using the Integration -> Remote Messages -> Search menu.
Drilling into the detail of the most recently created record, the following queued message displays:
Note that OrderFlow is now configured to automatically send negative availability figures as zero.
Normally, sending of these messages will be automated. Additionally, the Send button can be used to manually push through the message to Magento.
Clicking on the Send button should result in the Response field being populated with text such as the following:
<?xml version="1.0" encoding="UTF-8"?>
<SOAP-ENV:Envelope xmlns:SOAP-ENV="http://schemas.xmlsoap.org/soap/envelope/"
   xmlns:ns1="urn:Magento" xmlns:xsd="http://www.w3.org/2001/XMLSchema"
   xmlns:xsi="http://www.w3.org/2001/XMLSchema-instance"
   xmlns:SOAP-ENC="http://schemas.xmlsoap.org/soap/encoding/"
   SOAP-ENV:encodingStyle="http://schemas.xmlsoap.org/soap/encoding/">
   <SOAP-ENV:Body>
      <ns1:orderflowInventoryMultiUpdateResponse>
         <result xsi:type="xsd:string">Success - Message 4 Received</result>
      </ns1:orderflowInventoryMultiUpdateResponse>
   </SOAP-ENV:Body>
</SOAP-ENV:Envelope>
Note that the above response has indicated that message 4 has been received. This message can be found immediately on the Magento Admin Panel using the OrderFlow -> Requests menu, as shown below.
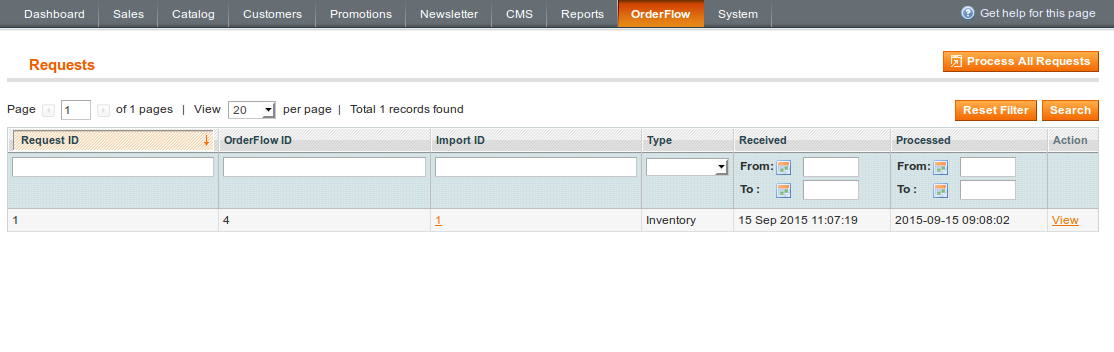
Each row in the grid shows the following:
Request ID: a numerical counter, simply an internal identifier within the extension for that record.
OrderFlow ID: this is the ID for the message that was received from OrderFlow, once again with the value of 4.
Import ID: the ID of the import record that gets created within the Magento extension.
Note that the import record above is not created instantaneously on receipt of the message. Instead it is queued for creation through a scheduled job. Before the request has been processed, no import record will have been created, and the value for the column will be 'Pending'.
The detail of the request shows the same information as above, but also shows the XML received from OrderFlow.
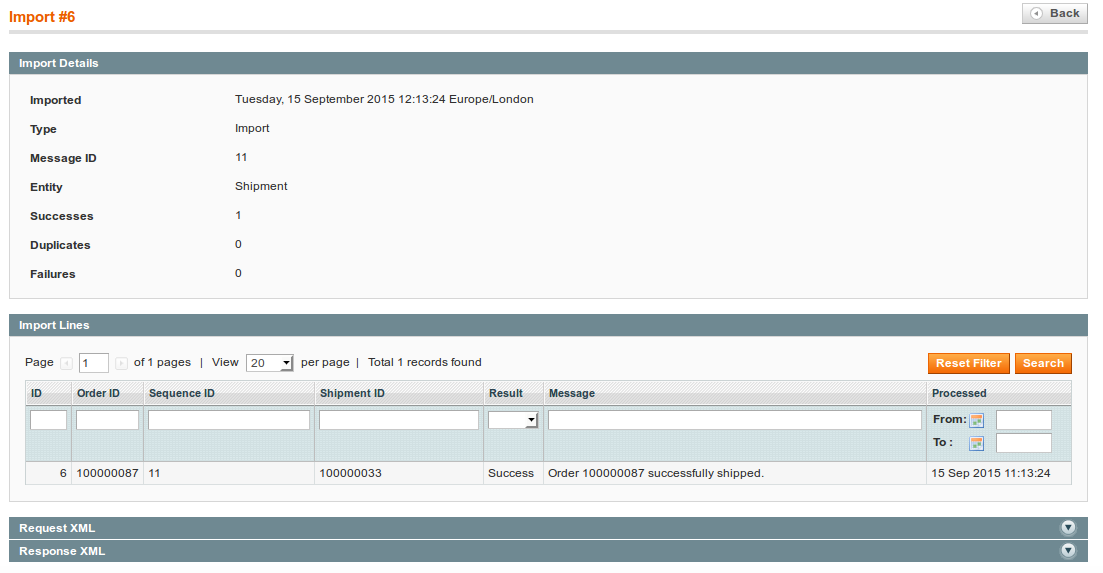
It is also possible to follow a Import ID link once the message has been processed. This leads to a screen such as the following.
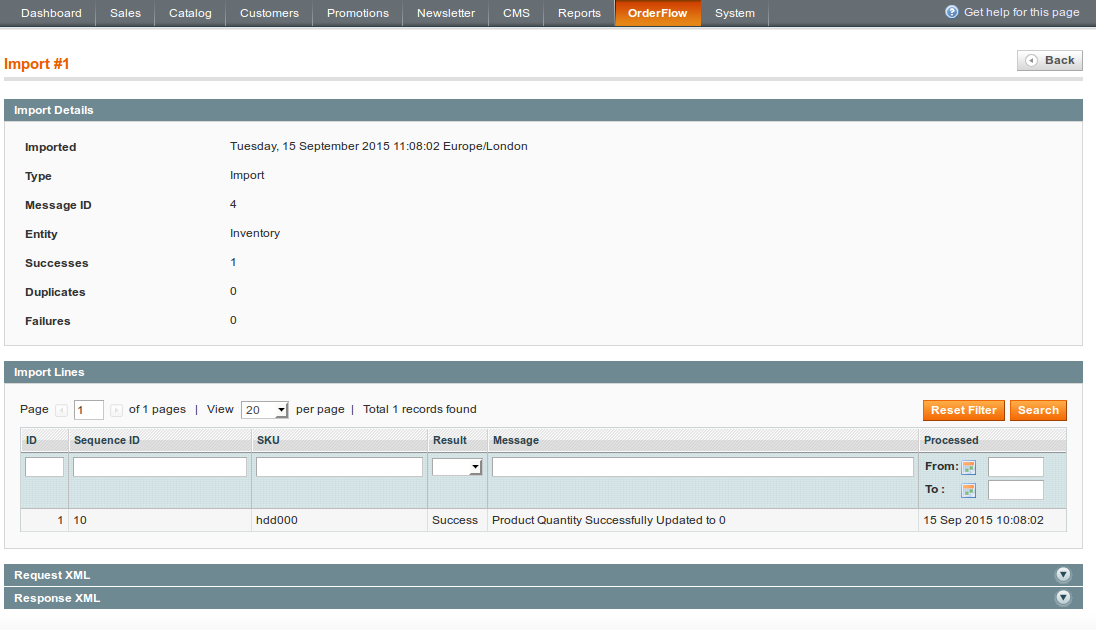
On this screen, we can see the outcome of import processing. Specifically, the screen informs us that the stock quantity of the SKU hdd000 has been set to zero.
Note the Sequence ID column. This displays the value of OrderFlow product inventory record ID at the point when the inventory notification is created. This field is used to ensure that stale updates are not applied, as described in the Handling Inventory Duplicates section.
Full Stock Push
A full stock push can be initiated to send similar stock updates to the ones applied above for all of the products known to OrderFlow.
To initiate a full stock push, navigate in OrderFlow to Inventory -> Admin -> Inventory, as shown below:
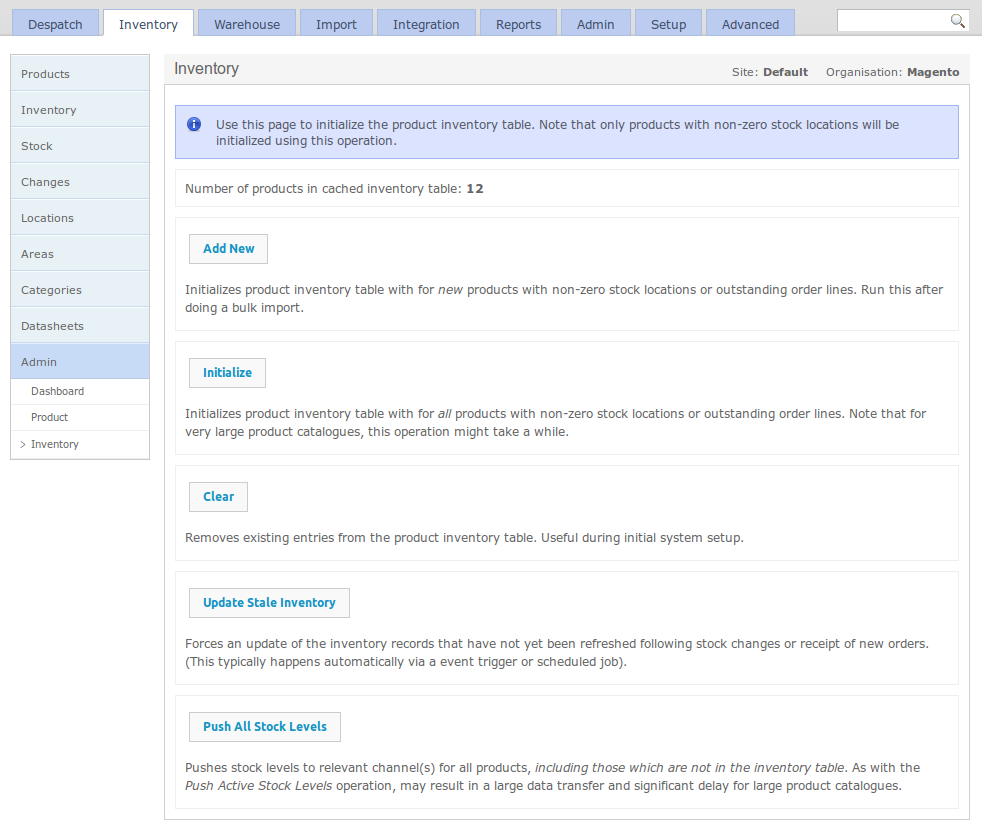
The Push All Stock Levels button can be used to initiate a product inventory export for all products. The stock push will be divided into multiple separate messages, with the maximum number of products sent per message set according to the system property inventory.notification.chunk.size. A sensible value for this property would be about 100 to 200.
Once invoked, the messages created would be queued in OrderFlow, then sent automatically to Magento. On Magento, the messages will be queued for processing as described in the previous section, and processed automatically. The Batch Size property in the Magento extension's Inventory Import configuration will control how many messages can be processed each time the inventory import job runs.
Note
In general a full stock push should not be necessary. Unless the inventory is reinitialised using the Initialize button, most of the stock updates will be discarded as duplicates. How this happens will be explained in more detail in the Handling Inventory Duplicates section below.
Initialize button will recalculate the inventory level for all of the products on the system.
Incremental Stock Push
The manual stock push operations are only useful in exceptional circumstances. Ordinarily, inventory notifications are automatically send through an incremental export process.
Each time a stock change is made, or a new order is received, or an order is cancelled, OrderFlow will automatically recalculate the inventory for each of the affected products, creating a new inventory record for each product.
Another process on OrderFlow checks for all inventory records created since the last inventory notification took place, and creates a new inventory notification for each of these.
This process results in a continual stream of near real time inventory updates for products whose stock positions may have changed.
Handling Inventory Duplicates
The OrderFlow Magento integration has been designed to deal with the consequences of real world situations that may occur in any enterprise computing environment; network outages may result in stock updates being received out of sequence, and even duplicates of the same message being received.
In the stock notification message, as well as sending a stock value, OrderFlow also sends the current inventory record ID as a product sequence number associated with the the update, as shown below:
<?xml version="1.0" encoding="UTF-8"?>
<SOAP-ENV:Envelope xmlns:SOAP-ENV="http://schemas.xmlsoap.org/soap/envelope/"
   xmlns:ns1="urn:Magento" xmlns:xsd="http://www.w3.org/2001/XMLSchema"
   xmlns:xsi="http://www.w3.org/2001/XMLSchema-instance"
   xmlns:SOAP-ENC="http://schemas.xmlsoap.org/soap/encoding/"
   SOAP-ENV:encodingStyle="http://schemas.xmlsoap.org/soap/encoding/">
   <SOAP-ENV:Body>
      <ns1:orderflowInventoryMultiUpdate>
         <sessionId xsi:type="xsd:string">[session_authentication_token]</sessionId>
         <skusQty SOAP-ENC:arrayType="ns1:skuQty[1]" xsi:type="ns1:skuQtyArray">
            <item xsi:type="ns1:skuQty">
               <key xsi:type="xsd:string">hdd000</key>
               <value xsi:type="xsd:int">0</value>
            </item>
         </skusQty>
         <skusSeqId SOAP-ENC:arrayType="ns1:skuSeq[1]" xsi:type="ns1:skuSeqArray">
            <item xsi:type="ns1:skuSeq">
               <key xsi:type="xsd:string">hdd000</key>
               <value xsi:type="xsd:int">10</value>
            </item>
         </skusSeqId>
         <messageSeqId xsi:type="xsd:int">4</messageSeqId>
      </ns1:orderflowInventoryMultiUpdate>
   </SOAP-ENV:Body>
</SOAP-ENV:Envelope>
The extension ensures that for each of the stock updates received, the system does not overwrite a more recently created stock record with one that is older, that is, a stale record.
If a stale update is received and processed, the extension will detect this and log an Imports -> Inventory entry such as the following:

The extension will also detect messages that have been previously received and processed. In this case, the occurrence will be logged for auditing purposes, but no further processing will be attempted.
Unsent Orders and Active Quotes
The stock available figure sent to Magento from OrderFlow takes into account the orders that it has received at the point where the stock figure is calculated.
However, there are three sources of lag which may result in the reported figure that is updated in Magento overstating the actual available figure:
- there is a delay in OrderFlow between the time that the 'most recent' order is received in OrderFlow and the time that the available figure is calculated.
- there is a delay in OrderFlow between the time the available figure is calculated and the time that it is sent to Magento.
- there is a delay in Magento between the time the available figure is sent to Magento and the time it is processed on Magento.
During the lag period, the following may have happened:
- new orders may have been taken for the sku concerned, but not yet sent to OrderFlow.
- new orders may have been added to cart, but not yet completed on Magento.
The OrderFlow Magento integration includes a feature which allows for these scenarios to be taken into account.
Note
This feature is only available on OrderFlow 3.6.9 and Magento Module version 1.0.0.37 onwards.
Magento Configuration
The following screenshot shows the inventory import configuration in Magento.
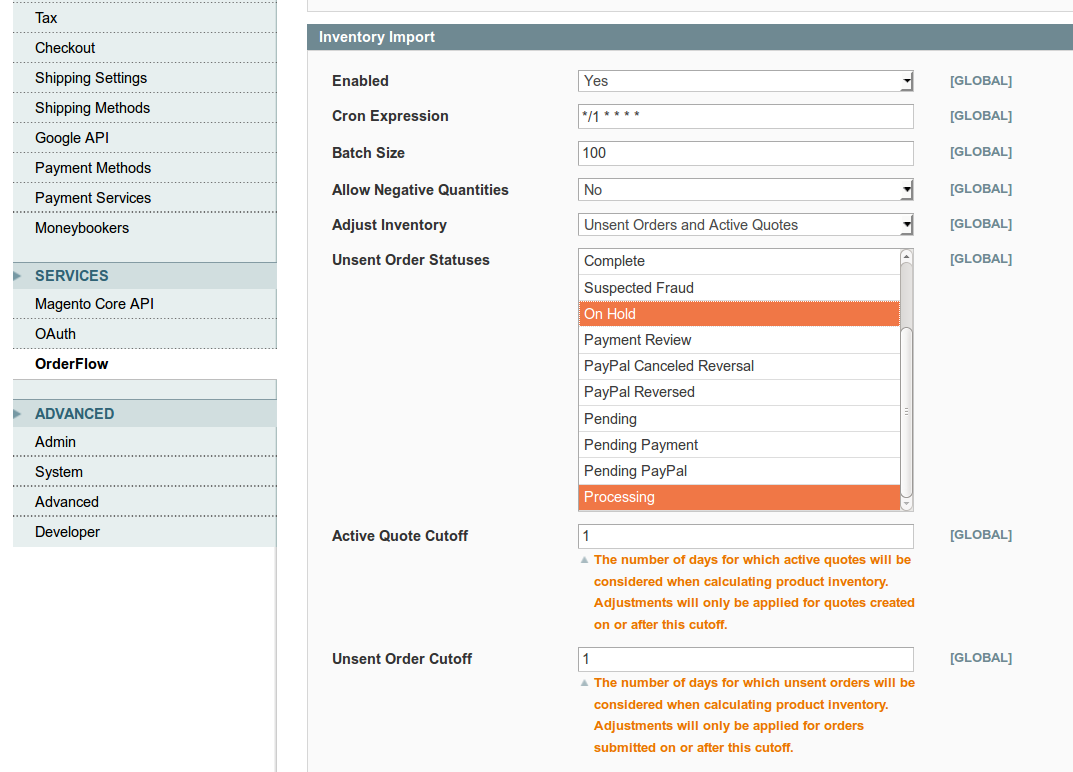
The Adjust Inventory control allows you to determine whether to allow inventory to be adjusted based on unsent orders, unsent orders and active quotes, or not at all. The options for this are:
- No: no inventory adjustment is made based on unsent orders and/or active quotes. This is the backward compatible setting, and is the default option.
- Unsent orders: the Magento module takes into account orders that have been submitted since the date of the last order used in calculating the inventory level in OrderFlow.
- Unsent orders and active quotes: the Magento module takens into account not only unsent orders, but active quotes that have not yet been confirmed as orders. Note that a quote is created when a user adds items into their 'shopping cart'.
The remaining configuration options set on the screen above.
- Unsent Order Statuses: determines the status of orders that will be considered as unsent. For example, orders for which the payment was unable to complete may be excluded from the list of orders that would be used to adjust the inventory for a product.
- Active Quote Cutoff: the maximum age for active quotes that might be used to adjust the inventory. This is useful to ensure that old or stale quotes don't artificially depress the adjusted product inventory. This value is set to 1 by default.s
- Unsent Order Cutoff: the maximum age for unsent orders that might be used to adjust the inventory. This allows exclusion from the inventory adjustment old orders that for whatever reason have not have been passed through to OrderFlow.
Shipment Import
Once the job of fulfilling an order has been completed, then OrderFlow needs to inform Magento that this has happened. This serves two purposes.
- to allow the order to be closed off, so that it no longer appears as requiring fulfilment.
- to pass back additional information that may be used for notifying customers of despatch, such as courier details and tracking references.
The shipment import on Magento is triggered at the point where the shipment is marked as picked and packed. Of course, the process of allocating stock, picking and packing will need to take place, but these operations are outside of the scope of this document.
There are a number of ways of marking a shipment as despatched on OrderFlow.
- from the shipment detail screen, using the Despatch button. This allows a single shipment to be marked as despatched.
- from the shipment search screen. This is only possible if configured correctly, and if the search has been limited to 'Packed' shipments. This option allows multiple shipments to be despatched manually.
- manually, using the Despatch -> Bulk Operations -> Despatch menu. This allows all packed shipments to be despatched by courier via single operation.
- automatically via a scheduled job, either at specific time intervals or after a configurable delay.
In the example below, we will navigate to a shipment that has been packed, and despatch it using the Despatch button below:
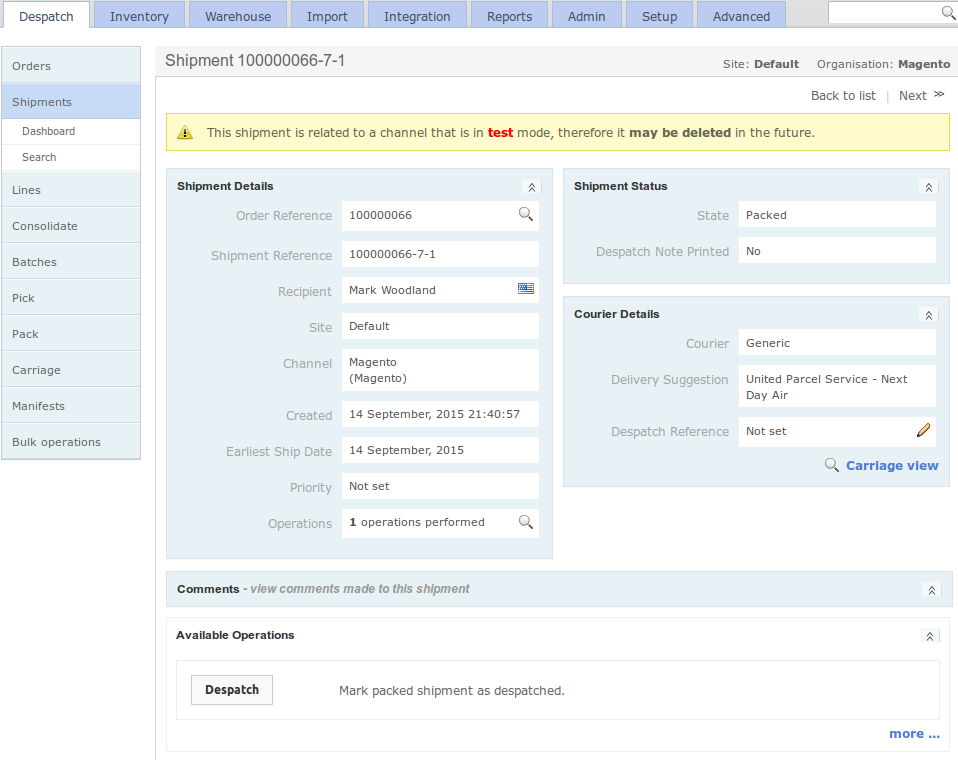
Once invoked, the outcome is similar to that of the Inventory Import, in that a new message is queued for sending, and will appear listed in the Integration -> Remote Messages -> Search menu.
The specific records will be easily found by applying the additional filters for Category ('API Integration') and Purpose ('Shipment despatched'). Once sent, the shipment will appear on the listing as shown below:

The body of the shipment despatch message contains details of the shipment despatch, the courier used, and the tracking number, if apppropriate.
It also contains a listing of the individual product and quantity combinations that have been included in the shipment.
This allows the extension to support partial fulfilments. If only a part of the initial order has been fulfilled, a shipment will be created for the order in Magento but the order will be kept open for further fulfilment updates.
   <?xml version="1.0" encoding="UTF-8"?>
   <SOAP-ENV:Envelope
      xmlns:SOAP-ENV="http://schemas.xmlsoap.org/soap/envelope/"
      xmlns:ns1="urn:Magento" xmlns:xsd="http://www.w3.org/2001/XMLSchema"
      xmlns:xsi="http://www.w3.org/2001/XMLSchema-instance"
      xmlns:SOAP-ENC="http://schemas.xmlsoap.org/soap/encoding/"
      SOAP-ENV:encodingStyle="http://schemas.xmlsoap.org/soap/encoding/">
      <SOAP-ENV:Body>
         <ns1:orderflowShipmentCreate>
            <sessionId xsi:type="xsd:string">[session_authentication_token]
            </sessionId>
            <orderIncrementId xsi:type="xsd:string">100000087
            </orderIncrementId>
            <skuQty SOAP-ENC:arrayType="ns1:skuQty[1]" xsi:type="ns1:skuQtyArray">
               <item xsi:type="ns1:skuQty">
                  <key xsi:type="xsd:string">aws006</key>
                  <value xsi:type="xsd:int">4</value>
               </item>
               <item xsi:type="ns1:skuQty">
                  <key xsi:type="xsd:string">hde001</key>
                  <value xsi:type="xsd:int">6</value>
               </item>
               <item xsi:type="ns1:skuQty">
                  <key xsi:type="xsd:string">hdd000</key>
                  <value xsi:type="xsd:int">5</value>
               </item>
            </skuQty>
            <comment xsi:type="xsd:string">Shipment Created</comment>
            <email xsi:type="xsd:int">1</email>
            <includeComment xsi:type="xsd:int">1</includeComment>
            <courierName xsi:type="xsd:string">Generic</courierName>
            <serviceName xsi:type="xsd:string"></serviceName>
            <trackingNumber xsi:type="xsd:string"></trackingNumber>
            <dateShipped xsi:type="xsd:date">2015-09-15 11:12:39</dateShipped>
            <messageSeqId xsi:type="xsd:int">[message_id]</messageSeqId>
         </ns1:orderflowShipmentCreate>
      </SOAP-ENV:Body>
   </SOAP-ENV:Envelope>
As soon as the notification request has been sent to Magento, it will be visible in the Magento Admin Panel under the OrderFlow -> Requests menu, as shown below.
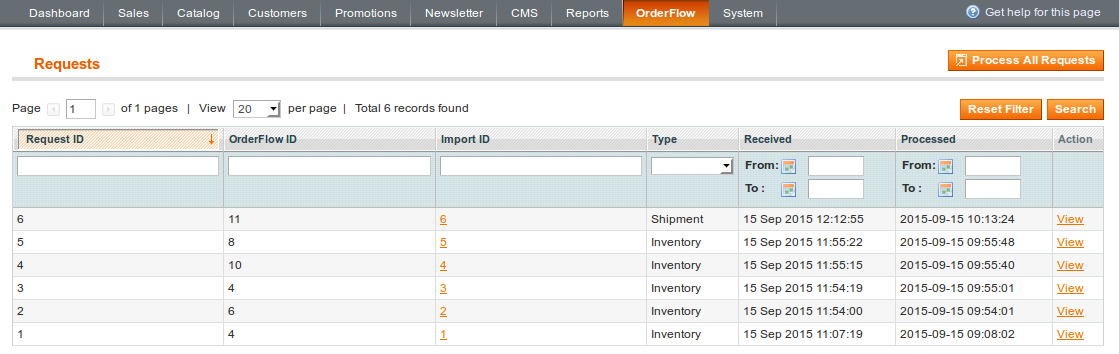
Again, as with the inventory import, the Import ID field is not populated immediately, but is only set once the request has been processed. The timing of this will depend on the configuration settings for the Shipment Import, as described in the Magento Configuration section.
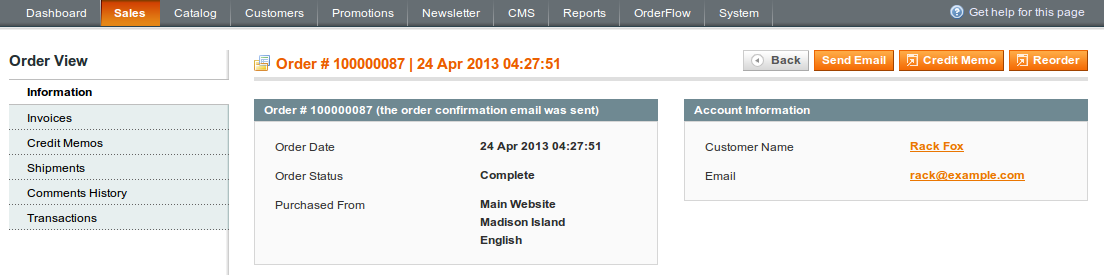
Once Import ID link is available, navigating to this will show the details of the import, which will confirm, as shown below that the shipment has been created.
From the previous screen it is possible to navigate to the both the Magento Admin Panel order and the shipment detail screen, which give more details on the current status of the order. If no more items need to be fulfilled, the expected behaviour at this point is for the order to be marked as complete.
Mappings and Advanced Configuration
The purpose of this chapter is to document the built-in mappings as well as the steps for adding custom mappings from Magento to OrderFlow.
Built-In Mappings
The purpose of the OrderFlow Magento extension mappings is to identify specific values of properties within the Magento environment and map them to their equivalents in Orderflow. The next sections describe the key built-in mappings that exist in the Magento Orderflow module.
Product Export
The list below are mappings identified from the OrderFlow Magento module class SixBySix_RealTimeDespatch_Model_Catalog_Product,
found in the file app/code/community/SixBySix/RealTimeDespatch/Model/Catalog/Product.php, or in the built-in Magento class Mage_Catalog_Model_Product.
Also included is the Magento API expression, which gives an indication of the code used in the Magento API to extract the field name specified.
| Orderflow Field Name | Magento API expression | Description |
|---|---|---|
| category | getCategory()->getName() | Product category. |
| currency | Mage::app()->getStore()->getCurrentCurrencyCode() | Returns the product's current currency code. |
| externalReference | getSku() | Retrieves ku throught ype instance. |
| description | getName() | Product description. |
| imageReference | getSmallImageUrl() | Product image URL,for displaying product images. |
| magentoType | getTypeId() | Product type identifier. |
| sellable | isSalable() | Whether the product is available for sale. |
| priceGross | Mage::helper('tax')->getPrice($this,$this->getFinalPrice(),true) | Returns the gross product price, including tax. |
| priceNet | Mage::helper('tax')->getPrice($this,$this->getFinalPrice()) | Returns the net product price, excluding tax. |
| tax | getGrossPrice()-getNetPrice() | The tax on the product. |
| weight | getWeight() | Retrieve weight throught type instance. |
The following built-in mappings are based on named product attributes attributes.
| Orderflow Field Name | Description |
|---|---|
| barcode | The barcode for the product. |
| length | |
| width | |
| height | |
| area | |
| volume | |
| weightUnits | Optional weight units for the product weight. Normally either 'gram' or 'kilogram'. |
| taxCode | The tax code for the product. |
Order Export
The built-in order import mappings include mappings to order, shipment and order line entities in OrderFlow, and are based on the following entry in app/code/community/SixBySix/RealTimeDespatch/etc/config.xml.
As with the product mappings, the order mappings are based on the extension class SixBySix_RealTimeDespatch_Model_Sales_Order, found in
app/code/community/SixBySix/RealTimeDespatch/Model/Sales/Order.php, which in turns extends Mage_Sales_Model_Order.
<order>
   <IncrementId>externalReference</IncrementId>
   <OrderCurrencyCode>currency</OrderCurrencyCode>
   <OrderCurrencyUnits>currencyUnits</OrderCurrencyUnits>
   <CustomerNote>customerComment</CustomerNote>
   <CouponCode>promotionCode</CouponCode>
   <DiscountDescription>promotionDescription</DiscountDescription>
   <Subtotal>goodsPriceNet</Subtotal>
   <SubtotalInclTax>goodsPriceGross</SubtotalInclTax>
   <GoodsTaxAmount>goodsTax</GoodsTaxAmount>
   <GoodsTaxCode>goodsTaxCode</GoodsTaxCode>
   <ShippingAmount>shippingPriceNet</ShippingAmount>
   <ShippingInclTax>shippingPriceGross</ShippingInclTax>
   <ShippingTaxAmount>shippingTax</ShippingTaxAmount>
   <ShippingTaxCode>shippingTaxCode</ShippingTaxCode>
   <PaymentMethodTitle>paymentGatewayIdentifier</PaymentMethodTitle>
   <NetTotal>totalPriceNet</NetTotal>
   <GrandTotal>totalPriceGross</GrandTotal>
   <TaxAmount>totalTax</TaxAmount>
   <TotalTaxCode>taxCode</TotalTaxCode>
</order>
<order_shipment>
   <CustomerNote>deliveryInstruction</CustomerNote>
   <ShippingMethod>deliverySuggestionCode</ShippingMethod>
   <ShippingDescription>deliverySuggestionName</ShippingDescription>
</order_shipment>
<delivery_address>
   <Street1>addressLine1</Street1>
   <Street2>addressLine2</Street2>
   <Street3>addressLine3</Street3>
   <Street4>addressLine4</Street4>
   <City>addressLine5</City>
   <Region>addressLine6</Region>
   <Postcode>postCode</Postcode>
   <Company>companyName</Company>
   <Name>contactName</Name>
   <CountryId>countryCode</CountryId>
   <Telephone>dayPhoneNumber</Telephone>
   <Email>emailAddress</Email>
   <EveningTelephone>eveningPhoneNumber</EveningTelephone>
   <Fax>fax</Fax>
   <MobileTelephone>mobilePhoneNumber</MobileTelephone>
</delivery_address>
<billing_address>
   <Street1>addressLine1</Street1>
   <Street2>addressLine2</Street2>
   <Street3>addressLine3</Street3>
   <Street4>addressLine4</Street4>
   <City>addressLine5</City>
   <Region>addressLine6</Region>
   <Postcode>postCode</Postcode>
   <Company>companyName</Company>
   <Name>contactName</Name>
   <CountryId>countryCode</CountryId>
   <Telephone>dayPhoneNumber</Telephone>
   <Email>emailAddress</Email>
   <EveningTelephone>eveningPhoneNumber</EveningTelephone>
   <Fax>fax</Fax>
   <MobileTelephone>mobilePhoneNumber</MobileTelephone>
</billing_address>
<order_item>
   <Name>description</Name>
   <QtyOrdered>quantity</QtyOrdered>
   <RowTotal>totalPriceNet</RowTotal>
   <TaxAmount>totalTax</TaxAmount>
   <RowTotalInclTax>totalPriceGross</RowTotalInclTax>
   <TotalTaxCode>totalTaxCode</TotalTaxCode>
   <Price>unitPriceNet</Price>
   <UnitTaxAmount>unitTax</UnitTaxAmount>
   <PriceInclTax>unitPriceGross</PriceInclTax>
   <TaxCode>unitTaxCode</TaxCode>
</order_item>
Custom Mappings Setup
The following section describes how to add custom order and product mappings to the Magento environment.
In line with Magento best practices, the technique involves the following elements:
- define a custom module, which overrides the OrderFlow extension module
- create a configuration, defining any custom mappings
- provided overridden model classes if necessary for the custom mappings
An example of a custom mapping module may have the following structure:
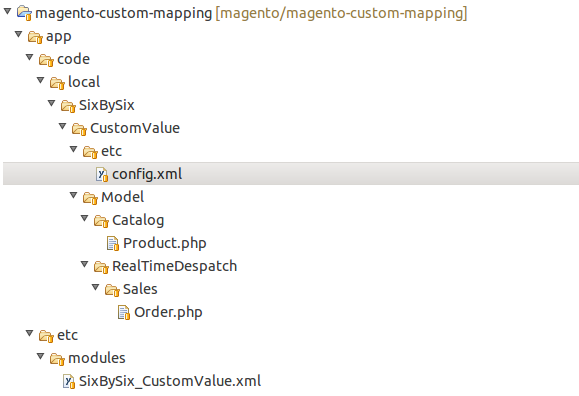
Note that we use a new module to apply mapping changes, as this minimises the likelihood of conflicts, and allows in most cases for future upgrades to the OrderFlow Magento extension without requiring additional changes to apply the custom mappings.
Custom Module Definition
An example custom mapping module definition is shown below.
<?xml version="1.0"?>
<config>
    <modules>
        <SixBySix_CustomValue>
            <active>true</active>
            <codePool>local</codePool>
            <depends><SixBySix_RealTimeDespatch/></depends>
        </SixBySix_CustomValue>
    </modules>
</config>
In the example above, the custom value module extends the SixBySix_RealTimeDespatch module, which is the OrderFlow extension module.
Mapping Configuration
Next, we need to create a configuration file for the module, found in this example in app/code/local/SixBySix/CustomValue/etc/config.xml.
<?xml version="1.0"?>
<config>
    <modules>
        <SixBySix_CustomValue>
            <version>0.0.0.1</version>
        </SixBySix_CustomValue>
    </modules>
    <global>
        <models>
            <customvalue>
                <class>SixBySix_CustomValue_Model</class>
            </customvalue>
            <catalog>
                <rewrite>
                    <product>SixBySix_CustomValue_Model_Catalog_Product</product>
                </rewrite>
            </catalog>
            <sales>
                <rewrite>
                    <order>SixBySix_CustomValue_Model_RealTimeDespatch_Sales_Order</order>
                </rewrite>
            </sales>
        </models>
    </global>
    <rtd_mappings>
        <product>
            <export>
                <CustomValue>customValue</CustomValue>
            </export>
        </product>
        <order>
            <CustomField>customOrderField</CustomField>
            <OrderCreateDate>createDateValue</OrderCreateDate>
        </order>
    </rtd_mappings>
</config>
Note in this example that we need to provide rewrite rules replace the order and product model classes with ones that apply our custom mappings. These are covered next.
Custom Mapping Classes
The custom mapping classes created need to extend the classes provided in the OrderFlow Magento extension.
Having added the custom mapping to the config.xml file, you will need to implement the methods that the methods to which the mapping applies.
This is shown clearly in the example product and order model classes below.
Product Model
<?php

/**
 * Custom Valued Product Model.
 */
class SixBySix_CustomValue_Model_Catalog_Product extends SixBySix_RealTimeDespatch_Model_Catalog_Product
{
    /**
     * Returns a custom value.
     *
     * This could be a call to a helper, service, additional business logic etc.
     *
     * @return string
     */
    public function getCustomValue()
    {
        return $this->getDescription();
    }
}
Order Model
class SixBySix_CustomValue_Model_RealTimeDespatch_Sales_Order extends SixBySix_RealTimeDespatch_Model_Sales_Order {

   /**
    * Returns a custom value.
    *
    * This could be a call to a helper, service, additional business logic etc.
    *
    * @return string
    */
   public function getCustomField()
   {
      return 'custom order field value';
   }


   /** Example to retrieve the order create date
    *
    * @return string
    */

   public function getOrderCreateDate()
   {
      return $this->getCreatedAtDate();
   }

}
Applying the Changes
You will then simply need to copy the files into the appropriate location in the Magento web root directory, then flush the Magento cache.