Custom Reports
Custom Reports
OrderFlow includes a set of built-in reports which cover typical management information requirements. However, because the system can be used in so many different ways, needing to cover such a disparate range of requirements, an extended custom reporting facility is essential.
Custom reports can only be created by users with the appropriate administrator access to the system.
These reports can be created in a variety of formats. The most common formats are CSV (Comma-Separated Values) and XLS (Microsoft Excel spreadsheets). These serve the needs for users who are looking to extract unformatted or raw data from the system.
For printable custom reports that need to be generated with pixel-perfect accuracy, OrderFlow uses Jasper Reports, the leading open-source reporting technology. Typical examples of these kinds of reports are barcode label generation reports, despatch notes and picking reports.
Custom vs Built-in Reports
It is helpful to explain exactly what is meant by a custom report, and its cousin, the built-in report:
Built-in Reports
Built-in reports are reports which are provided with the software. They are actually delivered in files included as part of the OrderFlow build.
Built-in reports are supported in the sense that they will be kept up to date with changes to OrderFlow report. For example, if an OrderFlow database table's column is renamed, then built-in reports which use this column will be changed accordingly.
Built-in reports are developed within the OrderFlow codebase and regression tested with every new OrderFlow release. If a built-in report does not work as it should, the problem will be treated as a bug and the work required to fix it will not be chargeable.
Built-in reports cannot be modified directly. However, these reports can be overridden. By overriding a built-in report, the report administrator effectively creates a custom report with the intention of reusing some elements of the built-in report, but modifying other elements. For example, if the administrator wants to slightly change the report display, but retain the report data source, this can be achieved by overriding a built-in report.
Note that once a built-in report has been overridden, it effectively becomes a custom report.
Custom Reports
Custom reports are reports which are added to the operating environment. They are in fact installed in the OrderFlow database. Note that custom reports are not supported in the same way as built-in reports.
In general, OrderFlow developers will try to allow for any negative impact that system upgrades may have on custom reports, and will, where possible, apply changes automatically to custom reports to accommodate these changes.
However, no guarantee can be provided that custom reports will never be broken by a system change. In our example of a column change above, custom reports, which rely on the old column name, will no longer work after the column change unless they are manually modified.
Custom reports can be developed by the OrderFlow support team or by any OrderFlow user with the necessary privileges. They are not regression tested against new OrderFlow releases - bug fixes and change requests will be charged on a time and materials basis. Custom reports should always be tested in the OrderFlow staging environment before new OrderFlow releases are used in a live environment.
Custom Data Reports
The most common custom reports are data reports which are aimed simply at extracting data from the system for subsequent analysis and manipulation. These reports are also the simplest reports in that they do not involve any complex presentation; the output tends to be simple tabular formats such as CSV or XLS.
Conceptually, any report involves two elements: a data source or query, which is used to extract the relevant data, and a design, which is used to render the report in the relevant format.
Report authors need to have the following knowledge:
- familiarity using SQL
- an understanding of the OrderFlow application, and knowledge of the relevant tables in the OrderFlow database schema
- for CSV-based reports, knowledge of how to use the [FreeMarker(http://freemarker.org/) templating engine, which can be easily acquired from the FreeMarker web site.
Data Sources
OrderFlow supports the use of a variety of data sources. The most commonly used are based on Structured Query Language (SQL), allowing report administrators to design reports which safely query data directly from the OrderFlow database.
An example of an SQL statement is shown below:
SELECT
    p.externalReference AS 'product',
    p.description AS 'description',
    s.externalReference AS 'site',
    o.externalReference AS 'organisation',
    l.externalReference AS 'location',
    lt.externalReference AS 'locationtype',
    lt.damaged AS 'damagedLocation',
    sc.id AS 'id',
    sc.type AS 'adjustment_type',
    sc.newQuantity AS 'new_quantity',
    sc.previousQuantity AS 'previous_quantity',
    sc.changeQuantity AS 'change_quantity',
    sc.user AS 'user',
    sc.created AS 'timestamp',
    sc.note AS 'comment'
FROM stock_change sc
JOIN product p ON p.id = sc.productId
JOIN organisation o ON o.id = p.organisationId
JOIN location l ON l.id = sc.locationId
JOIN location_type lt ON lt.id = l.logicalTypeId
JOIN site s ON s.id = l.siteId
WHERE
    (1=1)
AND
    (sc.type in ('positive_adjustment','negative_adjustment')
    OR
    (sc.type in ('move_in','move_out') and lt.damaged = true))
AND p.deleted = FALSE
#[organisations:p]
ORDER BY sc.id
The example above is used to query changes. Of course, familiarity with the OrderFlow database schema is also necessary for writing non-trivial reports.
Parameters
Reports can have parameters to restrict the data to be returned. Typical parameters include those for the site, channel or organisation(s) for which the data should apply. It is also very common to restrict the report parameters by date range.
In the example below, the parameters from_date and to_date are used to restrict a data by date range.
The parameters used in this way need to be declared in the report's Parameter Source field.
For more details on how this is done, see the Report Configuration GUI section.
An example parameter declaration is shown below:
organisation_id:Organisation,from_date:From date:required:datetime, to_date:To date:required:datetime,productReference:Product Reference:optional:string
The example above supports a required organisation, from date and to date parameters, and an optional product reference parameter.
More detail on the use of date parameters are contained in the Date Parameters section.
The parameters are used directly in the SQL of custom reports, as is shown in the example below.
SELECT externalReference from order_item o
WHERE
date(o.completed) >= ${from_date}
AND
date(o.completed) <= ${to_date}
Note that three parameter values are very commonly used in multi-channel and multi-site environments:
channel_id: used to filter report data by channelorganisation_id: used to filter report data by organisationsite_id: used to filter report data by site
Note that parameters can be required or optional. When using optional parameters, it is often useful to inclusion of the parts of the SQL conditional on whether a value has been supplied for the parameter.
In the example below, the clause p.externalReference = ? will only be added to the SQL if a value is supplied
for the productReference parameter.
#[include:productReference]p.externalReference = ${productReference}#[include]
Note that in the above example, the ${productReference} segment is translated into SQL that uses bound parameters,
which can be beneficial for query performance. In the example above, the SQL used after preprocessing would be
p.externalReference = ? . At times, it is more convenient just to insert the parameter literal.
This can be done using the literal: prefix.
In the example below, if the value SKU123 is supplied for the parameter productReference, then the SQL segment
#[include:productReference]p.externalReference like '%${literal:productReference}%'#[include]
would be translated into p.externalReference like '%SKU123%' before being executed.
Parameter Format and Types
Parameters are defined in reports using the following format:
Identifier:Name:required or optional:type:Default value
| Name | Example | Description |
|---|---|---|
| Identifier | productReference |
The identifier which is used in the report, typically as a parameter in the SQL itself. |
| Name | Product Reference |
The human readable name for the parameter, which appears as the name of the parameter when parameter values need to be captured on the report launching screen. |
| Required or option | required |
If present, must be either required or optional. |
| Type | string |
The type of the parameter. |
| Default Value | 123 |
The default value for the parameter is none is supplied by the user. |
Note that of the above values, the required or optional and the type values can be determined implicitly:
- if no
requiredoroptionalvalue is set, then the parameter is assumed to be optional. - if no type is set, the type is assumed to be
string.
| Type | Usage |
|---|---|
| string | Free text entry values |
| password | Password entry values |
| integer | Standard integer values |
| date | Dates without time component |
| datetime | Dates with time component |
| boolean | Simple true or false |
| double | Double-precision floating point (decimal) values |
| float | Single-precision floating point (decimal) values |
| long | Long integer values |
Reserved Parameter Conventions
The following are reserved parameters that define a convention that should be followed.
Note that these parameters conventions should be closely observed for reports that are to be used as a basis for periodic reports.
| Name | Title | Usage |
|---|---|---|
channel_id |
Channel, Used to filter data by channel. Used in channel scoped periodic reports. | |
organisation_id |
Organisation, Used to filter data by organisation. Used in organisation scoped periodic reports. | |
site_id |
Site, Used to filter data by site. Used in site scoped periodic reports. | |
from_date |
From Date, "Used to define the starting point for date-based filters. Suitable for daily, weekly and monthly periodic reports. | |
to_date |
From Date, "Used to define the end point for date-based filters. Suitable for daily, weekly and monthly periodic reports. | |
from_datetime |
From Date, "Used to define the starting point for date-based filters. Suitable for hourly, daily, weekly and monthly periodic reports. | |
to_datetime |
From Date, "Used to define the end point for date-based filters. Suitable for hourly, daily, weekly and monthly periodic reports. |
Date Parameters
The main thing to understand about the semantics of date parameters is the use of the to date or timestamp.
- for date parameters, the from and to are both inclusive. So if the to date is 31/01/2016, then the report data should include all data that is on that date, regardless of what time of day this occurred.
- for date time parameters, the from date is inclusive but the to date is exclusive. So if you want to include all data on 31/01/2016, the to date will need to be defined up to midnight on 01/02/2016.
Date Parameters
SQL
The inclusive to date is captured in the SQL by a combination of the use of the date() function and the <= sign in before the ${to_date}.
date(datefield) >= ${from_date} and
date(datefield) <= ${to_date}
Parameters
Note that the date parameter is of type date.
from_date:From date:required:date, to_date:To date:required:date
Date Time Parameters
SQL
The exclusive to datetime is captured using a < sign. There is no need for any function to be applied to the compared field value.
Note that datetime parameters are only suitable for date fields in which the values are captured as date times (with the date and time element in the stored data).
datefield >= ${from_datetime} and
datefield < ${to_datetime}
Parameters
Note the use of the datetime type, which prompts for time element be captured as input when running a report with this parameter.
from_datetime:From date:required:datetime, to_datetime:To date:required:datetime
Drop Down Parameters
On occasions it is necessary for the selectable parameter values to be from a pre-configured list. This is possible from OrderFlow versions 4.0.8.1 and later.
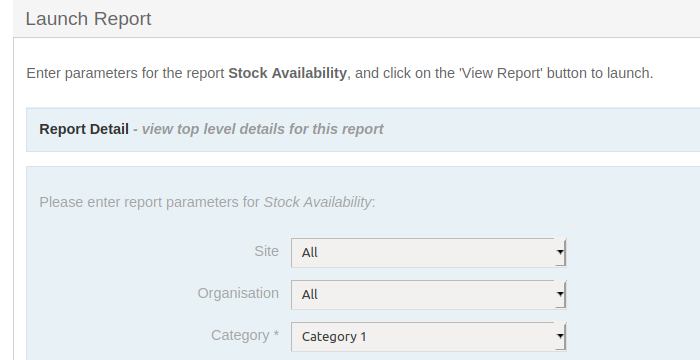
The setup of these categories is done as below:
site_id:Site, organisation_id:Organisation, include_unavailable_products:Include unavailable products:optional:boolean, category:Category:required:string:(cat1=Category 1|cat2=Category 2)
Note that in the example above, the operator will need to set a category parameter, and either the value 'cat1' or 'cat2' will be passed to the report query.
This mechanism is a simple way to restrict the parameter choices available to a user. However, it does require each parameter choice to be preset in the report configuration.
In the next section, we show how to support pre-selectable options that are themselves determined from a report, which will be useful in more dynamic environment.
Report-backed Parameters
It is possible to have parameters set up on OrderFlow that themselves use reports to specify default values.
For example, for areas, a report named 'area_options' may be used. In this case, an example report parameter will take the form:
organisation_id:Organisation:required,site_id:Site:required, area_id:Area:required:integer:null: 'area_options'
Note that the null value in this case indicates no default value.
It is worth bearing in mind that if the report-back parameter is required, then any other parameter that specifies the scope of the report (specifically site_id, organisation_id or channel_id)
will also need to be set as mandatory. In this case, the scope-defining parameter values will need to be selected before the report-backed options are presented to the user.
All of this is necessary because the report-backed options typically depend on the current report scope. For example, the selected areas will need to depend on the the selected site for the report.
Report 'Hardening'
It is sometimes required to 'harden' a report so that it does not expose data relating to organisations, channels or sites to which the user does not have access, for obvious reasons.
This is achieved by adding particular directives to a report's SQL data source. The directives each take the following form:
#[<*entity to restrict*>s:<*alias of restricted-entity-aware table in 'from' clause*>]
For example, the following directive is present in the example SQL statement above:
#[organisations:p]
where p is the alias for the organisation-aware product table.
As well as for organisations, directives should be declared where required for channels and sites. The syntax for these expressions follows that used for organisations:
#[channels:channelAwareEntityAlias]
#[sites:siteAwareEntityAlias]
These directives should be placed in the WHERE clause of a query.
Note that if a channel_id, organisation_id or site_id parameter is present in the report configuration,
the relevant value supplied by the user will automatically be applied
when the hardening expression is expanded during report execution.
On creation and update, if a report is active then its SQL data source is checked against its 'Hardening Requirement' value, to ensure that it contains the necessary directives.
Design
Regarding the design element of report generation, the simplest format is XLS (the Microsoft Excel spreadsheet format). OrderFlow supports the creation of Excel reports simply by listing the column headers. For the SQL above, the corresponding design for an Excel format report would be:
site,adjustment_type,location,product,change_quantity,previous_quantity,new_quantity,user,timestamp,comment
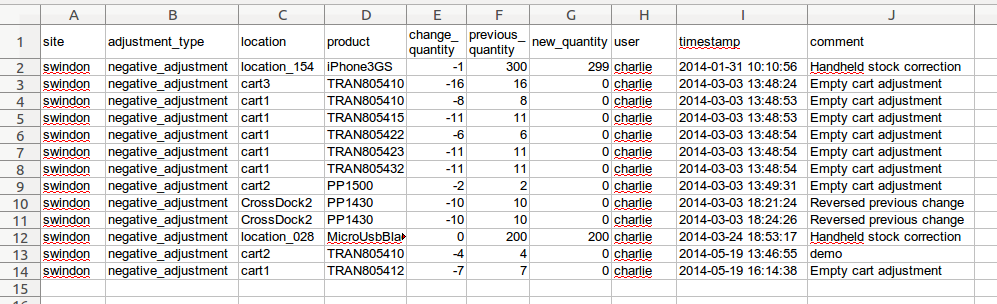
Example output:
The other principal format for data-centric reports is CSV. For these, the tool of choice is the open source FreeMarker templating engine. The equivalent CSV-based design for the Excel formatted report above is shown below:
site,adjustment_type,location,product,change_quantity,previous_quantity,new_quantity,user,timestamp,comment
<#list results as result>
${result.site},${result.adjustment_type},${result.location},${result.product},${result.change_quantity},${result.previous_quantity},
${result.new_quantity},${result.user},${result.timestamp?string('yyyy-MM-dd HH:mm:ss')},${result.comment}
</#list>
Example output in CSV:
site,adjustment_type,location,product,change_quantity,previous_quantity,new_quantity,user,timestamp,comment
swindon,negative_adjustment,location_154,iPhone3GS,-1,300,299,charlie,2014-01-31 10:10:56,Handheld stock correction
swindon,negative_adjustment,cart3,TRAN805410,-16,16,0,charlie,2014-03-03 13:48:24,Empty cart adjustment
swindon,negative_adjustment,cart1,TRAN805410,-8,8,0,charlie,2014-03-03 13:48:53,Empty cart adjustment
swindon,negative_adjustment,cart1,TRAN805415,-11,11,0,charlie,2014-03-03 13:48:53,Empty cart adjustment
swindon,negative_adjustment,cart1,TRAN805422,-6,6,0,charlie,2014-03-03 13:48:54,Empty cart adjustment
swindon,negative_adjustment,cart1,TRAN805423,-11,11,0,charlie,2014-03-03 13:48:54,Empty cart adjustment
swindon,negative_adjustment,cart1,TRAN805432,-11,11,0,charlie,2014-03-03 13:48:54,Empty cart adjustment
swindon,negative_adjustment,cart2,PP1500,-2,2,0,charlie,2014-03-03 13:49:31,Empty cart adjustment
swindon,negative_adjustment,CrossDock2,PP1430,-10,10,0,charlie,2014-03-03 18:21:24,Reversed previous change
swindon,negative_adjustment,CrossDock2,PP1430,-10,10,0,charlie,2014-03-03 18:24:26,Reversed previous change
swindon,negative_adjustment,location_028,MicroUsbBlackberry,0,200,200,charlie,2014-03-24 18:53:17,Handheld stock correction
swindon,negative_adjustment,cart2,TRAN805410,-4,4,0,charlie,2014-05-19 13:46:55,demo
swindon,negative_adjustment,cart1,TRAN805412,-7,7,0,charlie,2014-05-19 16:14:38,Empty cart adjustment
As the examples above show, CSV reports require slightly more effort to set up than spreadsheet-based reports. However, they do allow for fine-grained control of the formatting of certain data (such as dates) in a way that is not supported with Excel-based reports. The output data can also be previewed on screen prior to download, a capability that is not supported with Excel-based reports.
OrderFlow Report Administration
In this section we describe how the report administration functionality can be used in OrderFlow.
When creating a new custom report, four options are available:
-
create a new custom report from scratch. This involves the most effort.
-
clone an existing report. The report that you clone can be either a built-in report or a custom report. When cloning an existing report, a new report is created with a name and identifier that is different from the old one, but with other properties (e.g. the data source) that are the same as the old one. Cloning a report provides a convenient starting point for creating the new custom report, as it is usually possible to find an existing report on the system which has similar characteristics to the one you are attempting to create.
-
override an existing built-in report. Note that when overriding a built-in report, you are not actually creating a new one. Instead, you are making a change to the way the existing report appears or behaves. Essentially, you are creating a custom report from an existing built-in report, making it not automatically supported by the system.
-
import an existing report. When copying a report from another environment (e.g. from test to live), the most convenient way to do so is to import the report. This process allows you to import all of the configuration associated with a report, in a single operation, rather than having to copy individual fields manually. This makes the process of migrating a report much quicker and less error-prone.
Report Configuration GUI
The report configuration GUI supports the creation and modification of custom and overridden reports on OrderFlow. This section describes the purpose and usage of the main editable fields.
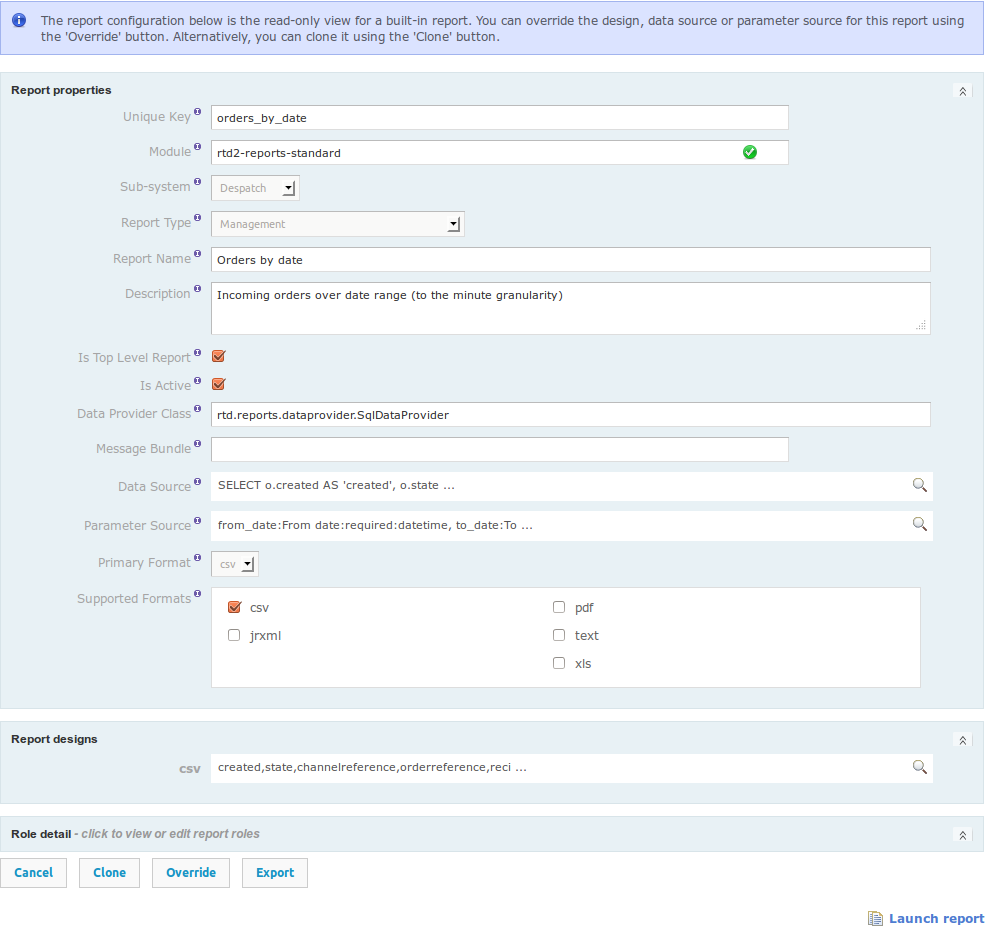
An example of the report configuration screen for an existing report is shown below.
Unique Key
The reference that is used in other parts of the application to identify the report. As the name suggests, this field must contain a unique value.
Module
Defines a Java module to look up for a report. This module must have visibility to the Data Provider Class. By default the rtd2-reports-standard module is used.
Sub-system
A drop-down menu that, along with individual user configuration, defines the visibility of the report, i.e. which sub-system (Despatch, Warehouse, Import, etc.) has access to it.
Report Type
As the name suggests, defines the type of the report - Despatch note, Admin, Barcode, Periodic, etc.
Report Name
The name the user sets to easily identify the report. This differs from Unique Key such that the unique key is used by the application, whereas the report name helps the user to distinguish between different reports.
Description
A description of what the report does and/or how it is used or any notes regarding it.
Is Top Level Report
A check box, which determines whether the current report is a main report or a sub-report. If it is a sub-report (i.e. the check box is not ticked), then it will not appear in the main list of reports, but it can be used by top level reports.
Is Active
Self-explanatory: determines whether the report is active, i.e. if it can be used or not.
Data Provider Class
The Java class, used to provide data for the report. The most commonly used data provider is rtd.reports.dataprovider.SqlDataProvider, which is used to return a list of rows using a single SQL query.
Message Bundle
A more advanced field - it is useful when producing multi-language reports (e.g. despatch notes). After uploading a message file resource, it can be used as a base key for looking up message resources.
Data Source
Used to query data from the OrderFlow database by using SQL statements. See Data Sources above for more detail on SQL queries in reports. Parameters can also be defined in this field, which are basically user inputs that help when querying the database.
Parameter Source
Used to define the source of any parameters that the query uses. These parameters are entered once a report is launched. The format, used to determine parameters is as follows:
name:title:optional/required:type:default-value
Each element is divided by a colon and the type is a string by default. The default-value can be omitted. The name element is a reference to the name, used in the SQL query in the Data Source field. An example parameter source value is:
from_date:From date:required:date, to_date:To date:required:date, channel_id:Channel, site_id:Site
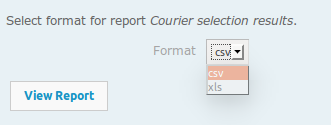
Primary Format
The default format, in which the report is executed. If multiple formats are supported by the same report, you can define which is the default format by using this field. Once the report is launched, this can be changed, so a different format is used. In the example below csv is the default format, but just before executing the report, the format can be changed to xls if desired.
Supported Formats
Determines the formats in which a report can be produced.
Report Designs
These specify the design(s) of the report, depending on the format that is used. See design above for more detail on formatting XLS and CVS reports and report design below for JRXML.
Role Detail
These properties are used to restrict access to the report to different user groups - e.g. Packer, Stock handler, Import operator.
Importing and Exporting Reports
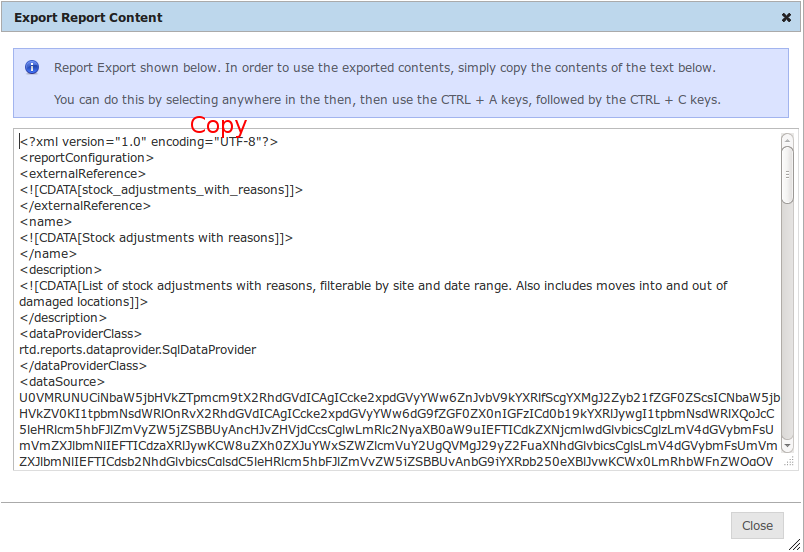
In order to export a report, simply click on the Export button at the bottom of the report configuration screen of the report to be exported:

A pop-up dialog then opens with all the configurations of the report, encoded in an xml format. Select and copy all the contents of the text in the text box.
Once this is done you need to make sure that the target report is in place. If necessary, you may need to create a new report, either by creating a new report from scratch or by the easier method of cloning an existing report. Make sure that the Unique Key of the two reports match, or the attempt to import will be rejected.
Once the target report is ready, you can import the contents of the source report from the browser's clipboard in the following way. First, click on the Import button at the bottom of the screen. This opens a dialog, similar to the export one, but with a warning message and an empty text box. To import the report, simply paste the contents from the export pop-up into the text box and click Import Config, as shown below.
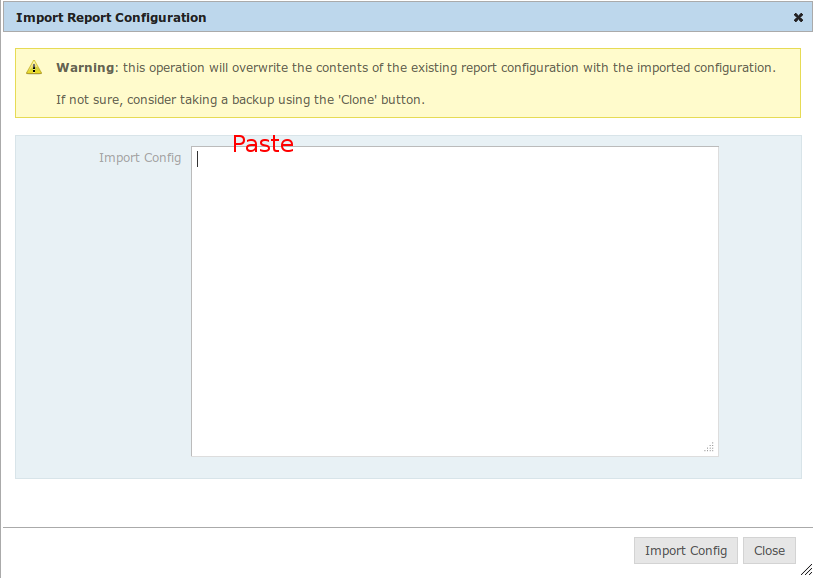
If successful, a small information window will pop at the top right corner of the screen, indicating that the import has been successful.
Custom Report Development Phases
A typical custom report will be developed in the phases described below.
-
Use a database query editor to experiment with and subsequently refine the query being used to generate the report data.
-
Clone or override an existing report to create the configuration entry which the report is to use. (Save the cloned report before proceeding.)
-
Create the report design.
-
Insert the report data source (query), adding any additional parameters necessary.
-
Create the parameter source to capture input parameters for the report.
-
Activate the report. Once activated, the report can be run using the Launch report link on the report configuration screen.
The screenshot below illustrates where steps 3-6 can be configured from.

Once the report has been created, it can be iteratively refined by editing, then saving the report configuration, then rerunning the report. It is quite convenient to have two browser tabs open simultaneously to serve this purpose.
Formatted Printable Reports
The custom reports we have described in the previous section are data reports, typically in an CSV or XLS format.
OrderFlow also supports a mechanism to publish and run printable reports, such as barcode labels, picking reports and despatch notes, These reports can be produced to pixel-perfect accuracy for Jasper Reports, the world's most popular open source reporting framework.
The design for the report can be produced using the iReport tool, provided for free by JasperSoft Corporation, the company behind Jasper Reports. In addition, JasperSoft now provide an alternative design tool, called Jasper Studio. Both tools provide a 'what you see is what you get' (WYSIWYG) editor which allows you to position report elements exactly as they need to appear on the output document.
This document does not cover in any detail the mechanics of JasperReports, a powerful, feature-rich piece of software but also one with quite a steep learning curve for the uninitiated. However, we will make comments on particular aspects of JasperReports, relevant to the way it has been used in OrderFlow, for example, in areas such as subreports, handling of fonts and handling of images.
For serious usage, we recommend purchasing a book on JasperReports. We also recommend that before attempting to produce printable paperwork using JasperReport, you familiarise yourself with the custom reports framework, ideally through creation of a few custom reports.
Despatch notes and other printable reports use the same reporting framework as the OrderFlow custom reports. However, they differ in two key respects:
- custom reports typically use some form of the SQL data provider, which supports the extraction of data for the report using SQL. For despatch note reports, the data is provided as part of a more wide-ranging business process that involves other changes to the shipment (such as the creation of print item and shipment document entries).
- the majority of the custom reports output data rather than a printable document. For JasperReports-based paperwork, the design of the report is the JRXML document, which is an XML file that can be most easily edited using a design tool such as iReport.