Despatch Notes
Despatch Notes
As part of the pack and despatch process, customer paperwork invariably needs to be generated to be included with the outgoing shipment. This paperwork is typically referred to as the 'despatch note', and sometimes as the 'customer invoice'. The despatch note will typically include:
- the name and address of the recipient.
- details on the merchant, including site and return addresses, telephone numbers, etc.
- details on the lines despatched for the order, including product name, quantity, and often pricing information.
- details on the total price of the order, including shipping costs.
- instructions, plus terms and conditions, on returns.
Despatch notes and other paperwork can be produced to pixel-perfect accuracy in OrderFlow. OrderFlow achieves this by building on the capabilities of Jasper Reports, the world's most popular open source reporting framework.
Despatch notes and other printable reports use the same reporting framework as the OrderFlow custom reports. However, they differ in two key respects:
- custom reports typically use some form of the SQL data provider, which supports the extraction of data for the report using SQL. For despatch note reports, the data is provided as part of a more wide-ranging business process that involves other changes to the shipment (such as the creation of print item and shipment document entries).
- the majority of the custom reports output data rather than printable documents. For JasperReports-based paperwork, the design of the report is the a JRXML document, which is an XML file that can be most easily edited using a design tool such as iReport.
Report Design
The report design document for an OrderFlow despatch note is a JRXML file, the standard design file format for JasperReports. An example is shown below:
<?xml version="1.0" encoding="UTF-8"?>
<jasperReport xmlns="http://jasperreports.sourceforge.net/jasperreports"
xmlns:xsi="http://www.w3.org/2001/XMLSchema-instance"
xsi:schemaLocation="http://jasperreports.sourceforge.net/jasperreports
      http://jasperreports.sourceforge.net/xsd/jasperreport.xsd"
name="Sample Despatch Note" language="groovy"
pageWidth="595" pageHeight="842" columnWidth="567"
leftMargin="14" rightMargin="14" topMargin="14" bottomMargin="14"
isFloatColumnFooter="true" uuid="cccea0e2-75fa-4d3e-a0f0-91c946de3713">

 <style name="default" isDefault="true" fill="Solid"
        hAlign="Left" vAlign="Top" fontName="Verdana" fontSize="9"
      isBold="false" isItalic="false" isUnderline="false"
      isStrikeThrough="false"/>

<parameter name="logo" class="java.lang.String"/>
<parameter name="shipmentReference" class="java.lang.String"/>
<parameter name="totalNetPrice" class="java.lang.String"/>
...
<field name="sku" class="java.lang.String"/>
<field name="description" class="java.lang.String"/>
    ...
<pageHeader>
  <band height="265">
    <image isLazy="true" onErrorType="Blank">
      <reportElement uuid="ea357aa3-012a-494c-b13b-6ebca85b87ae"
          x="0" y="28" width="215" height="25"/>
      <imageExpression><![CDATA[$P{logo}]]></imageExpression>
    </image>
    <staticText>
      <reportElement uuid="a0472efb-bc4e-4b88-9ac8-2046407d9738"
          style="default" x="306" y="45" width="96" height="12"/>
      <textElement textAlignment="Right" markup="none">
        <font size="8"/>
      </textElement>
      <text><![CDATA[Shipment Reference:]]></text>
    </staticText>
    <textField isBlankWhenNull="true">
      <reportElement uuid="7d8c0c59-0c87-40a8-b854-193cb2927209"
          style="default" mode="Transparent" x="410" y="45"
          width="157" height="12" forecolor="#000000"/>
      <textElement verticalAlignment="Middle">
        <font size="8"/>
      </textElement>
      <textFieldExpression><![CDATA[$P{shipmentReference}]]></textFieldExpression>
    </textField>
    ...
  </band>
</pageHeader>
<columnHeader>
  <band height="25">
    <staticText>
      <reportElement uuid="146763e7-e3be-44b9-9db4-62795c6a4ab3"
          style="default" positionType="FixRelativeToBottom"
          x="2" y="5" width="63" height="12"/>
      <textElement>
        <font isBold="true"/>
      </textElement>
      <text><![CDATA[SKU]]></text>
    </staticText>
    ...
    <line>
      <reportElement uuid="00c99d61-c45d-44c9-9f6c-05dede5c0027"
          style="default" positionType="FixRelativeToBottom"
          x="0" y="20" width="565" height="1"/>
    </line>
  </band>
</columnHeader>
<detail>
  <band height="15">
    <textField isStretchWithOverflow="true">
      <reportElement uuid="a100709f-94d1-420a-b8fc-d53015ab675f"
          style="default" x="0" y="2" width="60" height="11"/>
      <textElement>
        <font size="8"/>
      </textElement>
      <textFieldExpression><![CDATA[$F{sku}]]></textFieldExpression>
    </textField>
    ...
  </band>
</detail>
<columnFooter>
  <band height="103">
    <staticText>
      <reportElement uuid="c53ae53b-0090-467a-b686-b1537bee6245"
          style="default" x="348" y="37" width="111" height="13"/>
      <textElement textAlignment="Right">
        <font isBold="true"/>
      </textElement>
      <text><![CDATA[Total Net Price:]]></text>
    </staticText>
    <textField isBlankWhenNull="true">
      <reportElement uuid="7d8c0c59-0c87-40a8-b854-193cb2927209"
          style="default" mode="Transparent"
          x="464" y="37" width="103" height="14" forecolor="#000000"/>
      <textElement verticalAlignment="Middle"/>
      <textFieldExpression><![CDATA[$P{totalNetPrice}]]></textFieldExpression>
    </textField>
    ...
  </band>
</columnFooter>
</jasperReport>
The JRXML document contains both precise positioning information, and declarations of parameters and fields, for which information is extracted with the help of various expressions (explained in detail further in this chapter).
Editing this document directly by hand is generally not necessary. As with any formatted printable report on OrderFlow, the design be edited via a drag-and-drop interface using the freely available iReport or Jasper Studio tools.
Styles
Jasper Reports has the option to create styles, which help with the design of the report. Instead of entering the same property values for different elements throughout the report, you can simply create a single style and apply it to all required elements. In the example above, the style, called default, is defined at the top of the JRXML file and is used for all text fields and labels. Then only the properties, which differ from that style, are added in (e.g. the company name font size being bigger, some labels being right-aligned, elements being bold, etc.)
This is useful when making sure that the formatting throughout the report is identical, also saves time when adding in new fields or editing existing ones and automatically ensures that the code in the JRXML is as clean as possible.
Parameters and Fields
The despatch note generation environment will prepare the data, required to render the report. Typically, a despatch note is generated for each shipment.
Data is provided to the report in the form of parameters (for non-repeating data, such as the order header and shipment details) and fields (for repeating data, such as order lines).
Data can be extracted from any of these parameters or fields (a number of which are declared in the despatch note design example) using Java or Groovy expressions. While it is possible to access the OrderFlow data model directly from within the despatch note JRXML file, this is not desirable, as it means that the JRXML designer also needs to have a knowledge of scripting, a wider and technically more demanding skill set.
Instead, the recommended approach is to explicitly declare in the JRXML all of the parameters and fields individually as simple values, preferably just as strings. The JRXML file can in this way be limited purely to design.
This allows the report design to be easily edited by anyone with little or no programming knowledge, with data extraction left to programmers or the OrderFlow Technical Support team.
To facilitate this, OrderFlow provides a mechanism for populating the parameters and fields through a separate script outside of the JRXML.
By convention, this is done in two mapping files, for parameters and fields respectively, which by convention are named using based on name of the report (the JRXML file), followed respectively by _parameters.xml or _fields.xml.
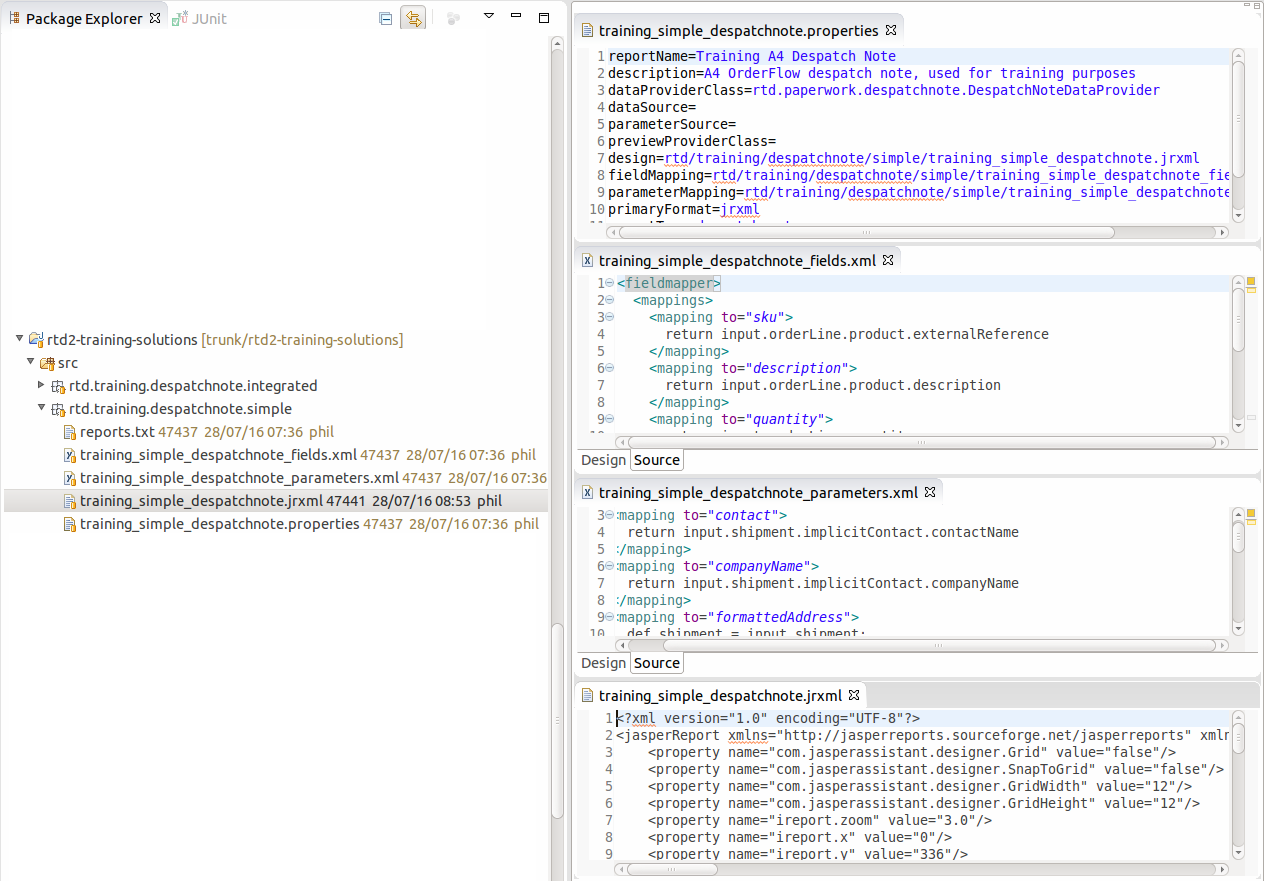
The organisation of these files in a built-in despatch note report in the Eclipse IDE is shown below.
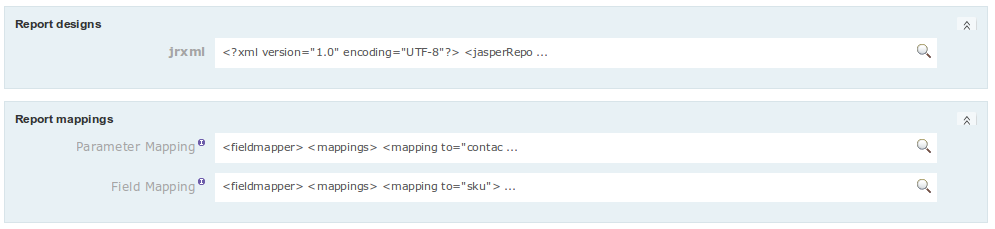
The same entries are visible on the OrderFlow GUI as shown below:
Note that the JRXML fields and parameters are declared individually in the JRXML, as in the example below:
<parameter name="formattedAddress" class="java.lang.String"/>
<parameter name="returnsAddress" class="java.lang.String"/>
<parameter name="returnsURL" class="java.lang.String"/>
<parameter name="returnsInformation" class="java.lang.String"/>
<parameter name="vatNumber" class="java.lang.String"/>
<parameter name="telephone" class="java.lang.String"/>
<parameter name="email" class="java.lang.String"/>
<parameter name="orderDate" class="java.util.Date"/>
<parameter name="shipmentReference" class="java.lang.String"/>
<parameter name="contact" class="java.lang.String"/>
<parameter name="logo" class="java.lang.String"/>
<parameter name="totalNetPrice" class="java.lang.String"/>
<parameter name="tax" class="java.lang.String"/>
<parameter name="totalShippingPrice" class="java.lang.String"/>
<parameter name="totalPrice" class="java.lang.String"/>
<parameter name="companyName" class="java.lang.String"/>
<parameter name="organisationName" class="java.lang.String"/>
<field name="quantity" class="java.lang.Integer"/>
<field name="sku" class="java.lang.String"/>
<field name="description" class="java.lang.String"/>
<field name="unitLinePrice" class="java.lang.String"/>
<field name="totalLinePrice" class="java.lang.String"/>
The parameters are declared in the JRXML file and used in the design document itself.
For example, the shipmentReference parameter value will be accessible in the document using a declaration
such as:
<textFieldExpression><![CDATA[$P{shipmentReference}]]></textFieldExpression>
In the next sections, we describe how these field and parameter values are populated through scripts.
Parameters
The parameter values for a despatch note report are extracted using scripts defined in the parameters mapping file, already introduced earlier. An example is shown below.
<fieldmapper>
 <mappings>
  <mapping to="formattedAddress">
    def shipment = input.shipment;
    return rtd.domain.Address.formattedAddress(shipment.implicitAddress, '\n');
  </mapping>
  <mapping to="shipmentReference">
    return input.shipment.externalReference
  </mapping>
  <mapping to="orderDate">
    def date = input.shipment.orderItem.placed;
    if (date != null) {
       return date;
    }
    return input.shipment.orderItem.created;
  </mapping>
  <mapping to="logo">
    def channel = input.shipment.orderItem.channel.externalReference;
    return 'logos/' + channel + '.png';
  </mapping>
  <mapping to="returnsAddress">
    def sharedProperties = input.sharedProperties;

    rtd.reports.util.ReportUtils.concatenate('\n', sharedProperties,
   'returns.business.name',
   'returns.site.address.line1',
   'returns.site.address.line2',
   'returns.site.address.line3',
   'returns.site.address.line4',
   'returns.site.address.posttown',
   'returns.site.address.postcode'
   ).toUpperCase();
  </mapping>
  <mapping to="returnsURL">
    return input.sharedProperties.get('returns.info.url')
  </mapping>
  ...
  <mapping to="totalNetPrice">
    return String.format('%.2f', input.shipment.orderItem.implicitGoodsPrice.net) + ' ' + input.shipment.orderItem.currency;
  </mapping>
  ...
 </mappings>
</fieldmapper>
Scripting Context
Note that in each case, the input variable is used to reference the contextual data available to the script.
The following parameters are available for use in the parameters mapping script include the list below. Note that it is possible, but not best practice, to access these values directly in the JRXML template.
| Expression | Type | Description |
|---|---|---|
| input.order | rtd.domain.OrderItem |
Holds a reference to the order, containing the shipment, for which the despatch note is generated. Java object, so OrderItem domain model can be navigated to extract values. |
| input.shipment | rtd.domain.Shipment |
Holds a reference to the shipment, for which the despatch note is generated. Java object, so Shipment domain model can be navigated to extract values. |
| input.sharedProperties | java.util.Map |
Holds reference to property values for properties in the group 'courier_shared'. |
| input.addressProperties | java.util.Map |
Holds reference to property values for properties in the group 'address'. |
| input. |
java.util.Map |
Holds reference to property values for properties in the property group associated with the shipments currently selected courier. Use the Setup -> Courier to determine the courier's current property group. |
For each of the property-related values, you can use the Setup -> Properties -> Search menu to determine the list of individual properties available and values set for your current channel, organisation and site context.
Examples
The code contains examples of different ways to extract data and format it.
The formattedAddress, as the name suggests, represents the shipping address, formatted correctly by using the method formattedAddress from the Address class and the data from input.shipment.implicitAddress from the RTD domain.
shipmentReference is the most straightforward example - it simply returns the output from input.shipment.externalReference.
orderDate contains a conditional statement - it checks whether the date of placing an order exists and if so, returns that data. Otherwise, it returns the date of creating the order.
logo actually contains a path to the image and the specifics around logos and images - themselves are described in more detail further in this document.
The returnsAddress uses the RTD concatenate method to create one text field that contains the returns business name and the whole address. If separate text fields were used instead, this would have created gaps (empty lines) where data was omitted, e.g. the address contains only 3 lines.
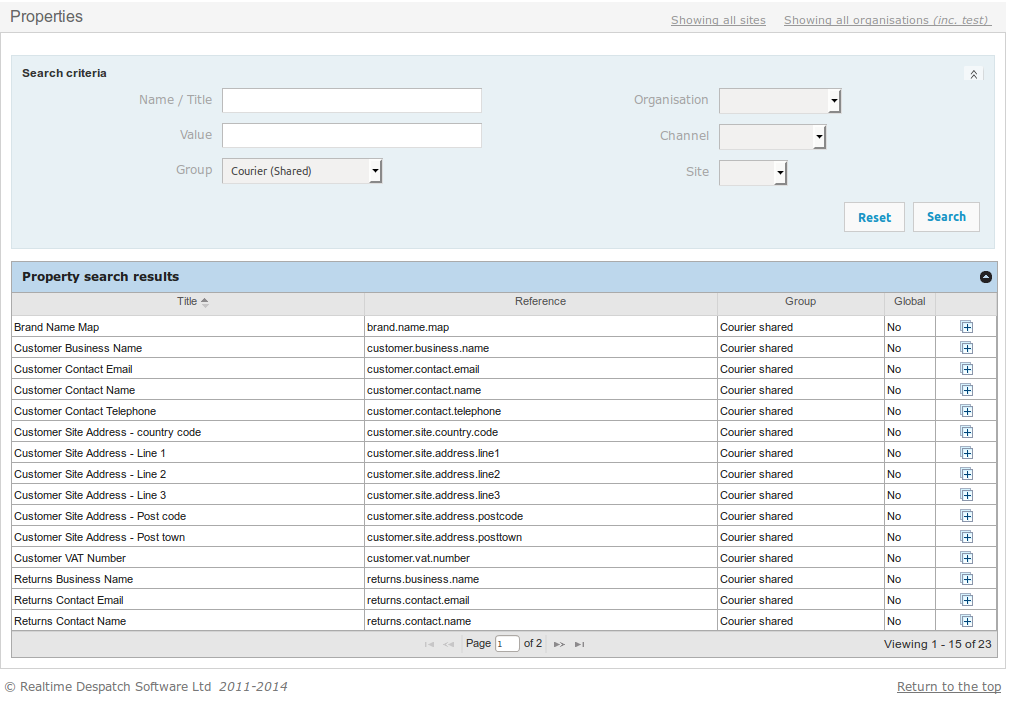
For the returnsURL, as well as all other information, related to returns, the Couriers (Shared) properties have to be accessed. In the example above, only the URL is depicted with the rest being omitted, but they can easily be accessed by using the sharedPropertes' get method. All fields can be viewed from the Setup tab - they are located at the bottom of that page. Below is a screenshot of some of the Courier (Shared) properties:
The last property in the example XML file is a total price, in particular - the totalNetPrice. This has been formatted by using the Java String.format method in order to display two digits after the decimal separator and also include the currency after the price.
Fields
The field mappings allow you to access values for repeated data within the report, which in the case of despatch notes will normally be in the form of order lines. One common exception is for despatch notes that are also used as picking notes, the field values access the order line location entries.
In the example field mapping file below, only five field values are populated by navigating data in the order line.
Populating these fields is relatively straightforward, and typically more easily done than for parameters. For the JRXML above, data for the fields is extracted as follows:
<fieldmapper>
 <mappings>
   <mapping to="sku">
     return input.orderLine.product.externalReference
   </mapping>
   <mapping to="description">
     return input.orderLine.product.description
   </mapping>
   <mapping to="quantity">
     return input.orderLine.quantity
   </mapping>
   <mapping to="unitLinePrice">
     return input.orderLine.implicitUnitPrice.gross
   </mapping>
   <mapping to="totalLinePrice">
     return input.orderLine.implicitTotalPrice.gross
   </mapping>
 </mappings>
</fieldmapper>
All data is extracted from the orderLine field, since items from the shipment are contained within it.
Scripting Context
The values available to the fields mapping script will include either of the following in the table below.
As with the parameters, the field mapping file is aimed at users familiar with the structure of the OrderFlow domain model.
| Expression | Type | Description |
|---|---|---|
| input.orderLine | rtd.domain.OrderLine |
Holds a reference to the current order line. Java object, so OrderLine domain model can be navigated to extract values. |
| input.orderLineLocation | rtd.domain.OrderLineLocation |
Similar to the orderLine field. The main difference is that it holds a separate value for each order line and location combination. For order lines picked from multiple locations, multiple entries will appear. Suitable for cases where the despatch note is also used as a picking note. |
The question on whether to access data via the OrderLine or the OrderLineLocation depends on which data provider is used.
Data Providers
Data providers were previously introduced in Custom Reports chapter. For despatch note generation, a number of specialist data providers have been created.
The most commonly used ones are listed with a description below:
| Class | Field Type | Description |
|---|---|---|
| DespatchNoteDataProvider | OrderLine |
Most commonly used data provider which simply provides a list of order lines in the current shipment. |
| LocationDespatchNoteDataProvider | OrderLineLocation |
Data provider which provides a list of order line locations. Used for despatch notes which are also used as picking reports. |
| OrderItemDespatchNoteDataProvider | OrderLine |
Data provider which for multi shipment reports, will make available to the despatch note all order lines, for the order, including ones in other shipments in the same order. Useful for despatch notes where lines in 'shipments despatched' separately need to be listed. |
| PartShippedDespatchNoteDataProvider | OrderLine |
Variation on DespatchNoteDataProvider, with mechanism to set the isLastShipment parameter if there are no more shipments to be sent out for the curernt order. |
| PackageAwareDespatchNoteDataProvider | OrderLine with embellishments |
Extension of DespatchNoteDataProvider, which allows for a separate despatch note document to be created for each package in a shipment, with package specific despatch notes detailing the contents of the specific package. |
There are other built-in despatch note data providers available, but the use of these is more esoteric.
Logos and Images
OrderFlow despatch notes and other printed document can contain images, particularly useful for displaying company logos.
There are a number of elements to be understood in the way that images should be used on OrderFlow.
- the image element in the design (using an image element in the JRXML file).
- the mechanism for identifying the image (using an image expression within the image element)
- the mechanism for provisioning images (using a File Resource entry).
Declaring Images
Images are declared using an imageExpression element in the JRXML design document.
<image isLazy="true" onErrorType="Blank">
 <reportElement uuid="ea357aa3-012a-494c-b13b-6ebca85b87ae"
         x="0" y="28" width="215" height="25"/>
<imageExpression><![CDATA[$P{logo}]]></imageExpression>
</image>
Two of the element properties are worth considering in more detail: isLazy and onErrorType.
isLazy
A flag that specifies whether the image should be loaded and processed when filling the
report or when exporting it - in case the image is not available at fill time.
For logos and other images, the value of true should be used. This allows the image
to be cached more effectively, removing the need for the same
image data to be embedded each despatch note generated. This improves performance
and reduces bandwidth, used in producing despatch notes.
onErrorType
Specifies the output if the image is unavailable when the system tries to load it. There are three possible options for this property - Error, Blank and Icon. For despatch note generation, the second option, Blank, is best. If an image is not present at the point where it is viewed or printed, a blank space will be outputted, rather than having an exception thrown or an icon appear in the image's place.
Uploading Images
To add a new logo to the file resources from OrderFlow, click on the Setup tab and from the left-hand side menu select File Resources. Then either select the submenu New, or click Add new file resource from the page on the right. Both of these actions lead to the New File Resource page.
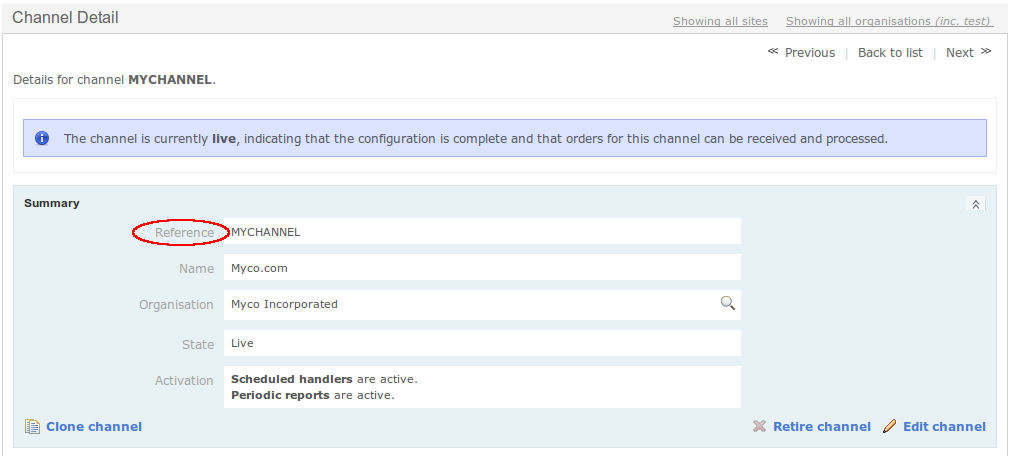
Any image detail can be set from this page. In this case, we want the Reference to be something like logos/mychannel.png. To find the exact reference of the channel, from OrderFlow, go to Setup, then Channels and find the channel you need. The name that is required is the channel reference - in the example below it is MYCHANNEL.
The Title can be the name of the channel, followed by "Logo" (e.g. MyChannel Logo) to make it easier to distinguish amongst the file resources. Once the Reference and Title have been set, click Create at the bottom of the page. This will create a new file resource with the data that you have set up for it.
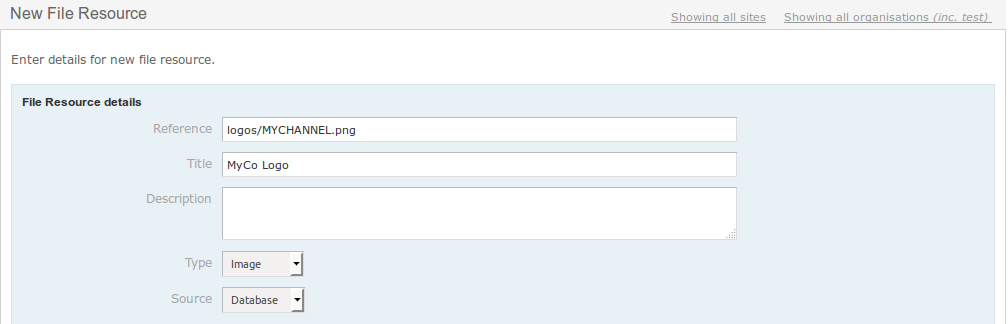
Before uploading the image, make sure that the Type of the file resource is set to Image. Then click on Upload image at the bottom of the screen, browse for and select the image you want to appear as your logo and click Update. Your logo should now be displayed at the bottom of the page.
Image Dimensions
An understanding of how image dimension are calculated is important in ensuring high quality image printouts.
JasperReports works on the basis of 72 DPI (Dots per Inch). However, images typically require a 300 DPI resolution for good quality printing.
The example despatch note contains a logo with a size of 215 by 25 pixels in iReport (with a 72 DPI resolution). This converts to approximately a 76x9mm image when printed. For 203 DPI (some Citizen and Zebra printers) a 606 by 70 pixels image is required. For printers operating at 300 DPI, best results are achived if the image is of size 896 by 104 pixels.
The conversions above are illustrated in the table below:
| Millimetres (mm) | Pixels - 72 DPI (JRXML) | Pixels - 203 DPI | Pixels - 300 DPI |
|---|---|---|---|
| 75.85 | 215.01 | 606.2 | 895.87 |
| 8.82 | 25 | 70.49 | 104.17 |
A note on some specific examples follows:
JasperReport Pixels to Millimetres
Divide the pixels by 72 (to get the number of inches), then multiply the value by 25.4, i.e. (pixels/72)*25.4.
Image in Millimetres to Pixels
You will need to do this conversion when working out the required dimensions of an image in pixels, for a given space in millimetres.
First convert the millimetres in inches and work from there, by dividing the size in millimetres by 25.4, i.e. millimetres/25.4. From there, converting to the respective size in pixels is straightforward - the image size in inches is simply multiplied by the DPI:
| Millimetres(mm) | Inches | Pixels - 72 DPI (JRXML) | Pixels - 203 DPI | Pixels - 300 DPI |
|---|---|---|---|---|
| x | y = x/25.4 | y*72 | y*203 | y*300 |
Using the above calculations will be helpful in ensuring that logos (and other image) in the report is printed out with the best possible quality. For labels with embedded barcodes, this is particularly important in ensuring that that the barcodes can be scanned off the printed label stock.
Subreports and Concatenated Reports
When preparing despatch notes, advanced techniques such as the use of subreports and concatenated reports are often required.
Subreports
Subreports allow for a primary or master report to embed a secondary or subreport. This feature is particularly useful for cases where a part of a report needs to be reused.
A good example is when the despatch note embeds a courier label, with the latter being detatchable from the main document via a peel-off section of integrated stationery. The courier label has a design which is specific to the courier being used, while the rest of the despatch note has a bespoke design for the customer, with a custom layout, use of customer logos, etc.
In order to make it easier for different sized courier labels to be embedded, the despatch note by itself is also embedded as a subreport, therefore the master report only contains the code for integrating those two.
Subreports, as the name suggests, are reports, which are embedded in other reports. In the aforementioned example, the main despatch note and the courier label are the embedded reports, whereas the master reports simply contains placeholders for these.
Below is an example (the JRXML file) of such a master report with an embedded 190x90 courier label at the bottom of the page and the embedded header of the despatch note at the top of the page:
<?xml version="1.0" encoding="UTF-8"?>
<jasperReport xmlns="http://jasperreports.sourceforge.net/jasperreports"
    xmlns:xsi="http://www.w3.org/2001/XMLSchema-instance"
    xsi:schemaLocation="http://jasperreports.sourceforge.net/jasperreports
    http://jasperreports.sourceforge.net/xsd/jasperreport.xsd"
    name="integrated_a4_190x90_bottom" language="groovy"
    pageWidth="595" pageHeight="842" columnWidth="595"
    leftMargin="0" rightMargin="0" topMargin="0"
    bottomMargin="0" uuid="1906a486-9497-44aa-a9f3-aa644caf2260">
<background>
<band splitType="Stretch"/>
</background>
<detail>
<band height="559" splitType="Stretch">
  <subreport isUsingCache="true" runToBottom="false">
    <reportElement uuid="c06fbe33-f558-4564-bca8-58dd91c5ecc1"
             x="0" y="0" width="595" height="537"/>
    <parametersMapExpression>
        <![CDATA[$P{REPORT_PARAMETERS_MAP}.courier_label_parameters]]>
    </parametersMapExpression>
    <dataSourceExpression>
        <![CDATA[$P{REPORT_PARAMETERS_MAP}.despatch_note_datasource]]>
    </dataSourceExpression>
    <subreportExpression>
        <![CDATA[$P{REPORT_PARAMETERS_MAP}.despatch_note]]>
    </subreportExpression>
  </subreport>
</band>
</detail>
<lastPageFooter>
<band height="283">
  <subreport runToBottom="false">
    <reportElement uuid="aedb7a2a-8fd2-4393-9be2-f1e04776a5d0"
            x="28" y="0" width="538" height="255"/>
    <parametersMapExpression>
        <![CDATA[$P{REPORT_PARAMETERS_MAP}.courier_label_parameters]]>
    </parametersMapExpression>
    <dataSourceExpression>
        <![CDATA[$P{REPORT_PARAMETERS_MAP}.courier_label_datasource]]>
    </dataSourceExpression>
    <subreportExpression>
        <![CDATA[$P{REPORT_PARAMETERS_MAP}.courier_label]]>
    </subreportExpression>
  </subreport>
</band>
</lastPageFooter>
</jasperReport>
Parameter Mappings in Subreports
Parameter mappings can be used in subreports.
Suppose for example we want to use a parameter mapping to output the return address using scoped properties. This can be done using the following parameter mapping entry.
<fieldmapper>
  <mappings>
    <mapping to="returnsAddress">
      def sharedProperties = input.sharedProperties;
      return rtd.reports.util.ReportUtils.concatenate('\n', sharedProperties,
                'returns.business.name',
                'returns.site.address.line1',
                'returns.site.address.line2',
                'returns.site.address.line3',
                'returns.site.address.line4',
                'returns.site.address.posttown',
                'returns.site.address.postcode'
                ).toUpperCase();
    </mapping>
   </mappings>
</fieldmapper>
When the subreport parameter mapping code is evaluated, the resulting value is stored against a parameter map that is visible only to the subreport.
This parameter map is stored using the the key %subreport%_parameters.
As a result, the parametersMapExpression in the previous section in the master report (which contains the reference to the subreport)
is required as shown below to allow the JRXML template to access the returnsAddress parameter described above.
<![CDATA[$P{REPORT_PARAMETERS_MAP}.courier_label_parameter)]]>
Concatenated Reports
Concatenated reports are a more advanced feature of Jasper Reports, primarily used with subreports and report groups. Generating a concatenated report is not covered in this document, but if required, OrderFlow can provide information on how to create them or can help by generating a custom concatenated report to cover your needs.
Package Aware Despatch Notes
As of OrderFlow 3.7.7, for multi-package shipments it is possible to use a specific data provider that allows for the creation of a separate document per package. An example is shown below:
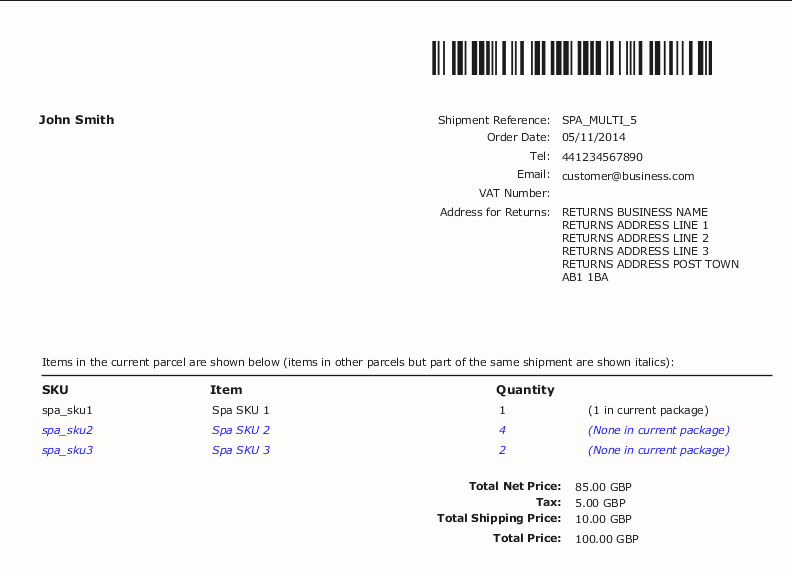
This feature is enabled through the use of the despatch note data provider rtd.paperwork.despatchnote.PackageAwareDespatchNoteDataProvider, plus changes to the JRXML document.
The JRXML is modified for a group to be declared per package, which refers to the groupKey field. This results in a new page started with each package.
<field name="groupKey" class="java.lang.String"/>
<group name="Package" isStartNewPage="true">
   <groupExpression><![CDATA[$F{groupKey}]]></groupExpression>
   <groupHeader>
      <band height="270">
         ... group header content
      </band>
   </groupHeader>
   <groupFooter>
      <band height="71">
         ... group footer content
      </band>
   </groupFooter>
</group>
<detail>
  <band height="15" splitType="Stretch">
  ... band content
  </band>
</detail>
The groupHeader and groupFooter elements are then used instead of the pageHeader and pageFooter bands for the delivery address and return addresses and other top level information
required in the despatch note.
Internationlised Despatch Notes
An internationalised despatch note is one that supports local language text through a single report. Without internationalisation, creating separate language version of despatch notes would require a separate despatch note report per language, resulting in a substantial amount of work in setting up and maintaining multi-language environments.
In the next section we describe how despatch notes are internationalised in OrderFlow, and follow this with a discussion on how different language versions are identified on the system.
Report Setup
The starting point for an internationalised despatch note is normally an existing working despatch note which contains text strings which are 'hard-coded' in the JRXML file in a single language. The idea is to replace these with resource references, where the actual text can be retrieved from a set of external files. This set of files is known as a message bundle.
If these message resources are not supplied as files built in to the application, they can be uploaded manually from the Setup -> File Resources menu. The example below shows a couple of built-in message resource files.

The message resources are properties files, with entries such as the following (for English).
page.header.help=Can we help?
page.footer.footer.text=Thank you for shopping with us. We hope you are happy with your order.
The equivalent entries in the German language message resource are shown below:
page.header.help=Wie können wir Ihnen behilflich sein?
page.footer.footer.text=Vielen Dank für Ihre Bestellung. Wir hoffen Ihre Bestellung war zufriedenstellend.
With the resource bundle in place and ready to be used, we need to update the despatch note to use internationalised text.
The first step here is to identify the message bundle to be used. This can be done using the Message Bundle field on the Report Configuration screen for the despatch note, shown below.
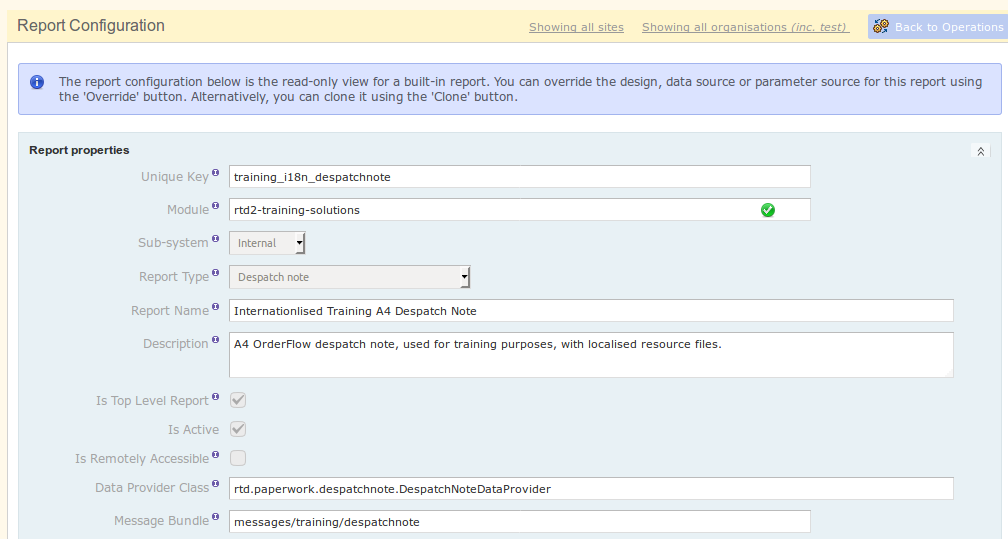
Note that the value here corresponds with the reference of the resource entry (excluding the '.properties' suffix). The exact mechanism for this is discussed in more detail in the Locale Identification section.
Next, the report design needs to be updated. The JRXML example shown below.
<textField>
   <reportElement uuid="85d01f90-e814-4aab-aa39-8e7590b4a84b" style="default" x="0" y="9" width="565" height="14">
   </reportElement>
   <textElement markup="none"/>
   <textFieldExpression><![CDATA[$R{page.footer.footer.text}]]></textFieldExpression>
</textField>
Note that the message reference 'page.footer.footer.text' corresponds with the key for one of the entries in the message property file.
In the example above, the localised German text may appear as in the below.

Locale Identification
The message files that are described in the previous section can vary according to language, country, and can also have a variant. This combination of information is known as a locale.
For example, it is possible to have separate resource files for Swiss and Austrian German, each with their own sets of text.
One question is how the Locale to be used can be identified in OrderFlow.
The language is determined from the languageCode field of the order.
The country code is mapped from the order or shipment's delivery country code field.
It is also possible to have further variations in the resource file used based on the order's source field. This for example,
would allow for different messages to be displayed for web site versus Amazon or eBay orders, even for the same country or language combination.
The message resource files are named used the following naming covention:
[message bundle reference]_[locale suffix].properties
The locale suffix has values such as those shown in the next table.
| Value | Description |
|---|---|
despatchnote.properties |
The default resource file, used if no locale information is specified. |
despatchnote_de.properties |
A resource file used for German orders. |
despatchnote_de_CH.properties |
A resource file used for Swiss German orders. Note the use of the CH country code to include Switzerland in the locale. |
despatchnote_de_CH_amazon.properties |
A resource file used for Swiss German orders that have originated from the Amazon channel. |
Parameter and Field Mappings with Localised Messages
The use of resource entries such as $R{page.footer.footer.text} support simple cases where one simply needs to replace some static text with a single language-specific value.
More complex cases may require some scripting. Suppose you wish to support output of the following text:
In English:

In German:

In the above case, we cannot simply use resource references in the JRXML, as there is additional dynamic information to be supplied in populating the text string.
In order to achieve the above, from Orderflow 3.8.0 we can use a Parameter Mapping, from which we can populate the message string appropriately. The mechanism for doing this is described next.
Firstly, the JRXML will contain an additional field declaration and design element, as shown below.
<parameter name="expectedArrivalText" class="java.lang.String"/>
...
<textField isBlankWhenNull="true">
   <reportElement uuid="7d8c0c59-0c87-40a8-b854-193cb2927209" style="default"
      mode="Transparent" x="2" y="208" width="563" height="14" forecolor="#000000">
   </reportElement>
   <textElement verticalAlignment="Middle" markup="styled"/>
   <textFieldExpression><![CDATA[$P{expectedArrivalText}]]></textFieldExpression>
</textField>
We then populate the parameter value using an entry such as the following:
<mapping to="expectedArrivalText">
  def dateText = new java.text.SimpleDateFormat('d MMMM').format(input.shipment.requestedDeliveryDate)
  return messages.message('shipment.expected.arrive.text', dateText);
</mapping>
Note that the message resource entry can be obtained using the expression messages.message('shipment.expected.arrive.text'). However, we can additionally specify
multiple arguments for the dynamic values we want to supply.
The bundle resources themselves need the additional entries, which can be added as follows for English.
shipment.expected.arrive.text=Your order is expected to arrive on <b>{0}</b>.
The German equivalent entry is shown below.
shipment.expected.arrive.text=Ihre Bestellung wird voraussichtlich am <b>{0}</b> ankommen.
Note that the placeholders are defined using the convention {0}, {1}, etc, with the number corresponding to the argument index in the messages.message(...) expression.